The cardboard box hack for solo hardwood plank placement
I have spent twenty five years on my knees with a moisture meter and a level. I have seen the way hardwood floors fail when the subfloor is ignored or the installation is rushed. I once walked into a house where a $15,000 wide plank walnut floor was cupping so bad it looked like a potato chip because the installer did not check the crawlspace humidity. The homeowner was devastated. That installer thought he could skip the moisture barrier because the house was new. He was wrong. A floor is a performance surface. It is not a decoration. If you treat it like a rug, it will fail you. When you work alone, you face the physical reality of heavy wide planks that fight you every step of the way. You need a system. This system involves more than just a hammer and nails. It involves the physics of friction and the chemistry of the bond. I use cardboard boxes to manage the load and protect the finish. It sounds simple, but it is a professional secret that saves your back and the floor.
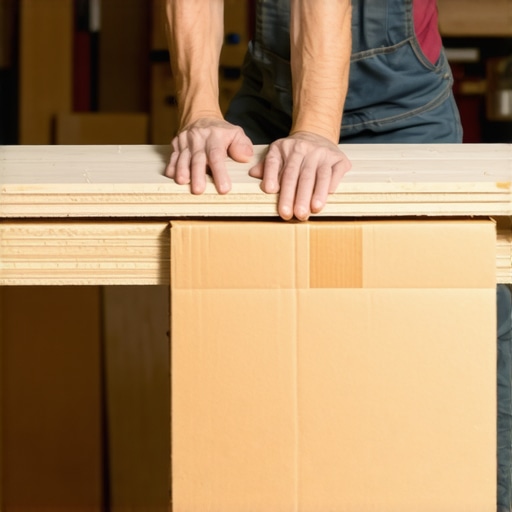
The physics of the cardboard slide
Cardboard boxes, friction reduction, wide plank hardwood, solo installation, and subfloor protection are the key elements of this method. By flattening heavy duty shipping boxes and placing them across the subfloor, you create a low friction staging ramp that allows a single installer to position long planks without damage. Most people try to carry every individual board to the installation point. This is a mistake. It leads to fatigue. It leads to dropped boards that dent the wood. I flatten double wall corrugated cardboard. I lay it out in a path from the staging area to the work zone. You can slide a hundred pounds of white oak across that cardboard with one hand. It protects the tongue of the board from hitting the subfloor and splintering. It also keeps your finished surface away from any grit or stray staples on the subfloor. You are not just moving wood. You are managing the integrity of the material. This is essential when you are working with seven foot long boards that weigh fifteen pounds each. You need your energy for the nailing, not the hauling. This is the difference between a floor that looks professional and one that looks like a struggle.
“A floor is only as good as the subfloor beneath it; deflection is the enemy of every joint.” – Master Flooring Axiom
Why your subfloor is lying to you
Subfloor deflection, joist spacing, plywood grade, oriented strand board, and self leveling compound determine the success of your hardwood floor. If your subfloor is not flat to 3/16 inch over a 10 foot radius, your hardwood planks will eventually squeak, pop, and fail. I have seen guys think that a thick underlayment will hide a dip in the concrete or the plywood. It will not. Underlayment is for sound and moisture. It is not a structural fix. If there is a hollow spot under that plank, the tongue and groove will rub together every time someone walks over it. That is where the noise comes from. You have to get out the grinder or the leveler. I spent three days grinding concrete on a job last month just so the floor would not click like a castanet. Most builders use the cheapest OSB they can find. It swells at the edges when it gets rained on during construction. If you do not sand those seams flat, your floor will look like a washboard. You need to check the joist spacing. If you have sixteen inch centers, 3/4 inch plywood is fine. If you have twenty four inch centers, you better have a thicker subfloor or you will feel the floor bounce. That bounce is what snaps the locking mechanisms on laminate and breaks the bond on glue down wood.
The 1/8 inch that ruins everything
Substrate flatness, 10 foot straightedge, laser level, floor grinding, and thinset mortar are the metrics of a perfect installation. A flatness deviation of more than 1/8 inch over a 6 foot span will cause grout cracking in showers and plank separation in laminate floors. Most guys skip the leveling compound. They think the underlayment will hide the dip. It won’t. I use a 10 foot straightedge on every job. I mark the high spots in red and the low spots in blue. If it is concrete, I grind the red. If it is wood, I sand the red. For the blue, I use a high quality self leveling underlayment. You cannot rush this. If you pour leveler and do not let it dry, you are just trapping moisture under your wood. That is a recipe for rot. People ask me why their laminate is buckling. I look at the floor and see a hump they didn’t fix. The floor is trying to climb over the hump. It has nowhere to go but up. Precision is the only way to avoid callbacks. I do not have time for callbacks. I want the floor to stay flat for fifty years. That means the work starts before the first plank is ever touched.
Adhesive chemistry and the molecular bond
Urethane adhesive, silane modified polymer, shear strength, VOC limits, and flash time are the chemical factors that ensure a permanent bond. Choosing the wrong glue for hardwood floors leads to delamination and hollow spots that ruin the acoustic profile of the room. I prefer a silane modified polymer. It stays flexible. Wood is a living thing. It moves. It breathes. It expands in the summer and shrinks in the winter. If you use a glue that dries hard like a rock, the wood will eventually break the bond. You need a glue that can stretch. You also need to pay attention to the trowel size. If you use a trowel with worn down teeth, you are not putting enough glue down. You will get hollow spots. I can hear a hollow spot from a mile away. It sounds cheap. I also see people ignore the flash time. If you lay the wood too soon, the glue has not off gassed. If you wait too long, it has skinned over. You have to hit that window perfectly. This is why I work in small sections. I do not spread more glue than I can cover in twenty minutes. It is a slow process. It is a calculated process. Chemistry does not care about your schedule. It only cares about the environment.
The moisture barrier mandate
Hydrostatic pressure, calcium chloride test, relative humidity, 6 mil poly, and vapor retarder are the essential defenses against moisture damage. You must use a moisture barrier over concrete slabs to prevent capillary action from warping hardwood floors or destroying laminate cores. I have seen moisture go through four inches of concrete like it was a sponge. If you do not have a barrier, that moisture will hit the bottom of your wood and stay there. The bottom of the board expands. The top stays the same. That is how you get cupping. I use a 6 mil poly film on every concrete job. I tape the seams with waterproof tape. I run it up the wall an inch. People think it is overkill. Those people are the ones calling me to fix their buckled floors two years later. You also have to check the crawlspace. If the crawlspace is damp, the subfloor is damp. You can put all the barriers you want on top, but the bottom of the subfloor is rotting. I tell clients to put a vapor barrier on the dirt in the crawlspace. It is the only way to protect the investment. Moisture is the enemy of all flooring. It never stops trying to get in.
Hardwood durability by the numbers
Janka hardness scale, species stability, white oak, maple, and heartwood provide the technical data needed to select the correct flooring for high traffic areas. A higher Janka rating indicates greater resistance to denting, but dimensional stability is more important for preventing gaps between hardwood planks.
| Species | Janka Rating | Stability Level |
|---|---|---|
| Brazilian Cherry | 2350 | Medium |
| Hard Maple | 1450 | Low |
| White Oak | 1360 | High |
| Red Oak | 1290 | High |
| Black Walnut | 1010 | Medium |
White oak is my favorite. It is stable. It has tyloses in the pores that make it resistant to rot. This is why they use it for wine barrels and boats. It is a workhorse. Maple is beautiful but it is temperamental. It moves a lot with humidity. If you live in a place like Houston with high humidity, maple is a gamble. You are better off with an engineered core that can handle the moisture swings. In Phoenix, the dry heat will shrink everything. You need to acclimate the wood to the space for at least two weeks. Do not just take it off the truck and nail it down. That is a amateur move. The wood needs to reach equilibrium with the air in the house. If the HVAC is not running, do not even bring the wood inside.
“Substrate preparation is the most important part of any tile or flooring installation.” – TCNA Standards
The regional humidity trap
Equilibrium moisture content, HVAC calibration, acclimation, seasonal movement, and hygroscopy are the environmental variables that dictate floor performance. In humid regions, hardwood floors require larger expansion gaps to prevent heaving, while dry climates necessitate humidification to avoid plank shrinkage. I always tell people that the house is a living organism. If you turn off the air conditioning and go on vacation for a month in the summer, your floor will be different when you come back. In the Pacific Northwest, the moisture is constant. You need a robust moisture barrier and stable species. In the desert, you will see gaps in the winter that you can fit a nickel into. That is normal. It is the wood breathing. If you try to fill those gaps with wood putty, you will regret it. In the summer, the wood will expand and push that putty out. It will look like a mess. You have to respect the climate. You cannot fight nature. You can only plan for it.
Tools for the solo professional
Cleat nailer, moisture meter, tapping block, pull bar, and suction cups are the professional tools required for solo hardwood installation. A calibrated moisture meter is the most important tool in your kit because it prevents the installation of unstable material. I never start a job without checking the wood and the subfloor. They should be within 2 percent of each other for wide planks. If they aren’t, I wait. I don’t care about the deadline. I care about the floor.
- Use a pneumatic cleat nailer for consistent pressure.
- Always keep a tapping block to avoid damaging the tongue.
- A heavy duty pull bar is required for the last row against the wall.
- Suction cups are helpful for positioning large format tile or smooth laminate.
- A laser level is better than a string line for long runs.
When you work alone, you need tools that act as a second set of hands. That is why the cardboard box hack is so effective. It acts as your assistant. It holds the weight while you align the groove. It is about working smarter. I have seen guys blow out their knees and backs by thirty five because they thought they could brute force every job. I am still here because I use my head.
The ghost in the expansion gap
Perimeter gap, baseboard clearance, shoe molding, thermal expansion, and structural movement are the design requirements for a floating or nail down floor. You must leave at least 1/2 inch of space at every vertical obstruction to allow the hardwood floors to expand and contract without binding. I call it the ghost because you don’t see it once the baseboards are on, but it is there. If you nail the baseboard into the flooring, you have locked it. The floor cannot move. It will buckle in the middle of the room. I have seen it happen. A beautiful oak floor popped up six inches off the subfloor like a tent because the trim carpenter nailed through the wood. You nail the baseboard to the wall, not the floor. The floor needs to be able to slide under it. This is especially true for laminate. Laminate moves more than hardwood. It is a giant sheet of sawdust and resin. It reacts to everything. If you don’t give it room to breathe, it will scream. Use spacers during the install. Do not trust your eye. Use a block of wood that is exactly the size of the gap you need. It is the small details that make a floor last a lifetime. Architecture is not just about the big picture. It is about the 1/8 inch gap that no one sees.