The physical reality of a ruined plank
Fixing deep hardwood gouges involves penetrating the damaged wood fibers with natural oils or synthetic resins to restore the structural integrity and visual continuity of the plank. For minor surface scratches, the oils found in a common walnut can effectively mask the damage. However, deep gouges that penetrate the wear layer and reach the raw timber require professional grade fillers, epoxy, or hot wax kits to prevent moisture infiltration and further splintering of the wood grain.
I once walked into a house where a $15,000 wide-plank walnut floor was cupping so bad it looked like a potato chip because the installer didn’t check the crawlspace humidity. The homeowner was worried about a small scratch from a moved sofa, but the entire floor was breathing its last breath because of the subfloor. I’ve spent twenty five years with sawdust under my nails, smelling like WD-40 and oak dust, and I can tell you that a scratch is rarely just a scratch. It is a breach in the armor of your home. When you drag a piece of furniture across 3/4 inch solid white oak, you aren’t just making a mark. You are shearing the lignin fibers and exposing the hygroscopic heart of the wood to the ambient environment. This exposure allows humidity to enter the wood cells, causing localized swelling and permanent distortion if not addressed with professional speed.
The physics of the walnut oil bond
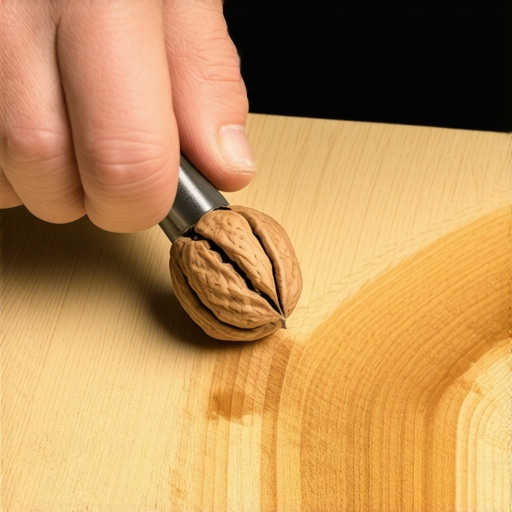
The walnut trick works because the meat of the nut contains high concentrations of fatty acids and natural oils that act as a biocompatible sealant. When you rub the raw walnut into a hardwood scratch, the friction generates heat. This heat liquefies the nut oils, allowing them to seep into the crushed wood cells. As the oils oxidize and harden, they darken to a hue that closely mimics the tannins found in domestic hardwoods like oak, cherry, and walnut. This is not a permanent structural fix, but it is a chemical reaction that stabilizes the damaged area.
To perform this correctly, you must use a raw, unsalted walnut. Do not use roasted nuts. You are looking for the raw oil. Rub the nut diagonally across the grain of the scratch. You will see the wood fibers drink the oil. Let it sit for five minutes. Buff the area with a microfiber cloth to remove any excess organic matter. This works best on site finished floors where the finish is a penetrating oil or a thin polyurethane. If you have a thick, factory finished aluminum oxide coating, the walnut oil may not penetrate as deeply, but it will still fill the white ‘chatter’ mark left by the impact.
“A floor is only as good as the subfloor beneath it; deflection is the enemy of every joint.” – Master Flooring Axiom
Why your subfloor is lying to you
A deep gouge is often exacerbated by a subfloor that has too much vertical deflection, causing the planks to rub against one another. If your floor clicks or moves when you walk near the gouge, the problem isn’t the scratch. The problem is the bond between the subfloor and the joists. Most guys skip the leveling compound. They think the underlayment will hide the dip. It won’t. I spent three days grinding concrete on a job last month just so the floor wouldn’t click like a castanet. If the subfloor isn’t flat to within 3/16 of an inch over a 10 foot radius, your repair will eventually pop out.
The structural failure of the surface
Deep gouges require the use of two part wood epoxies or burn-in wax sticks that can withstand the tensile stress of foot traffic. When a gouge is deeper than 1/8 of an inch, the structural integrity of the plank is compromised. You cannot just use a wood putty. Putty shrinks. It is a solvent based product that loses volume as it dries, leaving a concave divot that catches dirt. Instead, you need a material with high solids content. Burn-in sticks, which are a blend of hard resins and waxes, are the gold standard for high end hardwood floors. You melt the resin with a specialized iron, drip it into the gouge, and then use a leveler to scrape it flush. This creates a mechanical bond with the wood fibers that will not shrink over time.
| Wood Type | Janka Hardness (lbf) | Repair Difficulty | Best Filler Method |
|---|---|---|---|
| Brazilian Cherry | 3500 | High | Two-Part Epoxy |
| White Oak | 1360 | Medium | Burn-in Wax |
| Black Walnut | 1010 | Low | Natural Walnut / Soft Wax |
| Douglas Fir | 660 | Very Low | Shellac Sticks |
The 1/8 inch that ruins everything
Expansion gaps at the perimeter of the room are the lungs of your hardwood floors, allowing them to expand and contract without buckling. If you fill a gouge but the floor has no room to breathe, the pressure will eventually squeeze the filler right out of the crack. I see this all the time in kitchens. People install heavy islands on top of floating floors, effectively pinning the wood in place. When the humidity rises in the summer, the wood has nowhere to go. It buckles, and suddenly those small gouges you fixed are the least of your problems as the tongues and grooves begin to snap under the internal pressure. Always maintain a minimum of 1/2 inch gap at every vertical obstruction.
When laminate becomes a liability
Unlike solid hardwood, laminate floors cannot be sanded or deep-filled with the same success because their surface is a photographic layer under a melamine wear layer. If you gouge laminate, you are looking at a plastic failure. You can’t use the walnut trick here. The oil will just sit on the surface and create a slip hazard. For laminate, you must use color matched acrylic fillers. If the gouge is deep enough to reveal the HDF (High Density Fiberboard) core, you are in trouble. That core is essentially a sponge made of sawdust and glue. Once moisture from a mop hits that exposed core, the board will swell, and the edges will peak. This is why I tell people to buy an extra two boxes of laminate. You don’t repair laminate. You replace the board.
The moisture war between hardwood and showers
Installing hardwood floors adjacent to showers requires a specific moisture barrier and a capillary break to prevent grout failure and wood rot. I see people try to run oak right up to a walk-in shower. It is a recipe for disaster. The grout in the shower transition will eventually crack because the wood expands at a different rate than the tile and thin-set. The humidity from the shower will cause the end-matched grains of the hardwood to wick up moisture. This leads to black mold at the transition. If you must have this look, use a Schluter metal transition strip and a high quality 100 percent silicone sealant that matches the grout color. Never use standard cementitious grout in the gap between wood and tile. It has zero flexibility and will crumble within six months.
Professional Repair Checklist
- Measure the moisture content of the wood using a pin-type meter before applying any sealants.
- Clean the gouge with denatured alcohol to remove any floor wax or oils that will prevent adhesion.
- Select a filler that is one shade darker than the wood, as wood naturally darkens over time.
- Use a plastic putty knife to avoid scratching the surrounding finish during the application.
- Always sand in the direction of the grain if the repair requires leveling.
The ghost in the expansion gap
Ignoring the chemistry of the adhesive used in your flooring can lead to VOC off-gassing and a failure of the bond between the wood and the subfloor. Most people think the glue is just there to hold the wood down. It is actually a moisture vapor retarder. In basements or on slab-on-grade construction, you need a moisture-cured urethane adhesive. These adhesives are engineered to create a waterproof membrane. If you use a cheap, water-based adhesive, the moisture from the concrete will re-emulsify the glue. The floor will release, and you will hear a hollow ‘thump’ when you walk. That sound is the ghost of a bad installation. It is the sound of money leaving your pocket.
“A floor that is not acclimated is a floor that is destined to fail; three days is a myth, three weeks is a reality.” – NWFA Technical Guidelines
The truth about waterproof vinyl
Homeowners always ask why their ‘waterproof’ vinyl is buckling, and the answer is usually a lack of understanding of thermal expansion. While the material itself won’t be damaged by water, the entire floor plane still moves. If you have a south-facing sliding glass door, the sun will heat that LVP to 100 degrees or more. The plastic will expand. If you didn’t leave an expansion gap under the baseboards, the floor will peak in the middle of the room. It looks like a bubble. People think it is moisture. It is actually just physics. Also, while most people want the thickest underlayment, too much cushion actually causes the locking mechanisms on LVP to snap under pressure. You want a high-density, low-compression underlayment. Anything more than 1.5mm of soft foam is asking for the tongues to break.
Maintaining a floor is about understanding the molecular reality of the materials. Whether you are using a walnut to hide a scratch or grinding a concrete slab to perfection, the goal is the same. You are managing the relationship between the structure of the house and the environment it lives in. Don’t be fooled by the ‘aesthetic’ advice of decorators who have never held a floor sander. Listen to the wood. Watch the moisture meter. Respect the subfloor. If you do that, your floors will outlive you. If you don’t, you’ll be calling me in five years to tear it all out and start over. And trust me, I charge more the second time around.