I spent three days grinding concrete on a job last month just so the floor wouldn’t click like a castanet, and that same obsessive attention to detail is what saves a shower from total structural collapse. Most guys skip the leveling compound. They think the underlayment will hide the dip. It won’t. When we talk about grout in a wet environment, we are talking about a rigid mineral bridge between two floating islands. If the subfloor has even a millimeter of deflection, that bridge snaps. You might not see it with the naked eye under the harsh glow of a bathroom vanity light. That is why the flashlight test is the only tool that matters when you suspect your waterproofing is compromised. If you ignore a hairline crack today, you will be replacing the floor joists in five years. This is not about aesthetics, it is about structural engineering and moisture management. You have to understand how water molecules behave at a microscopic level. They do not just sit there. They hunt for paths of least resistance. A crack in your grout is a highway to your subfloor. Whether you are dealing with tile, hardwood floors in an adjacent room, or laminate in the hallway, moisture migration is your primary enemy. If the grout fails, the entire system fails.
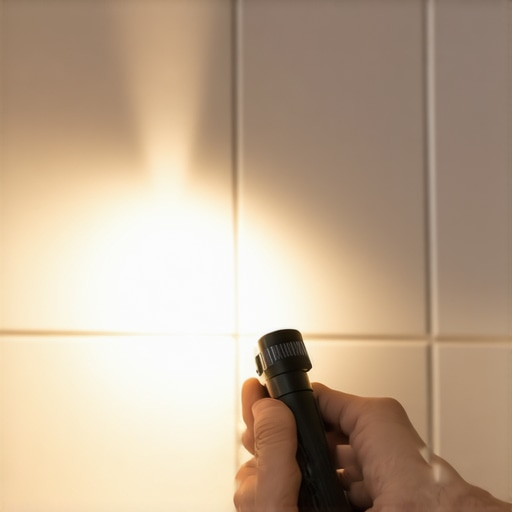
The shadow reveals the truth
The flashlight test is a diagnostic method used to identify hairline grout cracks by casting long shadows across the surface of the tile. By placing a high-lumen light source parallel to the floor, you can see topographical irregularities and fractures that remain invisible under standard overhead lighting conditions. It is the most effective way to verify the structural integrity of your shower enclosure without destructive testing. I have seen guys walk onto a job site and say the grout looks fine. Then I kill the lights, put my LED torch to the tile, and the floor looks like a roadmap of New York City. The light hits the edge of the crack and creates a shadow. No shadow, no crack. It is as simple as that. But the physics behind why those cracks are there is where things get complicated. Grout is a mixture of portland cement, aggregate, and pigments. When it cures, it forms a crystalline structure. This structure is incredibly strong in compression but weak in tension. If the tile moves even a fraction of an inch because the thin-set has lost its bond or the subfloor is flexing, the grout must give way. It is the sacrificial lamb of the flooring world.
“A floor is only as good as the subfloor beneath it; deflection is the enemy of every joint.” – Master Flooring Axiom
Why your subfloor is lying to you
Subfloor deflection refers to the amount of vertical movement a floor system experiences under a load. In shower installations, excessive deflection is the number one cause of grout failure and water intrusion. If your joists are spaced too far apart or the plywood thickness is insufficient, the rigid tile and grout layer will inevitably crack. You might think your floor is solid because it doesn’t squeak, but the grout knows. When you stand in that shower, you are applying a concentrated load. If the subfloor bows, the grout joints are squeezed or stretched. Since grout has a very low modulus of elasticity, it cannot stretch. It shatters. I have seen homeowners spend five grand on Italian marble only to slap it down on a single layer of 5/8 inch OSB. That is a crime. You need a minimum of two layers of subflooring or a properly engineered cement backer board system to meet TCNA standards. Without it, you are just waiting for a leak. Water will find its way through those micro-fissures and begin the process of wood rot. By the time you see the stain on the ceiling below, the damage is already five figures deep.
The chemistry of a failing bond
The chemical bond between the thin-set mortar and the tile is what prevents lateral movement in a shower floor. When this bond fails, often due to improper curing or moisture saturation, the grout is the first component to show signs of distress. Understanding the hydration process of cementitious materials is vital for a long-lasting installation. If the installer used too much water when mixing the grout, the resulting structure will be soft and powdery. This is called a soft cure. You can scrape it out with a fingernail. On the other hand, if the thin-set was allowed to skin over before the tile was set, you have no mechanical bond. The tile is just sitting there, held in place by friction and the grout itself. This puts immense pressure on the grout lines. Eventually, the vibration of daily use will snap those lines. This is why I always check the transfer of thin-set on the back of the tile. You want at least 95 percent coverage in a wet area. Anything less is a failure in the making.
Why hardwood and showers never mix
The Janka Hardness Scale measures the dent resistance of wood species, but it does not account for hygroscopic movement near wet areas. Installing hardwood floors against a shower threshold is risky because wood fibers expand and contract significantly with changes in relative humidity. If your shower grout is cracked, the escaping moisture will travel under the transition and cause cupping or crowning in the wood. I once walked into a house where a $15,000 wide-plank walnut floor was cupping so bad it looked like a potato chip because the installer didn’t check the crawlspace humidity and the shower was leaking through the grout. The wood absorbs the water, the cells swell, and the boards have nowhere to go but up. This is the same reason you don’t put laminate in a full bath. Laminate has an HDF core that is essentially a sponge made of sawdust and glue. One crack in your shower grout and that laminate floor will blow up like a balloon within 48 hours. You need to maintain a hard break between wet and dry zones, usually with a marble sill or a proper expansion joint.
| Material Type | Water Resistance | Expansion Potential | Subfloor Requirement |
|---|---|---|---|
| Ceramic Tile | High | Low | L/360 Deflection Limit |
| Solid Hardwood | Very Low | Extremely High | Moisture Barrier Required |
| Laminate Floor | Low | Moderate | Leveling Compound Essential |
| Epoxy Grout | Maximum | None | Rigid Substrate Only |
The 1/8 inch that ruins everything
An expansion gap of at least 1/8 inch is required at all vertical plane changes to accommodate the natural movement of the building envelope. Many installers mistakenly grout the corners of a shower where the walls meet the floor, which leads to stress fractures as the house settles. These corners should always be filled with a 100 percent silicone sealant that matches the grout color. Grout is rigid. Houses are not. Houses breathe. They expand in the summer and shrink in the winter. If you bridge that corner with grout, it will crack. Period. It is a physics problem. The silicone acts as a shock absorber. It can compress and stretch. When I do the flashlight test, the first place I look is the change of plane. If I see grout in those corners, I already know there are cracks there. This is a basic TCNA requirement that gets ignored on almost every builder-grade job I see. It is the mark of a pro versus a guy who just wants to get paid and leave.
“Movement at the perimeter is inevitable; lack of an expansion joint is a recipe for tenting.” – Flooring Structural Guide
The checklist for a waterproof diagnostic
- Verify that the shower has not been used for at least 48 hours to ensure surface dryness.
- Equip yourself with a 500+ lumen LED flashlight with a narrow beam spread.
- Turn off all interior bathroom lights and close any window blinds to achieve total darkness.
- Lay the flashlight flat on the tile surface and rotate it 360 degrees to catch shadows from every angle.
- Mark any detected cracks with a piece of blue painter’s tape for later repair.
- Inspect the transition where the tile meets the bathroom floor for signs of moisture migration.
- Check the density of the grout by pressing a small screwdriver into the crack to see if it crumbles.
The microscopic reality of grout erosion
Over time, chemical cleaners and acidic soap scum can degrade the polymeric binders in modern grout, leading to micro-pitting and structural weakening. This erosion makes the grout more permeable to water and more susceptible to cracking under load. You have to be careful what you clean your floors with. If you are using harsh bleach or acidic cleaners every week, you are eating away at the very thing keeping your house dry. Once the top layer of the grout is gone, the sand aggregate is exposed. This makes it even more porous. Water starts to sit in those pits. This is where mold starts. It is not just on the surface. It is inside the grout. When you use the flashlight test, you might also see these pits as tiny shadows. That is a sign that your grout is reaching the end of its life cycle. You can try to seal it, but once the structure is compromised, you are better off scraping it out and starting fresh with a high-quality epoxy grout that is resistant to chemicals and moisture. It is a pain in the neck to install, but it will outlast the house.