
I once walked into a house where a $15,000 wide-plank walnut floor was cupping so bad it looked like a potato chip because the installer didn’t check the crawlspace humidity. That sight stays with a man. It reminds me that hardwood floors are not just planks of dead organic matter. They are living, breathing systems of cellulose and lignin that react to every drop of moisture in the air. When you see a gap in a mitered joint, you are not just looking at a cosmetic flaw. You are looking at a failure of geometry and environment. I have spent twenty-five years on my knees with a moisture meter and a level, and I can tell you that the difference between a master-grade finish and a DIY disaster is measured in thirty-seconds of an inch.
The walnut floor that turned into potato chips
Hardwood floors, grout, and laminate require stable environments to maintain their structural integrity over time. In the case of the walnut disaster, the subfloor was a concrete slab that was still off-gassing moisture, which the installer ignored. This lack of moisture testing led to the wood expanding at the bottom faster than at the top, creating a cupping effect that ruined the entire installation. Mitering joints in such an environment is impossible because the wood is constantly in motion. If you want a floor that lasts, you have to respect the National Wood Flooring Association standards for acclimation and subfloor preparation. Before we even talk about toothpicks, we have to talk about why that gap is there in the first place.
“A floor is only as good as the subfloor beneath it; deflection is the enemy of every joint.” – Master Flooring Axiom
The physics of wood fiber and the mitered joint
Mitered joints in hardwood floors are particularly susceptible to seasonal movement because of the way wood grain is oriented at a forty-five degree angle. When the relative humidity drops in the winter, the wood cells lose water and shrink. Because the wood shrinks more across the grain than along it, the heel of the miter stays tight while the tip of the miter pulls away. This creates a triangular gap that catches dirt, pet hair, and the disdain of anyone who knows what they are looking at. You cannot simply slap wood filler in there. Wood filler is a brittle paste of sawdust and resin that has no structural strength. It will crack and fall out the first time someone walks across the floor with heavy boots.
The toothpick hack for microscopic perfection
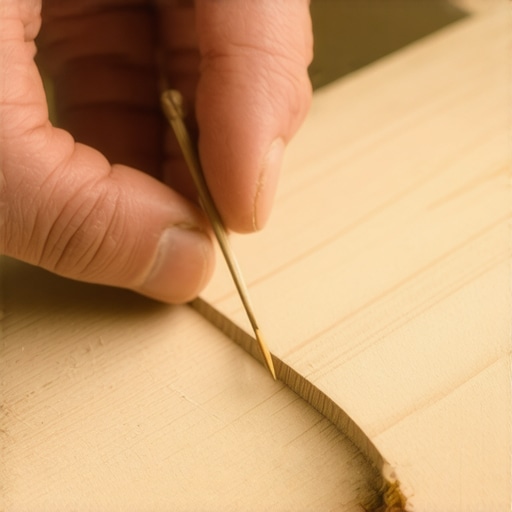
The toothpick hack is a professional secret for filling tiny gaps in mitered joints that provides both color matching and structural reinforcement. By using a sliver of actual wood, specifically a birch toothpick or a shaving from an offcut of the actual flooring, you are inserting cellulose fibers into the void. You apply a drop of high-quality polyvinyl acetate glue into the gap, then tap the toothpick into the space until it is wedged tight. The glue creates a chemical bond with the wood fibers, and the toothpick provides a mechanical bridge that moves with the floor. Once the glue is dry, you snip the toothpick and sand it flush with 220-grit paper. The result is a repair that is nearly invisible because it uses the same organic material as the floor itself.
Mechanical properties and Janka ratings of common hardwoods
| Wood Species | Janka Hardness (lbf) | Radial Shrinkage (%) | Tangential Shrinkage (%) | Best Gap Fix Method |
|---|---|---|---|---|
| White Oak | 1360 | 5.6 | 10.5 | Toothpick Hack |
| Black Walnut | 1010 | 4.8 | 7.8 | Wood Shaving |
| Hard Maple | 1450 | 4.8 | 9.9 | Toothpick Hack |
| Brazilian Cherry | 2350 | 3.1 | 8.2 | Epoxy Resin |
| Red Oak | 1290 | 4.0 | 8.6 | Toothpick Hack |
The anatomy of the toothpick intervention
Wood glue chemistry plays a major role in the success of the toothpick hack because the adhesive must remain slightly flexible after curing. I prefer a cross-linking PVA glue because it resists water better than standard white glue. When you jam that toothpick into the gap, you are essentially performing a micro-shim operation. You are not just filling a hole. You are putting tension back into the joint. I have seen guys try to use caulk or silicone in these gaps, but that is a rookie move. Caulk is for showers and baseboards, not for the walking surface of a high-end hardwood floor. Silicone will contaminate the finish, making it impossible to screen and coat the floor in the future. Stick to the wood-on-wood method if you want to be a professional.
The checklist for a perfect mitered joint repair
- Verify that the moisture content of the floor is within 2 percent of the subfloor before attempting any repairs.
- Clean the gap thoroughly with a thin blade or compressed air to remove sawdust and debris.
- Select a toothpick made of birch or bamboo to match the density of the hardwood.
- Use a needle-nose pliers to wedge the toothpick into the deepest part of the miter.
- Allow the adhesive to cure for at least four hours before attempting to sand the surface.
- Apply a wipe-on poly or a touch-up pen to match the sheen of the surrounding finish.
Why your subfloor is lying to you
Subfloor levelness is often the hidden culprit behind failing mitered joints in laminate and hardwood floors. If there is a dip in the plywood or concrete under the joint, the planks will deflect every time someone steps on them. This constant vertical movement acts like a pair of scissors, slowly cutting the glue bond and widening the gap. Most guys skip the leveling compound. They think the underlayment will hide the dip. It will not. While most people want the thickest underlayment, too much cushion actually causes the locking mechanisms on LVP or laminate to snap under pressure. You need a flat, rigid surface. I spent three days grinding concrete on a job last month just so the floor would not click like a castanet. If the floor is moving, no amount of toothpicks will save your miters.
“Wood is hygroscopic. It moves. If you don’t account for the moisture, the finest miter in the world will open up before the check clears.” – Flooring Professional Doctrine
The humidity factor in regional climates
Regional climate conditions dictate how you should approach hardwood floor maintenance and gap repair. If you are in a place like the Pacific Northwest, the high humidity means your wood will be expanded most of the year. If you fill gaps in the summer, you risk the wood crushing itself when the humidity spikes further. Conversely, in the dry heat of Arizona, your hardwood will shrink until the baseboards show a gap. You must perform repairs during the mid-point of your local humidity cycle. This ensures that the expansion gaps at the perimeter are doing their job. I have seen $20,000 floors buckle and lift off the subfloor because some ‘expert’ installed them tight to the wall in a humid July. You have to give the wood room to breathe, or it will find room by destroying your walls.
The chemistry of adhesives and fiber saturation
Polyvinyl acetate is the gold standard for these repairs because of its porous penetration capabilities. When the glue hits the dry fibers of the toothpick and the edge of the plank, it wicks into the tracheids and vessels of the wood. This creates a monolithic bond. It is not just sitting on the surface. It is becoming part of the wood structure. This is why the toothpick hack works where putty fails. Putty is a non-structural filler. It has no internal matrix. When the floor expands, the putty is squeezed out. When it shrinks, the putty falls through the crack. The toothpick, however, is a physical object. It stays put. It is the difference between a temporary patch and a permanent architectural solution.