
Most guys skip the leveling compound. They think the underlayment will hide the dip. It won’t. I spent three days grinding concrete on a job last month just so the floor wouldn’t click like a castanet. That job taught me that once the floor is down, you only have two choices. You rip it up or you get surgical. If you are reading this, you probably have a floor that sounds like a drum every time you walk across the room. It is a common failure. It is also fixable if you have the right chemicals and a steady hand. I smell like oak dust and WD-40 most days because I do not take shortcuts. This guide is for the person who wants to fix a hollow spot without destroying the aesthetic of their home. Hardwood floors and laminate require a flat surface. When the subfloor fails, the air gap becomes your enemy.
The physics of the hollow sound
Floating laminate floors require a subfloor that is flat within 1/8 inch over a 10 foot radius to prevent vertical deflection. When a dip in the concrete or plywood exists, the plank bridges the gap. This creates a void that resonates when stepped on. The sound is a result of the backing material striking the subfloor under pressure. Most people assume the floor is broken. It is not. It is simply unsupported. This lack of support puts extreme stress on the locking mechanisms. Over time, that 1/8 inch of movement will snap the tongue and groove. Once the joint breaks, the floor is ruined. You must fill that void with a non-compressible material to restore the structural integrity of the surface. We use injection resins because they flow like water but harden like rock. It is a game of viscosity and surface tension. You are essentially performing floor surgery.
“A floor is only as good as the subfloor beneath it; deflection is the enemy of every joint.” – Master Flooring Axiom
Why your subfloor is lying to you
Subfloor flatness is often confused with subfloor levelness. A floor can be slanted and still be perfect for laminate, but it cannot be wavy. Most builders rush the concrete pour. They leave high spots and low spots that the carpet installers hide with thick padding. When you switch to a hard surface, those sins are revealed. Laminate is a rigid product. It does not drape over contours like vinyl plank might. If the subfloor has a valley, the laminate will bridge it. The underlayment you bought might claim to hide subfloor imperfections, but that is marketing fluff. While most people want the thickest underlayment, too much cushion actually causes the locking mechanisms on LVP or laminate to snap under pressure. You need a high-density support. If the support is missing, the syringe method is the only way to retroactively install a structural pier of adhesive under the plank.
The chemical reality of repair resins
Injection adhesives for floors are usually moisture-cure polyurethanes or low-viscosity epoxies. You cannot use standard wood glue. Standard PVA glue shrinks as the water evaporates. If the glue shrinks, the hollow spot returns. You need a product that maintains its volume or expands slightly. Polyurethane resins react with the humidity in the air and the HDF core of the laminate to create a rigid bond. The viscosity must be low enough to pass through a 14-gauge needle but thick enough not to run away into the expansion gaps. We look for a centipoise rating similar to heavy syrup. If it is too thin, it will find a seam and leak onto the surface. If it is too thick, you will break the syringe trying to move the plunger. The chemistry must be exact. You are looking for a tensile strength that exceeds the density of the laminate itself.
[image_placeholder_1]
Tools for the precision floor surgeon
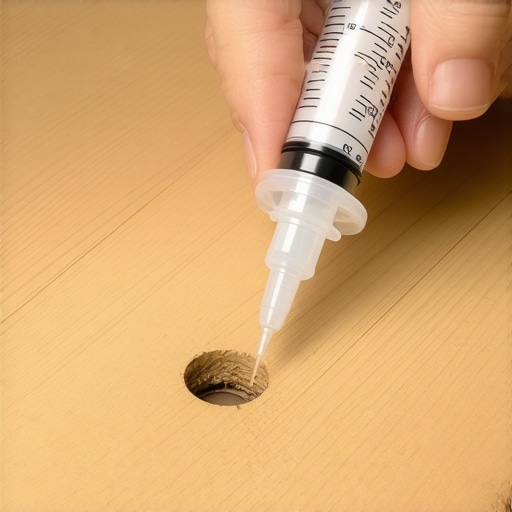
Repairing hollow spots requires a specialized injection kit. You need a 30cc syringe and a blunt-tip needle. Do not use sharp medical needles. They are too thin and will clog instantly with the adhesive resins. A 14-gauge or 16-gauge needle is the sweet spot. You also need painter’s tape, a high-speed drill, and a 1/16 inch drill bit. The goal is to make a hole so small it disappears into the grain pattern of the laminate. You will also need heavy weights. I use 50-pound sandbags or buckets of grout. If you inject expanding resin without weighting the floor down, the adhesive will lift the planks and create a permanent hump. That is a disaster. You cannot undo a hump. You can only fix a dip. Precision is the only thing that separates a pro from a hack.
A step by step guide to structural injection
Locating the void is the first step of the repair process. Walk the floor and mark the hollow areas with blue painter’s tape. Tap the floor with your knuckles to find the deepest point of the dip. This is your injection site. Drill a pilot hole through the laminate. Stop the moment you feel the drill bit hit the subfloor. Do not drill into your concrete or wood subfloor. You only want to create a portal through the plank. Vacuum the dust out of the hole. If there is sawdust in the void, the glue will not bond. Insert the needle. Push the plunger slowly. You should feel slight backpressure. This tells you the adhesive is spreading across the subfloor. After injecting about 20cc of resin, remove the needle and immediately place a heavy weight over the hole. Let it cure for 24 hours. If you walk on it too soon, you will displace the liquid glue and the hollow spot will return.
The 1/8 inch that ruins everything
Expansion gaps are the most misunderstood part of flooring. A floating floor is a giant raft. It moves with the seasons. In the summer, the humidity rises and the HDF core swells. In the winter, the dry heat from your furnace shrinks the planks. If you inject glue near the perimeter, you might accidentally pin the floor to the subfloor. This is a death sentence for laminate. If the floor is pinned, it cannot expand. It will buckle or the joints will separate in another room. When injecting, always ensure you are at least 12 inches away from any wall. If the hollow spot is near a wall, you are better off removing the baseboard and shims to see if the floor is binding. Sometimes a hollow sound isn’t a dip. It is tension. A pinned floor will arch like a bow. Pushing it down creates a click. No amount of glue will fix a tension arch. You have to release the pressure at the perimeter.
| Repair Method | Adhesive Type | Cure Time | Risk Level |
|---|---|---|---|
| Syringe Injection | Polyurethane | 24 Hours | Low |
| Expansion Gap Fill | Flexible Caulk | 12 Hours | None |
| Plank Replacement | N/A | Immediate | High |
| Foam Injection | Expanding Foam | 4 Hours | Extreme |
Moisture and the laminate disaster
Regional climate conditions dictate how laminate behaves. In humid regions like New Orleans or Houston, the moisture in the concrete slab is a constant threat. Laminate is basically compressed paper. If you inject resin into a wet subfloor, the bond will fail. You must check the calcium chloride levels or use a pinless moisture meter before you start. If the slab is sweating, your hollow spot is the least of your problems. You have mold and delamination in your future. In dry climates like Phoenix, the HDF shrinks so much that the locking mechanisms become brittle. Injecting in dry heat requires a resin with some flexibility. If the glue is too brittle, the seasonal movement will simply snap the glue bond. You need a chemical solution that matches your geography. Every installation is a chemistry experiment involving ambient temperature and relative humidity.
“Deflection is the precursor to destruction in any floating system.” – TCNA Technical Bulletin
Maintenance and the longevity of the fix
Fixing a hollow spot is a permanent solution only if the rest of the floor is stable. You must monitor your home to ensure the repair holds. This involves climate control. Laminate floors hate steam mops. The steam forces moisture into the seams and softens the core. If you have injected glue, the steam can reactivate or degrade the bond. Use a damp mop only. Keep your humidity between 30 and 50 percent. If the humidity swings wildly, the floor will move and eventually break the injection site. It is a maintenance cycle. You are the steward of this surface. Treat it like a piece of machinery. It will last. Neglect it. It will fail. I have seen floors last 30 years and floors last 30 days. The difference is always in the details and the subfloor.
- Check for moisture before any injection to ensure adhesive adhesion.
- Use blue tape to mark voids and protect the wear layer from spills.
- Weight the area with at least 50 pounds to prevent plank lifting.
- Clean the hole with a vacuum to remove debris that blocks glue flow.
- Color-match putty can be used to hide the drill hole after curing.
The repair is complete when the floor feels like solid stone under your feet. If you still hear a click, you missed a void. Start over. Do not settle for mediocre. A hollow floor is a failed floor. You have the tools and the knowledge to reclaim your space. Most homeowners are afraid to drill into their floor. Do not be afraid. Be precise. The alternative is spending thousands on a new floor because you were too timid to fix the subfloor properly. Flooring is a structural engineering challenge. You are the engineer now. Fix the physics and the aesthetics will follow.