Most guys skip the leveling compound. They think the underlayment will hide the dip. It won’t. I spent three days grinding concrete on a job last month just so the floor wouldn’t click like a castanet. That job taught me a lesson I have seen repeated a thousand times in bathrooms across the country. People focus on the color of the tile or the finish of the hardware while the structural integrity of the installation is rotting from the inside out. When you see a crack in the corner of your shower grout, you are not looking at a cosmetic issue. You are looking at a physics problem. A shower is a complex assembly of different materials including wood framing, cement board, thin-set, tile, and grout. Each of these materials expands and contracts at different rates when exposed to moisture and temperature changes. When you force a rigid material like cement-based grout into a corner where two different planes meet, you are asking for a failure. I have seen fifteen thousand dollar walnut floors cup until they looked like potato chips because of humidity, and I have seen master bathrooms ruined because an installer used grout where he should have used silicone. It is the same mistake every time. It is the belief that a floor or a wall is a static object. It is not. It is a breathing, moving structure.
The physics of the corner joint
Shower grout cracks at the corners because of differential movement between the walls. This phenomenon occurs when the vertical change of plane experiences independent shifting, causing rigid cementitious grout to fracture under the tensile stress of house settling or thermal expansion. Most residential structures utilize wood framing which is inherently prone to moisture-related movement. When you have two walls meeting at a ninety-degree angle, they are often tied to different studs or different parts of the foundation. They move independently of each other. Even a movement of one thirty-second of an inch is enough to shatter the bond of a standard grout line. This is why the Tile Council of North America (TCNA) is so specific about how these joints are treated. You cannot fight physics with more cement. You have to work with the movement or the movement will break your work. I smell like oak dust and WD-40 most days, and that smell comes from years of fixing these exact mistakes.
“A floor is only as good as the subfloor beneath it; deflection is the enemy of every joint.” – Master Flooring Axiom
Why your house is never actually still
Structural movement and building settling are the primary causes of grout failure. Every house undergoes seasonal expansion and contraction due to relative humidity changes, which exerts force on tile assemblies and the substrate. The wood in your walls is a hygroscopic material. It absorbs and releases moisture from the air. In the summer, the studs swell. In the winter, they shrink. If you live in a place with high humidity, this movement is even more pronounced. Your shower is essentially a box built inside a moving cage. If you lock the corners of that box with a brittle material like grout, the pressure has nowhere to go. The grout is the weakest link in the chain. It will crack. It will crumble. And once it cracks, it becomes a highway for water to get behind your tile. This leads to the real nightmare: mold, rot, and the eventual failure of the entire wall assembly. I have pulled down tile that looked perfect from the front but was held on by nothing but luck because the grout in the corners had been leaking for years.
The fatal flaw of rigid cementitious grout
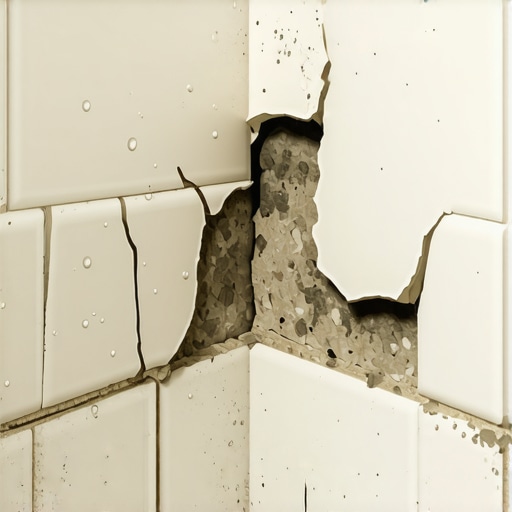
Cement-based grout lacks the elasticity required to bridge moving joints. Because Portland cement forms a crystalline matrix that is extremely hard but brittle, it cannot accommodate the coefficient of thermal expansion found in modern porcelain or ceramic tile installations. To understand this, you have to look at the chemistry of the grout itself. When you mix grout with water, a chemical reaction called hydration occurs. The calcium silicates in the cement grow needle-like crystals that interlock to create a solid mass. This mass is great for compression. It can handle you walking on it all day if it is on a floor. But it has almost zero tensile strength. It cannot stretch. When the two walls of your shower move away from each other even a hair, those crystals snap. This is especially true with modern large-format tiles. The bigger the tile, the less grout you have relative to the surface area. This concentrates all the movement stress into those tiny corner lines. It is a recipe for disaster if you are using the wrong material. [image_placeholder_1]
The difference between grout and caulk
Siliconized caulk and 100 percent silicone are flexible materials designed for movement. Unlike grout, these elastomeric sealants maintain a permanent bond while stretching to accommodate plane changes and dissimilar material transitions. I tell homeowners all the time that grout is for the flat parts and caulk is for the corners. It is a simple rule that would save billions in property damage if everyone followed it. But people want the colors to match perfectly, so they use the color-matched grout. Manufacturers now make color-matched silicone for this exact reason. You get the look of grout with the performance of a high-end sealant. If you are looking at a crack right now, do not just smear more grout over it. That is a band-aid on a broken leg. You need to remove the old grout and replace it with a material that can actually handle the stress of the joint. Anything else is just wasting time and money.
| Material Type | Elasticity | Water Resistance | Best Use Case |
|---|---|---|---|
| Cementitious Grout | None | Porous | Main tile fields |
| Epoxy Grout | Low | High | High-traffic floors |
| Siliconized Acrylic | Medium | Moderate | Baseboards and trim |
| 100% Silicone | High | Maximum | Shower corners and pans |
TCNA standards for change of plane
The Tile Council of North America requires movement joints at every change of plane. According to TCNA Handbook Method EJ171, any internal corner or perpendicular transition must be filled with a flexible sealant to prevent stress-induced fracturing. This is not just a suggestion. It is a technical standard developed over decades of testing. When I see an installer running grout through a corner, I know he has not read the book. I have spent my career following these standards because I hate doing jobs twice. The standard exists because we know that buildings move. We know that materials expand. Ignoring the standard is like building a bridge without expansion joints. Eventually, the bridge will collapse. In the flooring world, we see this in laminate floors that buckle because there is no expansion gap at the perimeter. We see it in hardwood that crowns because it was not acclimated. And we see it in shower grout that cracks because the installer thought he knew better than the engineering standards. I have no patience for that kind of work.
“Any change in plane must be treated as a movement joint; rigid materials in these locations will fail by design.” – TCNA Technical Manual
How moisture behind the tile accelerates failure
Water infiltration through cracked grout leads to substrate degradation. When moisture penetrates the grout line, it reaches the thin-set mortar and the waterproofing membrane, potentially causing delamination or efflorescence in the surrounding tile. This is where a small crack becomes a massive problem. Water is patient. It will find the smallest opening and work its way in. Once it gets behind the tile, it starts to break down the bond between the tile and the wall. If you have a traditional cement board installation without a topical waterproofing membrane, that water is soaking into the board and the studs. I have seen showers where you could push the tile and the whole wall would flex because the wood behind it had turned to mush. All of that started with a tiny crack in the corner grout. This is why I am a stickler for the details. I have spent too many days in respirators tearing out moldy drywall because someone saved five dollars on a tube of silicone.
Preparing the joint for a permanent fix
Successful repair requires the total removal of existing grout from the corner. To ensure a mechanical bond, you must use an oscillating tool or a grout saw to clear the joint depth down to the substrate or waterproofing layer. You cannot just put silicone over the top of old grout. It will not stick. You have to get in there and clean it out. This is the part of the job that everyone hates. It is dusty, it is tedious, and it is hard on your knees. But if you do not get back to a clean surface, the new sealant will peel off within months. I use a vacuum with a HEPA filter to suck out the dust as I go. You want that joint to be bone dry and free of any soap scum or old debris. I often use denatured alcohol to wipe down the edges of the tile before I apply the new sealant. It removes any oils that might interfere with the bond. It is about the prep work. The actual application of the silicone is the easy part. The three hours spent on your knees with a scraper is where the real work happens.
The chemistry of 100 percent silicone
Pure silicone sealants utilize a cross-linking polymer chain for maximum flexibility. These acetoxy-cure or neutral-cure formulas provide a non-porous barrier that is resistant to microbial growth and thermal cycling. When you look at silicone under a microscope, it is a series of long, flexible chains. These chains can stretch and compress thousands of times without breaking. This is the opposite of the crystalline structure of grout. Silicone is also hydrophobic, meaning it repels water. This makes it the perfect material for a shower corner. It creates a gasket that seals the joint while allowing the walls to move. You want to look for a product that is labeled as 100 percent silicone. Avoid the “siliconized” acrylics for shower corners. They are easier to clean up with water, but they do not have the same longevity or flexibility as the real stuff. In my experience, the extra effort of working with pure silicone is worth it every single time.
The 1/8 inch that ruins everything
Precision in joint width is vital for the performance of flexible sealants. A movement joint that is too narrow will not allow for enough material elongation, while a joint that is too wide may suffer from sagging or internal cohesive failure. I see guys trying to squeeze a bead of caulk into a hairline crack. It will not work. You need a minimum of an eighth of an inch to get enough material in there to actually function as a joint. If the gap is too small, the silicone cannot stretch enough before it tears. It is basic engineering. If you have a one-inch piece of rubber, you can stretch it. If you have a piece of rubber the thickness of a human hair, it will snap the moment you pull it. The same logic applies to your shower corners. This is why I sometimes have to widen the gap with a diamond blade. It sounds scary to the homeowner, but it is the only way to ensure the repair lasts for twenty years instead of twenty days.
- Inspect all corners for vertical and horizontal cracks
- Remove all old grout using a specialized grout removal tool
- Clean the joint thoroughly with a vacuum and denatured alcohol
- Apply a high-quality 100% silicone sealant color-matched to your grout
- Tool the joint with a rounded applicator for a smooth, water-shedding finish
- Allow at least 24 hours of curing time before exposing the area to water
Why your subfloor might be the real culprit
Excessive floor deflection can cause stress that telegraphs into the wall corners. If your joist span does not meet L/360 deflection standards, the movement of the floor every time you step into the shower will put torsional strain on the wall-to-base transition. This is a common issue in older homes or homes built with 2×8 joists that are over-spanned. You step into the shower, the floor dips slightly, and that pull is transferred directly to the corners of the walls. No amount of grout or silicone will fix a floor that is bouncing. I have spent days in crawlspaces sistering joists and adding blocking just to stop a shower from leaking. People think I am crazy when I start talking about the basement while looking at a bathroom leak, but it is all connected. You cannot build a stable house on a weak foundation. If your subfloor is lying to you about its stability, your grout will be the first thing to tell the truth. I have seen laminate floors separate and hardwood floors squeak because of this same lack of structural rigidity. It all comes back to the physics of the build.
The ghost in the expansion gap
The lack of an expansion gap at the perimeter is a silent killer of tile installations. Without a specified clearance between the tile edge and the wall framing, the lateral expansion of the tile assembly will force the corners to compress and fracture. This is the same principle that causes hardwood floors to buckle. Materials need room to grow. If you tile tight against the wall and then grout that gap, you have created a ticking time bomb. As the temperature rises, the tile expands. Since it has nowhere to go, it pushes against the wall. The wall pushes back. The weakest point is the corner grout, which gets crushed. This is why a professional always leaves a gap and covers it with a flexible transition. It is the ghost in the machine. You do not see it, but you definitely see the results when it is missing. I have walked into jobs where the tile was actually tenting in the middle of the room because there was not a single expansion joint in a forty-foot run. It looked like a mountain range in the middle of a kitchen. All of that could have been avoided with a simple eighth-inch gap.
Final thoughts on shower maintenance
Fixing cracked grout is about more than just aesthetics. It is about protecting the structural integrity of your home. You have to treat your shower like the engineering challenge it is. Use the right materials, follow the technical standards, and do not ignore the signs of movement. If you do it right the first time, you will not have to see me in five years when your subfloor is rotting out. I would rather be installing a beautiful site-finished oak floor than tearing out a moldy shower, so take my advice and use the silicone. It is the difference between a job that lasts and a job that fails.