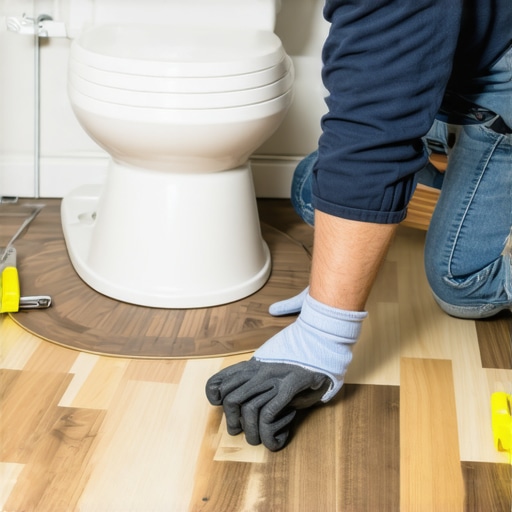
The Trick to Installing Laminate Around Curved Toilet Bases
Most guys skip the leveling compound. They think the underlayment will hide the dip. It won’t. I spent three days grinding concrete on a job last month just so the floor wouldn’t click like a castanet. That job was a bathroom renovation where the homeowner had bought the cheapest laminate they could find at a big-box store. They expected it to behave like solid oak. It didn’t. When you are dealing with moisture-heavy environments like bathrooms, the subfloor is the only thing standing between a successful install and a moldy disaster. I’ve spent twenty-five years with sawdust under my nails and a moisture meter in my pocket, and if there is one thing I have learned, it is that the bathroom is the ultimate test of an installer’s patience. You aren’t just laying planks. You are engineering a floating system that has to survive humidity, spills, and the physical constraints of a curved toilet base.
The ghost in the expansion gap
To install laminate around a curved toilet base, you must maintain a 1/4 inch expansion gap while using 100% silicone sealant to prevent moisture infiltration. This gap allows the floating floor to move as humidity levels fluctuate throughout the seasons. If you pin the floor against the toilet, the planks will buckle, the locking mechanisms will snap, and the floor will eventually fail at the joints. Most amateurs try to cut the laminate tight to the porcelain. This is a mistake that leads to peaked seams. The floor needs to breathe. Even if the manufacturer calls it waterproof, the HDF core inside that plank is still made of wood fibers that expand and contract. I always leave that gap and then fill it with a high-quality silicone that matches the floor or the toilet base. This provides a flexible gasket that moves with the floor while keeping water from getting underneath the planks.
“A floor is only as good as the subfloor beneath it; deflection is the enemy of every joint.” – Master Flooring Axiom
Why your subfloor is lying to you
A subfloor may look flat to the naked eye, but any deviation greater than 1/8 inch over six feet will cause laminate clicking and eventual joint separation. You have to get down on your knees with a straightedge. In bathrooms, the subfloor around the toilet is often compromised by years of slow, hidden leaks. If the plywood is soft, you don’t just cover it up. You cut it out and replace it. If the concrete slab is reading high on the moisture meter, you need a calcium chloride test. I never trust a slab that hasn’t been tested. Moisture vapor travels through the microscopic capillaries in concrete like a highway. If you trap that vapor under a laminate floor without a 6-mil poly film, it will turn the underside of your floor into a science project within six months. You are not just a floor layer; you are a moisture manager.
The 1/8 inch that ruins everything
Precision cuts around a toilet require a cardboard template or a contour gauge to ensure the expansion gap is uniform and hidden by the base of the porcelain. I see guys try to freehand these cuts with a jigsaw all the time. They end up with jagged edges and gaps that are too wide to cover. I take a piece of the underlayment or the scrap box and trace the curve of the toilet onto it. I cut that template out first and test the fit. Only when the template is perfect do I transfer that line to the laminate plank. Remember to use a fine-tooth blade on your jigsaw. If you use a coarse blade, you will chip the aluminum oxide wear layer on the surface of the laminate. Those chips look terrible and they expose the core to moisture. Use a down-stroke blade if you’re cutting from the top to keep the surface clean.
Chemical warfare against humidity
The secret to a long-lasting bathroom floor is the chemical bond of the perimeter sealant and the moisture resistance of the core material. Laminate is essentially a high-density fiberboard core with a photographic layer and a hard wear layer. When you cut that plank to fit around a toilet, you are exposing the raw HDF. That core is like a sponge. Even if the surface is waterproof, the edges are vulnerable. I always apply a bead of PVA glue or a dedicated joint sealant to the tongues and grooves of the planks that will be in the immediate vicinity of the toilet and the shower. This creates a secondary barrier against water. Then, when the floor is finished, I use a high-grade 100% silicone around the base of the toilet. Do not use grout. Grout is rigid. It will crack the moment someone sits on the toilet and the floor flexes. Silicone stays flexible.
| Material Property | Laminate HDF Core | Solid Hardwood Floors | Engineered Wood |
|---|---|---|---|
| Moisture Resistance | Moderate to High | Low | High |
| Acclimation Time | 48-72 Hours | 7-14 Days | 3-5 Days |
| Installation Type | Floating Click-Lock | Nail or Staple | Glue or Float |
| Expansion Gap Req. | 1/4 to 3/8 Inch | 3/4 Inch | 1/2 Inch |
The myth of the waterproof click
While many modern laminate brands are marketed as waterproof, this rating usually only applies to topical spills for a limited duration. It does not mean the floor can be submerged or that it is immune to subfloor moisture. The marketing departments at the big-box stores like to show pictures of dogs and spilled water, but they don’t show the underside of the plank after a year of being over a damp crawlspace. In a bathroom, the steam from showers is a constant threat. This is why acclimation is non-negotiable. I don’t care if the homeowner is in a hurry. Those boxes need to sit in the room where they will be installed for at least 48 hours. The planks need to reach equilibrium with the home’s humidity. If you take cold planks from a truck and install them immediately, they will grow on you, and that perfect cut around the toilet will be pushing against the porcelain by morning.
Tools that separate pros from amateurs
Professional flooring installation requires specialized tools such as a tapping block, a pull bar, and a heavy-duty contour gauge. You cannot just beat on the end of a plank with a hammer. You will ruin the locking profile. I use a professional-grade tapping block that is designed to distribute the force of the blow across the entire edge of the plank. When I’m working around the toilet, I often have to use a pull bar to snug the short ends of the planks together because there isn’t enough room to get a block in there. I also keep a set of spacers handy. You cannot trust your eyes to maintain a 1/4 inch gap. You need physical spacers that won’t compress. I’ve seen guys use scraps of laminate as spacers. That’s fine, but make sure they don’t slip out while you’re hammering on the other side of the room.
- Ensure the subfloor is flat within 1/8 inch over 6 feet.
- Perform a moisture test on concrete slabs using a calcium chloride kit.
- Acclimate the laminate for 72 hours in the room of installation.
- Use a 6-mil polyethylene vapor barrier over concrete.
- Trace a cardboard template of the toilet base before cutting.
- Maintain a 1/4 inch expansion gap at all walls and fixtures.
- Apply 100% silicone to all perimeter gaps in the bathroom.
The toilet flange trap
The height of the toilet flange must be adjusted to account for the thickness of the new laminate and underlayment to prevent leaks. This is where most DIY jobs fail. If you add 12mm of laminate and 3mm of underlayment, you’ve just raised the floor by over half an inch. Now your toilet flange is sitting too low. If you just put a double wax ring in there and hope for the best, it will eventually leak. And because it’s under the floor, you won’t know it’s leaking until the subfloor is rotten. I always use a flange extender. You want that flange to be sitting on top of the finished floor, or at least level with it. This ensures the wax ring compresses correctly and creates a true seal. This isn’t just flooring; it’s plumbing logic. If you ignore the flange height, you’re asking for a callback that will cost you three times what you made on the job.
“Expansion gaps are not optional. Every vertical obstruction requires a minimum 1/4 inch space to allow for seasonal movement.” – Laminate Flooring Standards Board
Template logic for the perfect radius
Creating a template involves tracing the footprint of the toilet onto a rigid material and transferring those coordinates to the laminate layout. I like to use a piece of heavy builder’s paper. I lay it down, tuck it against the toilet, and use a pencil to scribe the line. Then I cut the paper and test it. This allows me to see exactly where the planks will fall. I try to plan my layout so that a single seam doesn’t fall right in the middle of the toilet curve if I can help it. It’s much easier to cut a radius into the side of a full plank than to try to join two half-moons perfectly. When I transfer the line to the plank, I use a scribe or a compass set to the width of the expansion gap. This automatically gives me the 1/4 inch space I need while following the exact contour of the porcelain. It’s an old-school finish carpentry trick that works every time.
Why grout is a swear word in laminate
Using grout around a laminate floor is a recipe for failure because grout is brittle and cannot accommodate the movement of a floating floor. Some people want the look of tile and try to use grout between laminate planks or around the base of the toilet. Don’t do it. Laminate is designed to move. When you step on it, the underlayment compresses slightly and the floor shifts. Grout will crack and turn into dust within weeks. If you want a transition from showers to laminate, use a proper transition strip or a color-matched flexible caulk. For the toilet base, the silicone is your best friend. It seals the edge, hides the gap, and moves with the floor. If you’re worried about the look, there are plenty of sanded siliconized caulks that look like grout but behave like rubber. That is the only way to get the aesthetic without the structural failure.
The structural reality of the wax ring
A properly installed wax ring is the primary defense against water damage, and it must be replaced every time the toilet is moved for flooring. Never reuse a wax ring. Once it has been compressed, it’s done. I prefer the new rubberized flange seals because they are more forgiving if the toilet isn’t perfectly level, but a standard wax ring works if the flange height is correct. When you set the toilet back down on your new laminate floor, you have to be careful not to overtighten the bolts. You can crack the porcelain, or worse, you can pin the laminate floor so tightly that it can’t move. I always tighten the bolts just enough to stop the toilet from rocking, then I check it again after a week of use. The goal is to keep the toilet stable without killing the expansion potential of the floating floor system. It’s a delicate balance of physics and plumbing.