The Blue Tape Secret for Getting Perfectly Level Laminate Planks
Most guys skip the leveling compound. They think the underlayment will hide the dip. It won’t. I spent three days grinding concrete on a job last month just so the floor wouldn’t click like a castanet. My back was screaming and the dust was so thick it felt like I was breathing the slab. I have seen fifteen thousand dollar walnut floors turn into potato chips because the subfloor was neglected. Laminate is even worse because the locking mechanisms are fragile. If you walk across a floor and hear a hollow thud or a sharp click, it is a sign that the subfloor failed. The blue tape method is the only way to avoid this disaster. It turns an invisible problem into a visual map. I have spent twenty five years on my knees with a moisture meter and a level. I know that a floor is not a decoration. It is a structural engineering challenge. If you ignore the substrate, the finish material is irrelevant.
Subfloors are often the primary cause of floor failure because they hide structural inconsistencies
Subfloors are the foundation of every flooring installation. Whether you are dealing with concrete slabs, plywood, or OSB, the flatness tolerance is the most critical metric. Most laminate manufacturers require a floor to be flat within 3/16 of an inch over a 10 foot radius. If you ignore this, the locking joints will eventually snap. The physics of a click-lock floor rely on a consistent plane. When a plank spans a dip, it acts as a bridge. Every time you step on that bridge, the tongue and groove rub together. This friction creates heat and wear. Eventually, the thin wood fibers or plastic composites fatigue. The floor begins to separate. You see gaps. You hear squeaks. You blame the product, but the fault lies in the preparation. I have seen homeowners try to fix this by adding extra underlayment. That is a mistake. Too much cushion increases the vertical movement. It accelerates the failure of the joints. You need a rock solid base. That starts with a 10 foot straight edge and a roll of blue painter tape.
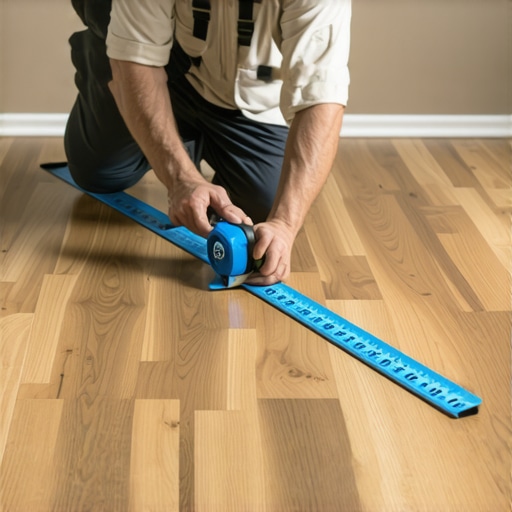
The mapping process reveals the hidden topography of your room
Blue tape mapping is a technique used to identify high spots and low spots on a substrate before laying laminate planks. By sliding a straight edge across the floor, an installer can mark exact locations where leveling compound or grinding is required. This visual guide ensures precision. I start in the far corner of the room. I lay my 10 foot aluminum straight edge down and look for daylight underneath. If I can slide a nickel under the bar, that spot is too low. If the bar rocks like a seesaw, I have found a high spot. I take a piece of blue tape and mark the center of the dip. I write the depth of the dip right on the tape. 1/8 inch. 1/4 inch. 3/16 inch. By the time I am done, the floor looks like it has blue measles. But I have a map. I know exactly where the floor is lying to me. This is the difference between a floor that lasts thirty years and one that fails in three. I do not trust my eyes. I trust the straight edge. Concrete is never flat. It is poured by guys who are in a hurry. Plywood is never flat. It swells at the seams. You must find these errors before the first plank is laid.
“A floor is only as good as the subfloor beneath it; deflection is the enemy of every joint.” – Master Flooring Axiom
The chemistry of leveling compounds and bond strength
Self leveling underlayment is a polymer modified cement designed to create a flat surface over uneven subfloors. These products use chemical resins to increase tensile strength and adhesion to the existing concrete or wood. You cannot just throw any cement into a hole. You need to understand the bond. I always use a primer. The primer penetrates the pores of the substrate and creates a bridge for the leveling compound. Without it, the dry concrete will suck the moisture out of the wet leveler too fast. This causes the leveler to shrink and crack. It will lose its bond and start to crunch under the floor. That sound is a nightmare. I mix my leveler with a high speed drill and a paddle. I follow the water ratio to the milliliter. If it is too thin, it is weak. If it is too thick, it won’t flow. I pour it into the blue tape circles I marked earlier. I use a featheredging tool to blend the edges into the surrounding floor. The goal is a transition so smooth you cannot feel it with your hand. This is where the structural zooming matters. The microscopic crystals in the cement are forming a lattice that must support the weight of your furniture and your family for decades.
Technical specifications for the perfect installation
Installation standards for laminate flooring involve strict acclimation periods, expansion gaps, and moisture testing. A calcium chloride test or an in-situ probe is necessary to measure the relative humidity of a concrete slab. If the moisture is too high, the floor will fail. Laminate is essentially a high density fiberboard core with a photo layer and a wear layer. The core is made of wood fibers and resins. These fibers are hygroscopic. They want to drink water. If they get damp, they swell. The edges of the planks will push against each other and lift up. We call this peaking. To prevent this, you must use a 6 mil polyethylene vapor barrier over concrete. You must also leave a 3/8 inch gap at every wall. I have seen floors buckle so hard they pushed the baseboards off the wall. The floor needs to breathe. It is a living thing. It expands and contracts with the seasons. If you lock it against a heavy kitchen island or a door jamb, it will find the weakest point and break.
| Material Type | Max Flatness Deviation | Acclimation Time | Ideal Humidity |
|---|---|---|---|
| Laminate HDF | 3/16 inch per 10 feet | 48 to 72 Hours | 35 to 55 percent |
| Solid Hardwood | 1/8 inch per 10 feet | 7 to 14 Days | 30 to 50 percent |
| Engineered Wood | 3/16 inch per 10 feet | 72 Hours | 35 to 55 percent |
| LVP Vinyl | 3/16 inch per 10 feet | 24 to 48 Hours | 25 to 60 percent |
The ghost in the expansion gap
Expansion gaps are the perimeter spaces required to allow flooring materials to move without structural binding. These gaps are hidden by baseboards or quarter round molding, but they are vital for floor longevity. I often see DIY installers push the planks tight against the drywall. They think it looks cleaner. They are wrong. When the humidity hits 60 percent in the summer, those planks will grow. They have nowhere to go. They will hump up in the middle of the room. It looks like a mole is burrowing under your house. I use spacers every 12 inches along the wall. I make sure that nothing is pinning the floor down. This includes transitions. You cannot screw a T-molding through the laminate into the subfloor. That creates a dead point. The floor must float. It is a single, massive sheet of material that moves as one unit. If you pin one corner, the tension will tear the joints apart in the opposite corner. This is the physics of a floating floor system. It is simple, yet most people ignore it because they want the floor to look like a solid piece of stone. It is not stone. It is wood fiber.
Essential checklist for a professional result
- Perform a moisture test on the subfloor using a pinless meter or a chemical kit.
- Check the flatness of the entire room using a 10 foot straight edge.
- Mark every deviation greater than 1/8 inch with blue painter tape.
- Grind down high spots using a diamond cup wheel and a vacuum shroud.
- Fill low spots with a high strength polymer modified self leveling compound.
- Allow the laminate to acclimate in the room for at least 48 hours before opening boxes.
- Install a 6 mil vapor barrier and high quality underlayment with a high IIC rating.
- Maintain a consistent 3/8 inch expansion gap around all vertical obstructions.
Moisture barriers and the invisible threat
Vapor barriers protect laminate flooring from hydrostatic pressure and capillary action occurring within concrete substrates. Even an old slab that feels dry can be emitting water vapor. This vapor travels upward and gets trapped under the underlayment. It creates a microclimate of high humidity. This is where mold starts. This is why your floor smells musty after a few years. I never install over concrete without a moisture barrier. I overlap the seams by 6 inches and tape them with waterproof tape. I want a sealed envelope. This is especially true in regions like the coastal South where the water table is high. The humidity in a place like Houston or New Orleans will destroy an unprotected floor in months. I also pay attention to the underlayment. People think the thickest foam is the best. It is not. A thick, squishy underlayment is the enemy of click-lock joints. You want a high density underlayment that provides sound dampening without allowing the planks to deflect downward. A 2mm or 3mm high density rubber or felt is superior to a 6mm cheap foam. The goal is support, not cushion.
“Deflection is the primary catalyst for mechanical failure in floating floor systems; rigidity of the substrate is non-negotiable.” – TCNA Flooring Guide
The truth about wear layers and mil thickness
Wear layers are the protective coatings applied to the top of laminate planks to resist abrasion and staining. The AC rating (Abrasion Class) determines where the floor can be installed. For a residential home, you want at least an AC3 rating. For a busy kitchen or a commercial space, AC4 or AC5 is required. This layer is usually made of aluminum oxide. It is incredibly hard. It will dull a carbide saw blade in a few dozen cuts. I always tell my clients to look at the mil thickness of the wear layer on LVP or the AC rating on laminate. Do not be fooled by a thick plank with a thin wear layer. A 12mm plank with an AC2 rating is garbage compared to an 8mm plank with an AC4 rating. The thickness of the plank provides some stability, but the surface is what takes the abuse. I have seen dogs with long nails shred a cheap floor in a weekend. I have seen cheap office chairs roll the finish right off a builder grade laminate. Buy the best wear layer you can afford. Your subfloor preparation ensures the floor stays together, but the wear layer ensures it stays looking new.