The expensive lesson of the cupping walnut planks
I once walked into a house where a $15,000 wide-plank walnut floor was cupping so bad it looked like a potato chip because the installer didn’t check the crawlspace humidity. The owner was devastated. The wood was a high-grade select walnut, beautiful and dark, but it was ruined by moisture. This taught me that the surface is only a small part of the story. When you look at a scratch or a scuff, you are looking at the final layer of a complex engineering system. Hardwood is a living, breathing material that reacts to every change in its environment. A scuff is a physical break in the sacrificial layer of the floor. This layer, whether it is polyurethane or an aluminum oxide finish, is designed to take the punishment of daily life. When that layer fails, you see a white mark. This is usually not the wood itself but the light reflecting off the jagged edges of the torn finish. Understanding this physics is the first step to a real fix. I have spent twenty-five years on my knees with a moisture meter and a level, and I can tell you that most people overthink the repair while underthinking the cause. We are going to fix that scuff for fifteen dollars, but we are also going to understand why it happened and how to keep the rest of the floor from following suit.
The molecular chemistry of polyurethane finishes
A polyurethane finish acts as a protective resin that bonds to wood fibers to create a durable wear layer. This layer is a chain of polymers that cross-link during the curing process to form a hard plastic shell. When a chair leg or a pebble drags across this surface, it creates a microscopic canyon. The reason the scratch looks white is because the smooth surface of the poly has been turned into a rough, uneven texture that scatters light. This is called light refraction. To fix it, you do not necessarily need to sand the floor. You need to fill that canyon with a material that has the same refractive index as the original finish. This is where the poly-pen comes in. It is a delivery system for a fast-drying, high-solids resin that flows into the scratch and levels out. It effectively wets the area and fills the void, allowing light to pass through clearly again. It is not magic. It is chemistry. You are essentially welding a small amount of new resin into the old finish. This works best on modern factory-finished floors where the coating is thin and hard. On older, site-finished floors with thick wax or oil, the pen might not bond as well. You have to know what you are working on before you start. Dust is your enemy here. Even a single grain of oak dust trapped in the resin will create a bump that you will feel every time you walk by.
“A floor is only as good as the subfloor beneath it; deflection is the enemy of every joint.” – Master Flooring Axiom
Identifying the depth of a surface abrasion
A surface abrasion is categorized by its depth into the finish layers and whether it has breached the stain layer. You can test this with a simple drop of water. If the water beads up, the finish is intact and you are dealing with a clear coat scuff. If the wood turns dark, the scratch has reached the raw wood. This distinction is vital. A poly-pen is a clear resin. It will not add color. If your scratch is white, the wood is likely fine. If the scratch is the color of a raw 2×4, you have a deeper problem. In that case, you need a stain marker before the poly-pen. Most homeowners jump straight to the stain, which makes the scratch look like a dark scar. Always start with the clearest, least invasive method. I see people ruin beautiful white oak floors by dumping dark walnut stain into a superficial scuff. It is a tragedy. You have to look at the floor at an angle with a flashlight. If you see a physical indentation but no color change, you are in the clear. The poly-pen will fill that dent and make it disappear. If the scratch is deep enough to catch your fingernail, you might need two coats. You apply the first, let it flash off for ten minutes, and then apply the second. It is a slow process of building the layer back up to level with the surrounding floor.
Why a poly pen works on some floors and fails on others
The success rate of a poly-pen repair depends heavily on the sheen level and the chemical composition of the existing floor finish. If you have a high-gloss floor, a satin pen will stick out like a sore thumb. Most modern floors are a matte or satin finish. The industry has moved away from the mirror-like gloss of the nineties because gloss shows every single footprint. A poly-pen is usually formulated as a universal satin. This is a safe bet for 80 percent of floors. However, if you are working on a wire-brushed or hand-scraped floor, the texture complicates things. The resin might pool in the low spots of the grain and create a shiny patch. In those cases, you have to be precise. You only want the resin in the scratch, not on the surrounding wood. I keep a clean microfiber rag in my pocket at all times. After I apply the pen, I lightly buff the edges. This feathers the new resin into the old, preventing a visible border. This is the difference between a DIY job and a professional repair. It is all in the transition. If the transition is hard, your eye will find it. If it is soft, the repair becomes invisible.
The technical comparison of repair tools
| Repair Tool | Janka Compatibility | Dry Time | Durability |
|---|---|---|---|
| Poly-Pen | High (Oak, Maple) | 15 Minutes | Moderate |
| Stain Marker | Universal | 5 Minutes | Low |
| Hard Wax Kit | High (Exotics) | 30 Minutes | High |
| Shellac Stick | Low (Pine) | 2 Minutes | Moderate |
As seen in the table, the poly-pen is the best middle ground for most common hardwoods like oak and maple. It offers a fast dry time and moderate durability. For heavy traffic zones like hallways or the area in front of a kitchen sink, you might think you need something tougher. But the poly-pen is surprisingly resilient. It handles the expansion and contraction of the wood better than hard wax, which can sometimes pop out if the floor moves too much. Wood is always moving. In the winter, the air is dry and the planks shrink. In the summer, they swell. This movement puts stress on any repair. A rigid repair will crack. A flexible repair, like the polymers in a high-quality pen, will move with the wood. This is why we avoid using wood filler for surface scuffs. Filler is for holes, not scratches. It is brittle and opaque. It looks like clay. You want something that remains translucent so the natural beauty of the wood grain can still be seen from beneath the repair layer.
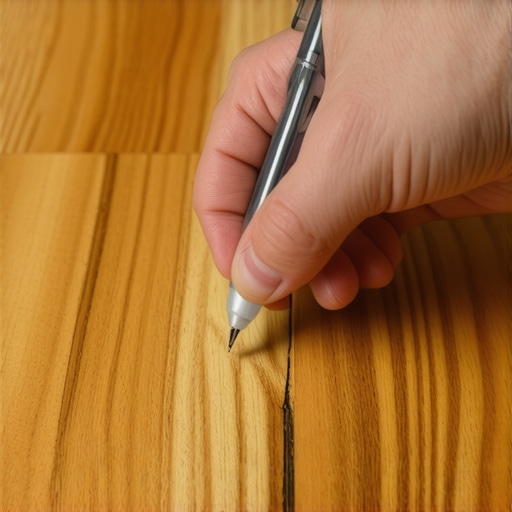
Steps for executing an invisible repair
- Clean the area with a pH-neutral cleaner to remove all wax and oils.
- Use a vacuum with a brush attachment to pull dust out of the scratch.
- Identify the sheen level of your floor to match the pen.
- Apply the pen in short, light strokes along the length of the scratch.
- Buff the edges immediately with a clean, lint-free cloth.
- Allow the resin to cure for at least twenty-four hours before heavy foot traffic.
- Inspect the repair under different lighting conditions.
The cleaning step is the one everyone skips. If you have been using those orange-scented oil soaps or wax-based cleaners, nothing will stick to your floor. Not even a professional-grade finish. You have to strip that residue off first. I use a mix of water and a tiny bit of denatured alcohol. It cuts the grease and evaporates quickly. Do not soak the wood. Water is the enemy of hardwood. It causes the cells to swell and can lead to grain raising. Just a damp wipe is enough. Once the area is surgically clean, the bond will be permanent. If you skip this, the poly-pen will just peel off in a week, and you will be back where you started. I have seen guys try to fix floors in houses where the owners used spray-on wax every week. It is a nightmare. The finish just slides right off. You have to be diligent about the prep work if you want a result that lasts years instead of days.
“Modern aluminum oxide finishes are harder than the wood they protect; repairing them requires precision rather than force.” – NWFA Technical Guide
The impact of ambient humidity on wood cell stability
The ambient humidity in a home directly affects the moisture content of hardwood planks and the stability of the applied finish. In regions like the Pacific Northwest, the constant dampness keeps wood cells expanded. If you perform a repair in the dead of winter when the heater is running and the air is dry, the scratch might look different come July. This is because the wood fibers around the scratch are physically larger in the summer. I always tell people to wait for a neutral day to do their repairs. If the house is too dry, the wood is at its most contracted. If you fill a scratch then, the repair might be squeezed out when the wood expands. In places like Phoenix, the dry heat is a constant battle. The wood shrinks so much that you get gaps between the boards. This is normal, but it puts a lot of tension on the finish. A scuff in a dry climate is more likely to turn into a flake. The finish becomes brittle. The poly-pen helps here too because it adds a bit of moisture-resistant resin back into the fracture, sealing the wood from further drying. It acts as a tiny moisture barrier for that specific damaged spot.
Why the subfloor dictates the lifespan of your finish
A stable subfloor prevents the excessive deflection that causes hardwood finishes to crack and scuff prematurely. If your floor squeaks or moves when you walk on it, your subfloor is the problem. No amount of $15 pens will fix a floor that is constantly flexing. That movement creates friction. Friction creates heat and mechanical stress. The finish is the first thing to go. It starts with small white lines at the edges of the boards, called side-bonding or white-line-fining. Then it turns into surface scuffs as the boards rub against each other or as furniture shifts slightly due to the dip in the floor. I spent three days grinding concrete on a job last month just so the floor wouldn’t click like a castanet. The homeowner thought I was crazy. They wanted to see the wood go down. But I knew that if that slab wasn’t flat to within an eighth of an inch over ten feet, the expensive engineered planks would fail within a year. The locking mechanisms would snap. The finish would crack. You have to think of your floor as a structural system. The poly-pen is for the accidents of life, like dropping a fork or sliding a chair. It is not a cure for poor installation. If you have deep, recurring scuffs in the same spot, check for a dip in the subfloor. You might be treating the symptom instead of the disease. A solid, flat foundation is the only way to ensure your hardwood remains a heirloom and not a headache. Keep your moisture levels consistent, keep your subfloor stiff, and use the poly-pen for the little things. That is how you maintain a professional grade floor for a lifetime.