I spent three days grinding concrete on a job last month just so the floor wouldn’t click like a castanet. Most guys skip the leveling compound. They think the underlayment will hide the dip. It won’t. I have spent twenty-five years on my knees with a moisture meter and a level. I have seen fifteen-thousand dollar hardwood floors ruined by an installer who did not understand subfloor deflection. When you talk about the secret to getting perfect miter cuts on your baseboards, you are not talking about a saw. You are talking about structural engineering. A miter is a diagnostic tool. If your miter is opening, your house is moving, your wood is breathing, or your subfloor is failing. I smell like WD-40 and oak dust because I respect the physics of the trade. If you want a floor that looks like a render, you have to treat it like a machine.
The structural reality of the ninety degree corner
A perfect miter cut relies on the precise angle of the corner intersection, which is rarely a true ninety degrees. You must use a protractor to measure the actual angle and divide it by two. Adjusting for wall crowning and floor deflection ensures the joint stays closed over time. Walls are almost never square. Between the build-up of drywall mud and the slight bowing of the studs, a corner is an approximation. If you set your saw to forty-five degrees and hope for the best, you are failing before you start. You have to measure the splay. A corner that is ninety-one degrees requires a cut of forty-five point five degrees. That half-degree is the difference between a clean line and a gap filled with caulk. Caulk is for painters. Woodwork is for craftsmen.
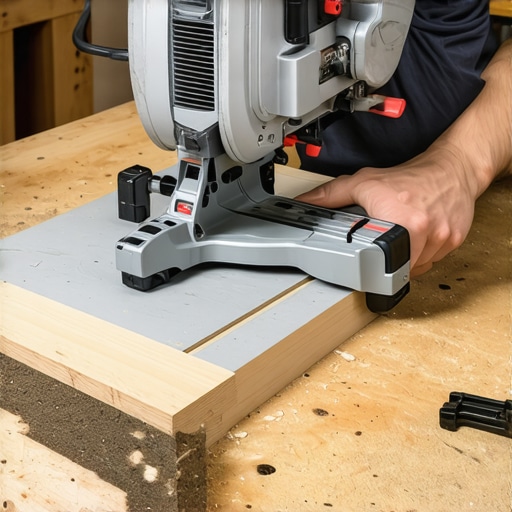
Mechanics of blade deflection and motor runout
The physics of the saw blade determines the accuracy of the miter joint during the cut. High tooth counts and slow feed rates reduce the lateral pressure on the blade, preventing it from wandering through the wood grain. Stable arbors and quality bearings are necessary to eliminate mechanical vibration and runout. When a ten-inch carbide blade spinning at four thousand revolutions per minute hits a piece of dense white oak, it wants to deflect. This is lateral movement. If you are using a thin-kerf blade, it will bend away from the resistance of the wood. This creates a cut that is not square in the vertical plane. You end up with a miter that touches at the top but is open at the bottom. I use eighty-tooth blades with a negative hook angle. This shears the wood fibers rather than tearing them. The vibration of a cheap motor will also ruin the finish. If the arbor has play, your cut will have a chatter. That chatter prevents the wood glue from creating a molecular bond. You want the surfaces so smooth they stick together with surface tension alone.
“A floor is only as good as the subfloor beneath it; deflection is the enemy of every joint.” – Master Flooring Axiom
The failure of the builder grade subfloor
Subfloor flatness directly impacts the alignment of baseboard miters at the floor level. Even a minor dip of one-eighth of an inch causes the baseboard to tilt, which throws the vertical miter out of alignment. Grinding high spots and filling low spots is the only way to ensure trim stability. If your hardwood floors or laminate are resting on a subfloor that looks like a topographical map of the Ozarks, your baseboards will never be right. When you nail the trim into the wall, it follows the floor. If the floor drops, the bottom of the miter pulls away. This is why I spend so much time with a straightedge. You cannot hide a bad subfloor with shoe molding. That is a lazy man’s fix. For laminate floors, the problem is even worse because the floor is floating. It moves underfoot. If the baseboard is pinned too tight, the floor cannot expand. If it is too loose, you see a gap. The trim must be an independent structure that barely kisses the floor surface.
Moisture cycles and joint failure
Wood is a hygroscopic material that expands and contracts based on the relative humidity of the environment. Baseboards cut and installed at high moisture levels will shrink as they dry, causing miter joints to open at the outside point. Proper acclimation to the local climate is mandatory for stability. In the swampy humidity of Houston, solid wood is a liability. You have to account for the fact that those boards are swollen with water. When the air conditioner kicks on in the summer and dries out the house, the wood cells collapse. The width of the board shrinks. In a miter, this shrinkage is magnified. This is why I prefer the coping method for inside corners. Coping allows one board to slide behind the other. It handles the movement. For outside miters, you have to use a chemical bond. I don’t just nail them. I glue them with a two-part cyanoacrylate adhesive. It turns two pieces of wood into one solid unit of cellulose.
Managing moisture near showers and wet areas
Wet areas require specialized trim installation techniques to prevent water wicking and rot. Using a bead of high-quality silicone between the bottom of the baseboard and the tile floor prevents moisture from reaching the subfloor. Grout should never be used as a substitute for a flexible sealant in these transitions. When I am working near showers, I am thinking about the vapor drive. If you have tile floors, you likely have grout. Grout is porous. It absorbs water. If your baseboard sits directly in a pool of water on top of the grout, it will act like a straw. It sucks the water up into the wood. This causes the miter to rot from the inside out. I always leave a sixteenth-inch gap and fill it with a color-matched sealant. This creates a waterproof barrier. It also allows the different materials to expand at different rates. The thermal expansion coefficient of ceramic tile is nothing like that of a pine baseboard. If you don’t give them room to move, they will break each other.
The chemistry of the bond
Modern adhesives create a bond that is stronger than the wood fibers themselves by penetrating the cellular structure of the material. Cross-linking polyvinyl acetate glues offer superior water resistance and shear strength for miter joints. Mechanical fasteners serve only to hold the joint in place while the chemical weld cures. I don’t trust nails to hold a miter. Nails pull out. Wood glue is the real hero. When you apply PVA glue, the water in the glue carries the polymers into the wood fibers. As the water evaporates, the polymers link together. This creates a bridge between the two boards. I use spring clamps to apply even pressure. Too much pressure squeezes all the glue out, leaving a starved joint. Too little pressure and the polymers can’t bridge the gap. It is a balance of chemistry and force. I also back-cut my miters by one degree. This ensures the front face makes contact first, hiding the joint perfectly even if the back of the board is slightly off.
| Material Type | Expansion Rate | Janka Hardness | Best Cutting Method |
|---|---|---|---|
| Solid Oak | High | 1290 | Miter with Back-cut |
| MDF Trim | Low | N/A | Coped Inside Corners |
| Finger-Jointed Pine | Medium | 380 | Glued and Nailed |
| PVC Composite | Very Low | N/A | Stainless Fasteners |
Laminate floors and the floating trim problem
Laminate floors require a significant expansion gap at the perimeter to prevent buckling during humidity spikes. The baseboard must cover this gap without exerting downward pressure on the flooring planks. Over-tightening the trim can lock the floor in place, leading to joint separation in the center of the room. Most people want the thickest underlayment they can find for their laminate. They think it feels better. The reality is that too much cushion causes the locking mechanisms to snap under pressure. When you install baseboards over a floating floor, you are essentially creating a lid. If that lid is too tight, the floor can’t breathe. I have seen floors tent up six inches off the subfloor because the installer nailed the baseboards through the laminate. You have to nail into the studs, not the floor. The trim should be a fraction of a millimeter above the floor. If you can slide a piece of paper under it, it is perfect.
Regional climate impacts on miter stability
Local environmental conditions determine the long-term success of any flooring installation. In arid regions like Phoenix, wood will reach an equilibrium moisture content of five percent, while coastal areas may stay at twelve percent. Failure to calibrate installation techniques to these specific zones results in structural failure. If you are in the desert, your baseboards will shrink until they show a gap large enough to hide a coin. You have to install them bone-dry. If you are in the Pacific Northwest, you have to worry about the wood expanding and pushing the miters apart. I always check the moisture content of the trim before it goes on the wall. If the wood is at ten percent and the house is at six percent, I wait. Acclimation is not a suggestion. It is a law of nature. I have seen guys rush a job and three months later the miters look like open mouths. You cannot fight the environment. You can only prepare for it.
- Measure every corner with a digital protractor.
- Use a high-quality eighty-tooth carbide blade.
- Apply PVA glue to every miter joint.
- Acclimate all trim for at least seventy-two hours.
- Back-cut miters by one degree for a tighter face fit.
- Avoid nailing within two inches of the miter point to prevent splitting.
“Precision is not an act; it is a habit of respecting the material’s limits.” – Master Flooring Axiom
The physics of the expansion gap
The expansion gap is the most misunderstood component of a floor system. It is a structural necessity that allows for the kinetic movement of the floor mass across the subfloor. Properly sized gaps at the perimeter are hidden by the baseboard but must remain unobstructed. I once walked into a house where a fifteen-thousand dollar wide-plank walnut floor was cupping so bad it looked like a potato chip because the installer didn’t check the crawlspace humidity. The wood had expanded so much it hit the walls. With nowhere to go, it went up. The miter cuts on the baseboards were pushed off the walls. This is why the gap matters. For hardwood floors, you need at least three-quarters of an inch. For laminate, a half-inch is usually enough. But that gap must be empty. If you drop a screw or a piece of debris in there, it becomes a fulcrum. The floor will pivot on that point and break the tongue-and-groove joint. I clean my gaps with a vacuum before the trim goes down. It is about the details no one sees.
Final calibration of the miter joint
Getting the perfect cut is about the marriage of geometry and patience. You have to understand that the house is a living thing. It breathes, it settles, and it reacts to the sun. Your baseboards are the frame for the floor’s performance. When I finish a job, I want to see a line so clean it looks like it was grown there. No gaps, no caulk, and no movement. If you follow the physics, use the right chemistry, and respect the subfloor, you will get a result that lasts a century. This isn’t just DIY. This is building something that stands the test of time. Keep your blades sharp and your moisture meter calibrated. That is the only secret there is. The rest is just hard work and sawdust under your nails.