I spent three days grinding concrete on a job last month just so the floor wouldn’t click like a castanet. Most guys skip the leveling compound. They think the underlayment or a bit of extra thinset will hide the dip. It won’t. I have seen fifteen thousand dollar projects ruined because an installer was too lazy to run a straightedge across the slab. My knees still ache from that grind, but when I laid the first tile, I knew it was dead flat. This is the reality of professional flooring. It is not about the pretty patterns or the color of the stone. It is about the structural integrity of the substrate. If your subfloor is garbage, your finish is garbage. I smell like WD-40 and oak dust most days, and I have learned that the only way to avoid a callback is to be a perfectionist about the things the homeowner will never see. Flooring is a performance surface. It has to withstand the physics of expansion, the chemistry of moisture, and the relentless pressure of foot traffic.
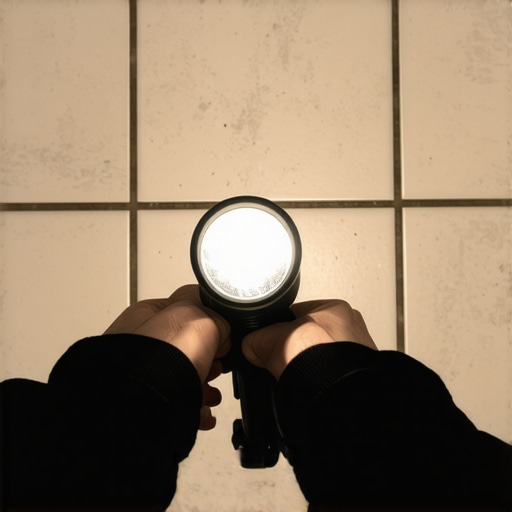
The shadow that exposes every installation failure
The flashlight test identifies tile lippage by placing a high-power LED light source flat against the floor to cast long shadows over any uneven edges. This method reveals vertical displacement between tiles that is invisible under normal overhead lighting, allowing for corrections before the thinset mortar achieves its final set. When you lay a tile, you are fighting gravity and the tension of the mortar. As the water evaporates from the thinset, the tile can settle or ‘slump.’ By the time you come back the next day, that tile is locked in place. If one corner is 1/32 of an inch higher than its neighbor, you have a trip hazard and a visual disaster. I use a high-lumen tactical light for this. I place it on the floor and slide it across the surface. If I see a shadow, I know the tile is not flat. This is especially vital for large format tiles where the manufacturing process often leaves a slight ‘bow’ or crown in the center of the plank. Without the flashlight, you are flying blind until the grout goes in, and by then, it is too late.
“A floor is only as good as the subfloor beneath it; deflection is the enemy of every joint.” – Master Flooring Axiom
The physics of the flat substrate
Subfloor flatness is measured by the maximum allowable deviation over a specific distance, typically one eighth of an inch over ten feet for large format tile. This standard prevents structural stress on the tile locking mechanisms and ensures that thinset mortar provides a consistent bond without voids. You have to understand the chemistry of the concrete slab. A slab might look dry, but it is a porous sponge. If the moisture vapor transmission rate is too high, it will pop your tiles right off the floor. I never start a job without a calcium chloride test or a pinless moisture meter. If the slab is hitting six pounds per one thousand square feet over twenty-four hours, you need a moisture mitigation barrier. We are talking about the molecular level here. The calcium silicate hydrate gel in the concrete needs to be stable. If you ignore the flatness, you end up with ‘hollow spots.’ A hollow spot is an air pocket where the mortar did not transfer. When a heavy person walks over that spot, the tile flexes. Since tile is a rigid ceramic or porcelain, it does not like to flex. It cracks. Then the homeowner blames the tile, but it was really the installer who did not grind the high spots or fill the birdbaths in the slab.
| Material Type | Flatness Tolerance (10ft) | Acclimation Time | Expansion Gap Requirement |
|---|---|---|---|
| Large Format Tile | 1/8 inch | None | 1/4 inch per perimeter |
| Solid Hardwood | 3/16 inch | 7 to 14 days | 3/4 inch per perimeter |
| LVP (Vinyl Plank) | 3/16 inch | 48 hours | 1/4 to 3/8 inch |
| Laminate Flooring | 1/8 inch | 48 hours | 3/8 inch |
Why your thinset cannot fix a bad floor
Thinset mortar is a bonding agent designed to adhere tile to a substrate, not a leveling product intended to fill large voids or compensate for a wavy subfloor. Over-applying thinset leads to shrinkage during the curing process, which pulls tiles downward and creates uneven lippage across the floor surface. I have seen guys try to ‘butter’ a tile an inch thick to make up for a low spot. That is a crime against engineering. Thinset is full of polymers, specifically ethylene-vinyl acetate copolymers, which give it flexibility and grip. But those polymers also shrink as they cure. If you have a thick bed of mortar in one area and a thin bed in another, they will shrink at different rates. This ‘differential shrinkage’ is what causes your floor to look like a mountain range after twenty-four hours. You must use a self-leveling underlayment or a mud bed to get the floor flat first. I treat the thinset as a chemical bridge, not a filler. If you want a floor that lasts fifty years, you respect the limits of the chemistry. This applies to showers too. If your shower pan is not sloped perfectly toward the drain, you will have standing water that eventually eats through the grout and causes mold growth behind the tile.
The chemical bond inside the shower pan
Shower installations require a waterproof membrane that prevents moisture from reaching the framing while allowing the tile to bond securely to the surface. Modern systems use bonded membranes like polyethylene sheets or liquid-applied barriers that create a monolithic seal against water penetration and vapor transmission. Most people think the tile and grout are waterproof. They are not. Grout is porous. Water goes through it like a sieve. The real work is happening underneath. I prefer a bonded waterproofing system. I want the water to stop exactly at the back of the tile. In the old days, we used ‘hot mop’ or lead pans, which let the entire mud bed get saturated with water. That is how you get that musty smell in old bathrooms. Now, we use liquid membranes that cure into a rubbery skin. It is all about the mil thickness. If you do not apply it thick enough, the water will find a pinhole and rot your subfloor. When I am doing a shower, I check the millage with a gauge. It is the difference between a dry house and a structural failure. If you are installing hardwood floors in a room adjacent to a shower, you better make sure that threshold is sealed tight, or the wood will soak up that humidity and expand until it buckles.
“For tiles with at least one edge 15 inches or longer, the subfloor must be flat within 1/8 inch in 10 feet.” – Tile Council of North America
Hardwood floors and the moisture trap
Hardwood floors are hygroscopic materials that expand and contract based on the relative humidity of their environment, necessitating strict acclimation periods and moisture testing of the subfloor. Failure to manage the moisture levels results in cupping, where the edges of the planks rise higher than the center due to excessive subfloor dampness. I once walked into a house where a fifteen thousand dollar wide-plank walnut floor was cupping so bad it looked like a potato chip because the installer didn’t check the crawlspace humidity. It was a tragedy. Solid wood is a living thing. It breathes. If you pin it down to a wet slab, it will fight back. You need to know the Janka hardness of your wood, sure, but you also need to know the equilibrium moisture content. In a place with high humidity, you cannot use wide planks without expecting gaps in the winter. You have to explain to the homeowner that wood is not plastic. It has cell walls that hold water. If the air gets dry, the water leaves the cells and the wood shrinks. That is why expansion gaps at the perimeter are not optional. You hide them under the baseboard, but if you tight-fit a wood floor against a wall, it will eventually push the wall out or buckle in the middle of the room.
The 1/8 inch rule for laminate success
Laminate and luxury vinyl plank floors require a flat substrate to prevent the click-lock joints from snapping under the weight of foot traffic. While these floors are marketed as easy to install, they are highly sensitive to subfloor ‘dips’ that cause the boards to flex and eventually fail at the tongue-and-groove connection. People buy waterproof LVP and think they can do whatever they want. They lock it under a heavy kitchen island and then wonder why the seams are opening up in the hallway. You killed the floor’s ability to breathe. These are floating floors. They need to move as a single unit. If you pin one side down with a three hundred pound cabinet, the floor cannot expand toward that wall. It will find the weakest point and pop. Also, people buy the thickest underlayment they can find, thinking it will be softer. Too much cushion is a death sentence for click-lock floors. It creates a trampoline effect. Every time you step, the joint flexes. Eventually, the plastic locking mechanism shears off. Then you have a ‘bouncing’ floor that cannot be fixed without tearing the whole thing up. Stick to the high-density underlayments that are only two or three millimeters thick. They provide plenty of sound dampening without sacrificing the joint’s life.
- Check subfloor flatness with a 10-foot straightedge before starting.
- Perform a moisture test on concrete slabs regardless of the floor type.
- Use a high-lumen flashlight to check for lippage after every few rows of tile.
- Verify that the expansion gap at the perimeter is at least 1/4 inch for LVP and 3/4 inch for wood.
- Clean out all debris from the thinset joints before they harden to ensure even grouting.
- Never install heavy permanent fixtures like islands on top of a floating floor.
The final verdict on the flashlight test
The flashlight test is the final gatekeeper of quality. It is a simple tool that requires zero high-tech sensors, but it provides more information than a laser level ever could. If you can pass the flashlight test at 2:00 AM after a twelve-hour shift, you are a master of your craft. Flooring is not a cosmetic choice. It is a structural engineering challenge that starts with the chemistry of the slab and ends with the physics of the joint. Do not let the beauty of the material blind you to the necessity of the preparation. Grind the high spots, fill the low spots, and always, always check your shadows. Your knees will hurt, and you will smell like dust, but your floors will stand the test of time. There is no shortcut to a flat floor. There is only the work, the light, and the truth of the straightedge. Follow the TCNA and NWFA standards like they are law, because in the world of professional installation, they are.