
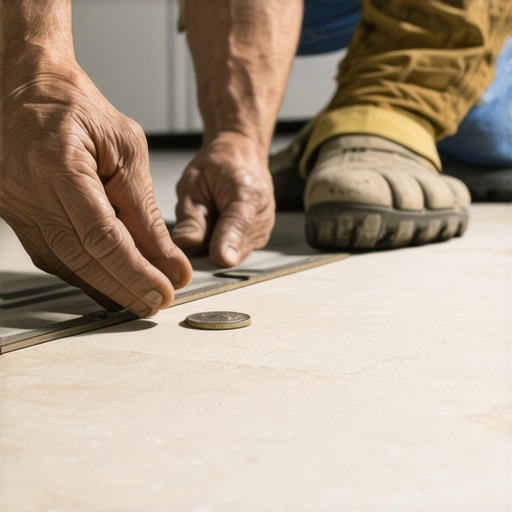
Why your subfloor is lying to you
To check subfloor levelness with a nickel, place a five-cent piece under a ten-foot straightedge to verify that no dip or crown exceeds 3/16 inch across its length. This mechanical measurement ensures your laminate flooring locking joints do not rub, squeak, or snap under daily foot traffic. If the nickel slides under the straightedge, the subfloor needs grinding or self-leveling compound.
I spent three days grinding concrete on a job last month just so the floor wouldn’t click like a castanet. The homeowner had bought a premium twelve-millimeter laminate with an attached pad. They figured the heavy planks and the foam backer would swallow the dips. They were wrong. Concrete does not yield. When you walk over a hollow spot in a subfloor, the locking mechanism undergoes extreme vertical deflection. It bends. It rubs. Eventually, the thin tongue of the fiberboard core shears off. Once that tongue snaps, the seam opens up, water gets in from a damp mop, and the entire floor is ruined. You can buy the most expensive Swiss-engineered laminate on the market, but if you lay it over a roller coaster of a subfloor, it will fail.
A subfloor that looks flat to the naked eye is often a landscape of micro-valleys and ridges. Light coming through a low window highlights these imperfections only after the shiny laminate is installed. By then, the trim is nailed down, the transition strips are glued, and the furniture is back in place. You have to pull up every board to fix the mistake. Checking levelness is not an optional prep step. It is the core structural foundation of the entire installation process.
“A floor is only as good as the subfloor beneath it; deflection is the enemy of every joint.” – Master Flooring Axiom
The eighth inch that ruins everything
An out of spec subfloor causes click-lock laminate joints to flex, fatigue, and break because the engineered tongue cannot handle vertical movement. Most manufacturers specify that a subfloor must be flat within 3/16 inch over a ten-foot radius or 1/8 inch over a six-foot radius. Exceeding this tolerance voids your product warranty instantly.
When you step on a laminate plank that spans a depression, your body weight forces the plank down. This movement exerts severe leverage on the locking joint. Laminate flooring is made of High-Density Fiberboard, which consists of compressed wood fibers and synthetic resins. While HDF is incredibly dense and resistant to direct impacts, its shear strength along the machined locking profiles is relatively low. The thin, interlocking profile is only a few millimeters thick. Constant vertical deflection fatigues this joint. Over a few weeks, the friction between the tongue and groove creates an annoying ticking sound. Over a few months, the joint separates entirely. This creates a small gap where dirt, pet dander, and moisture accumulate.
Underlayments do not fix this. Many homeowners buy thick, squishy underlayment pads thinking they will cushion the floor and fill the gaps. This is a critical error. While most people want the thickest underlayment, too much cushion actually causes the locking mechanisms on laminate to snap under pressure. A soft pad allows the floor to plunge even deeper into the subfloor dips, accelerating joint failure. You want a dense, high-compression underlayment that limits vertical movement to a minimum.
The anatomy of the nickel test
The nickel test works because a standard United States five-cent coin measures exactly 1.95 millimeters in thickness, which is approximately 1/12 of an inch. By stacking two nickels, you create a physical gauge measuring 3.9 millimeters, or roughly 5/32 of an inch, which sits just under the maximum allowable 3/16 inch deflection limit.
To perform this test, you need a high-quality ten-foot metal straightedge. Do not use a cheap wood stud from the home center. Wood warps, cups, and twists with changes in relative humidity. An anodized aluminum straightedge or a heavy brass level is mandatory. Lay the straightedge flat across the subfloor in a spoke pattern, rotating it thirty degrees around a central point. Slide your stacked nickels under the straightedge at various intervals. If the stacked nickels can pass freely under the metal edge at any point, the dip in the subfloor is too deep. The area must be filled with a high-compressive-strength cementitious leveler.
Conversely, if you find high spots where the straightedge rocks back and forth like a seesaw, those peaks must be removed. On wood subfloors, this means using a heavy-duty floor sander equipped with sixteen-grit paper or a hand planer to shave down the high joists. On concrete subfloors, you must use a concrete shroud grinder equipped with a diamond cup wheel. This process is dusty, loud, and physically demanding, but it is the only way to ensure a flat substrate. The nickel does not lie. It is an objective physical constant that eliminates guesswork.
| Subfloor Parameter | Acceptable Tolerance | Testing Tool | Corrective Action |
|---|---|---|---|
| Plywood Subfloor | 3/16 inch per 10 feet | 10-foot Straightedge & Nickels | Sanding peaks, filling valleys with wood-patch |
| Concrete Slab | 1/8 inch per 6 feet | 10-foot Straightedge & Nickels | Diamond grinding peaks, self-leveling underlayment |
| Laminate Joint Play | Zero vertical movement | Physical hand pressure | Subfloor remediation prior to laying planks |
| Underlayment Density | High-compression foam/cork | Durometer gauge | Avoid soft, thick foam sheets over 3mm |
The chemistry of subfloor prep
Preparing a subfloor for laminate requires chemical compatibility between the patching compounds, the subfloor material, and the moisture barriers. You cannot simply throw any cheap plaster or concrete patch over a wood subfloor because wood moves with humidity changes while cement-based patches are rigid.
If you are working on a plywood or OSB subfloor, you must use a polymer-modified, latex-based patching compound. These formulas retain a microscopic degree of flexibility. When the wood subfloor expands and contracts with seasonal relative humidity, the modified patch yields slightly rather than cracking and crumbling into a powder beneath your laminate. Before applying the patch, ensure the wood subfloor is securely fastened to the joists. Screw down any squeaking sheets using three-inch deck screws spaced every six inches along the joists. Squeaks are wood-on-wood or wood-on-nail friction. If the subfloor is moving enough to squeak, it will easily crack your patching compound.
On concrete slabs, moisture is the ultimate enemy. A concrete slab may feel dry to the touch, but it acts like a giant sponge drawing moisture from the earth below. You must test the concrete using a calcium chloride test or a relative humidity probe inserted into the slab. If the emission rate exceeds three pounds per one thousand square feet over twenty-four hours, you must apply a high-quality polyurethane moisture barrier before pouring self-leveling underlayment. When pouring self-leveler, always use the manufacturer’s recommended primer. Skipping the primer causes the dry concrete slab to suck water out of the wet leveler too quickly. This ruins the hydration process, leaving you with a weak, dusty surface that will crack under the pressure of foot traffic.
“Ensure subfloor flatness tolerances of 3/16 inch in 10 feet are met before laying laminate; failure to do so voids manufacturer warranties.” – NWFA Installation Guidelines
A checklist for subfloor evaluation
This comprehensive checklist must be completed before a single carton of laminate flooring is opened or acclimated in the room. Skipping even one of these steps can result in a structural failure of your floor within the first year of installation.
- Inspect the subfloor for visible dips, crowns, or waves using a ten-foot straightedge.
- Perform the nickel test at three-foot intervals across the entire room, noting any areas where the coin slides under the level.
- Check the moisture content of the wood subfloor using a pin-type moisture meter, ensuring it reads under twelve percent.
- Measure concrete slab relative humidity to confirm it falls within the manufacturer’s safe parameters.
- Drive three-inch screws into every subfloor joist to eliminate squeaks and secure loose panels.
- Grind down concrete high spots with a diamond cup wheel, utilizing a vacuum shroud to control dust.
- Apply latex-modified patching compound to low spots on wood subfloors and let it cure fully.
- Clean the entire subfloor with a heavy-duty shop vacuum to remove all drywall dust, plaster, and grit.
The ghost in the expansion gap
Laminate flooring is a floating floor system that expands and contracts with temperature and humidity, requiring a minimum 3/8 inch gap at all vertical walls. If you pin the floor against a wall, a door jamb, or a heavy kitchen island, the expansion force will cause the planks to buckle upward.
I have seen beautiful installations completely ruined because the installer forgot to leave a gap at the drywall line. The floor looked perfect in November. When the humid summer months arrived, the wood fibers absorbed ambient moisture and expanded. With nowhere to go, the floor lifted off the subfloor in the center of the room, creating a bouncy, hollow-sounding dome. This is why you must never install heavy cabinetry on top of a floating floor. The weight of heavy kitchen cabinets locks the laminate in place, preventing natural movement. Always install your cabinets first, then run the floating floor up to the legs, covering the gap with a toe kick or base shoe molding.
This environmental reality is why proper acclimation is required. Leave your laminate cartons unopened in the installation space for at least forty-eight hours. This allows the core material to reach equilibrium moisture content with the home’s heating and cooling system. If you skip acclimation and install the floor straight from a cold delivery truck, the planks will warp as they adjust to the warm indoor air, regardless of how level your subfloor is. Treat your floor like a living structural element and it will perform perfectly for decades.