
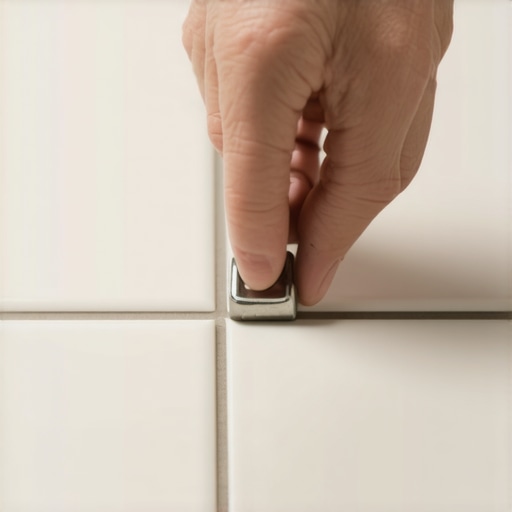
Most guys skip the leveling compound. They think the underlayment will hide the dip. It won’t. I spent three days grinding concrete on a job last month just so the floor wouldn’t click like a castanet. That job was a wake up call for the homeowner who thought he could just slap some luxury vinyl over a wavy slab. Floors are not just something you walk on. They are the final layer of a complex structural assembly that starts at the foundation and ends at your socks. If the skeleton is weak, the skin will fail. I have seen fifteen thousand dollar wide-plank walnut floors cupping because someone forgot a twenty dollar roll of poly film or failed to locate the joists correctly. When you are dealing with tile, the stakes are even higher. You cannot just guess where the wood is. You need a method that ignores the noise of the mortar and the density of the ceramic.
The myth of the electronic stud finder
Electronic stud finders use capacitive sensing to detect changes in density behind a wall or floor surface. These tools struggle with tile because the density of the grout, the cement board, and the porcelain itself creates too much interference for a standard consumer grade sensor to penetrate accurately. You end up with false positives or a complete lack of signal. This is why the magnet trick is the only reliable way to map out a subfloor through a finished surface. You are not looking for the wood. You are looking for the steel. Every subfloor is fastened to the joists with either screws or nails. A neodymium magnet will find those fasteners every single time. It is a binary reality. The magnet either sticks or it does not. There is no guessing. There is no calibration error. There is only the physical attraction between the rare earth metal and the carbon steel fastener buried beneath two inches of construction material.
“A floor is only as good as the subfloor beneath it; deflection is the enemy of every joint.” – Master Flooring Axiom
The molecular pull of neodymium
Neodymium magnets are made from an alloy of neodymium, iron, and boron. They create a magnetic field so intense that they can detect a fastener through a sandwich of three quarter inch subflooring and a half inch of tile and mortar. When you slide one of these magnets across a tiled floor, you are feeling for a specific mechanical tug. It is a subtle snap. That snap tells you exactly where a screw was driven into the center of a joist. I usually use a one inch disc magnet with a pull force of at least 50 pounds. I wrap it in a thin layer of electrical tape to prevent it from scratching the grout or the tile surface. You move it in a slow, deliberate grid pattern. Once it grabs, you mark that spot. Do it five more times and you have a straight line. That line is your joist. It is the only way to ensure your new hardwood floors or heavy transitions are anchored into something that can actually hold a load.
The physical geometry of the joist system
Standard residential floor joists are typically spaced sixteen inches or twenty four inches on center. Knowing this geometry allows you to predict where the next fastener should be once the magnet finds the first one. If you find a screw and then find another one sixteen inches away, you have confirmed the structural layout of the room. This is vital when you are installing heavy glass shower doors or planning a kitchen island. You need to know where the meat of the wood is. In the Northeast, where the humidity swings from ten percent in the winter to ninety percent in the summer, those joists are constantly moving. They are breathing. If you anchor into just the subfloor and miss the joist, the seasonal movement will eventually back that fastener out. That is how you get squeaks. That is how you get cracked grout lines in your showers. It is a failure of engineering, not a failure of the material.
| Material Type | Density (lb/ft3) | Magnet Reliability | Detection Difficulty |
|---|---|---|---|
| Porcelain Tile | 145-155 | High | Moderate |
| Cement Board | 75-90 | High | Low |
| Oak Hardwood | 40-50 | Very High | Very Low |
| Laminate Core | 50-60 | High | Low |
| Mortar Bed | 120-130 | High | High |
Why your grout lines hide the truth
Grout is a mixture of water, cement, and sand that fills the voids between tiles. While it seems solid, it provides zero structural support for the floor assembly and can actually mask the locations of subfloor fasteners. When you are scanning a floor, the grout lines can sometimes trap a magnet or cause it to jump. You have to be careful to distinguish between a magnet catching on a metal corner bead or a piece of wire lath and the solid, centered pull of a joist screw. I have seen guys try to use the grout lines as a guide, assuming they follow the joists. They almost never do. Layout is usually determined by the aesthetics of the room entry, not the structural grid below. If you trust the tile layout to tell you where the joists are, you are going to end up with a drill bit full of nothing but air and disappointment.
“Deflection shall not exceed L/360 for ceramic tile or L/720 for natural stone installations under total design load.” – TCNA Handbook Standards
Measuring deflection in the shower pan
Deflection is the amount a floor bends under a load. In showers, excessive deflection leads to waterproof membrane failure and catastrophic leaks into the floor system. Using the magnet trick here is about more than just finding a stud. It is about verifying that the joist spacing is tight enough to support the weight of a mud bed and a human being. If I find that the joists are twenty four inches on center in a bathroom, I know I have a problem. That floor is going to bounce. I will often use the magnet to map the joists and then sister in new lumber from below if I can access the crawlspace. You want that floor to be as rigid as a tombstone. Any flex at all will shear the bond between the tile and the thin-set. Once that bond is gone, water finds its way into the subfloor, and then you are looking at a full scale tear out due to rot.
The master installer checklist for structural stability
- Check moisture content of the subfloor using a pin-type meter.
- Verify joist spacing is sixteen inches on center or less for tile.
- Use neodymium magnets to locate all fasteners in the work area.
- Mark joist centers with a chalk line for heavy installations.
- Inspect the perimeter for proper expansion gaps of at least one quarter inch.
- Ensure the thin-set coverage is at least ninety five percent in wet areas.
- Check for subfloor thickness to ensure it meets minimum code for the span.
Hardwood floors and the fastener map
When installing hardwood floors over an existing subfloor, you must ensure your cleats or staples are hitting the joists at regular intervals to prevent the boards from cupping. A magnet is the best friend of a hardwood installer. If I am laying down three quarter inch white oak, I want to know exactly where the joists are so I can stagger my seams and nail patterns accordingly. Laminate floors are a bit more forgiving because they float, but even they require a flat surface. If the joists are sagging, the laminate will separate at the click-lock joints. You will see a gap, and once a gap appears, moisture gets in. The core of that laminate is basically compressed sawdust and glue. It will swell up like a sponge the moment it touches water. All because someone didn’t take five minutes to check the joist levels before they started clicking planks together.
The density of laminate versus porcelain
Laminate flooring consists of high-density fiberboard (HDF) while porcelain is a kiln-fired ceramic with a very low absorption rate. The magnet trick works differently through these materials due to their varying thicknesses. With laminate, you can use a smaller magnet because the material is less dense and usually thinner. With porcelain, you are often fighting through the tile itself plus a layer of polymer-modified thin-set. The chemistry of that thin-set is important. Modern thin-sets contain latex and other polymers that increase the bond strength but also add to the overall thickness of the assembly. The further the magnet is from the screw head, the weaker the pull. This is why you must use the strongest rare earth magnet you can find. It has to punch through that entire chemical and mineral sandwich to find the steel fastener below.
The structural cost of missing the mark
If you miss the joist when anchoring a heavy load, you are relying entirely on the pull-out strength of the subfloor material. Plywood and OSB have very little vertical holding power for a screw. Over time, vibration and foot traffic will cause the fastener to wallow out the hole. This is how kitchen islands start to wobble and how heavy glass shower doors eventually sag and shatter. The magnet trick is not just a shortcut. It is a professional standard for anyone who actually gives a damn about the longevity of their work. Don’t be the guy who guesses. Don’t be the guy who trusts a cheap electronic sensor. Get a magnet, find the steel, and build something that is actually going to last longer than the mortgage. Floors are meant to be permanent. Treat them that way.