
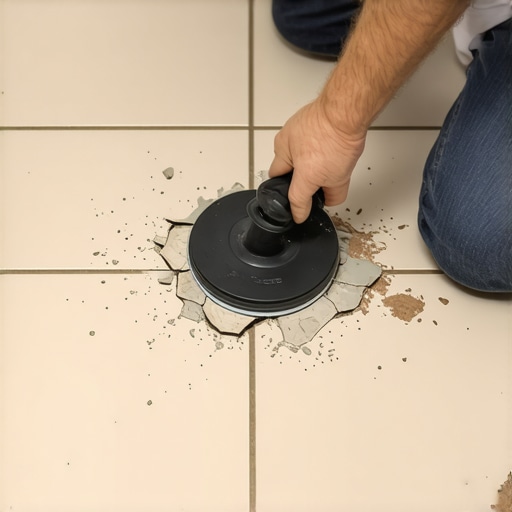
Most guys skip the leveling compound. They think the underlayment will hide the dip. It won’t. I spent three days grinding concrete on a job last month just so the floor wouldn’t click like a castanet. That job taught me that even a single broken tile in the middle of a vast kitchen is never just about the tile. It is about the failure of the bond beneath it. When a homeowner calls about a cracked tile, they usually expect a five minute fix. They see the surface. I see the subfloor. I see the deflection. I see the moisture vapor pushing up through the slab. To fix a single tile without destroying the six tiles surrounding it, you have to stop thinking like a laborer and start thinking like a surgeon. The suction cup method is the only way to achieve a zero-clearance extraction, but it requires a level of patience most installers buried years ago.
The vacuum mechanics of tile lifting
The suction cup method for replacing broken tiles relies on creating a vacuum seal that allows for vertical extraction without prying against adjacent grout lines. This technique is specific to tiles that have already lost their primary bond to the thinset or tiles where the grout has been fully removed to eliminate lateral tension. By applying a heavy duty vacuum lifter to the center of the damaged piece, an installer can exert hundreds of pounds of vertical force. This is far safer than using a pry bar, which inevitably chips the edges of the healthy tiles next door. You are fighting the atmospheric pressure that holds the tile against the substrate while simultaneously attempting to overcome any remaining C2S1 classification adhesive bond. It is a game of physics and patience.
Why your subfloor is lying to you
A floor is only as straight as the wood or concrete beneath it. Most installers assume a slab is flat because it looks flat. It isn’t. When you find a cracked tile in the center of a room, it is usually because there is a birdbath in the concrete. As people walk over that spot, the tile flexes into the dip. Eventually, the ceramic reaches its breaking point. This is why the suction cup method is so useful. It allows you to remove the failed unit and inspect the dip. If you don’t fill that low spot with a self-leveling underlayment or a high-quality patch before the new tile goes down, you will be back in six months to do the exact same job.
“A floor is only as good as the subfloor beneath it; deflection is the enemy of every joint.” – Master Flooring Axiom
The ghost in the expansion gap
Movement joints are the most ignored part of flooring. Whether you are dealing with laminate, hardwood floors, or ceramic tile, everything moves. Hardwood floors expand with humidity. Tile expands with thermal changes. If your tile was installed tight against the walls without an expansion gap, the pressure has nowhere to go but up. This creates a tenting effect. When you use a suction cup to pull a tile, you might notice the surrounding tiles shift slightly. This is the floor finally breathing. If you don’t maintain that 1/8 inch perimeter gap, the new tile you just installed will pop just like the old one did. You cannot fight the laws of thermal expansion. It is a battle you will lose every single time.
The chemistry of thinset bond failure
To understand why a tile breaks, you have to understand the molecular bond of modified thinset. Modern mortars contain polymers that create a bridge between the porous back of the tile and the substrate. If the installer didn’t back-butter the tile, or if the thinset was allowed to skin over before the tile was set, the bond is compromised. Using a suction cup allows you to lift the tile and see the mortar ridges. If those ridges are still standing and haven’t been collapsed, you have a dry-bond failure. This is common in high-heat environments or in areas with high airflow that dries the mortar too quickly. You have to scrape that old mortar back to the original substrate before you even think about buttering the new tile.
“Tile installed over an unstable substrate will eventually fail through shear stress or compressive cracking.” – TCNA Handbook Guidance
The grout removal imperative
You cannot lift a tile if it is still locked in by grout. Grout is essentially a bridge of sand and cement that turns the entire floor into a single monolithic sheet. To use the suction cup method, you must first use a diamond-grit multi-tool blade to grind away the grout around the specific tile. Do not hit the edges of the good tiles. You need to clear the joint all the way down to the subfloor. This removes the lateral friction. Once the tile is isolated, the vacuum lifter can do its job. If you leave even a tiny bit of grout in the corner, the suction cup will pull the corner of the adjacent tile right along with the broken one. Precision is the difference between a one-hour repair and a thousand-dollar disaster.
How showers change the extraction game
Replacing a tile in showers is a completely different beast. You aren’t just worried about the bond. You are worried about the waterproofing membrane. If you use a hammer and chisel, you risk puncturing the Schluter-Kerdi or the liquid-applied membrane beneath the thinset. A leak in a second-story shower can rot out a subfloor in months. The suction cup method is preferred here because it is a non-impact method. By lifting the tile vertically, you avoid the sharp edges of a chisel digging into the waterproofing layer. You must be extremely careful when cleaning the old thinset. I always tell my guys to use a plastic scraper or a very dull margin trowel to avoid nicks. One small hole in that membrane and the whole shower is a teardown.
Comparing tile rigidity to laminate flexibility
People often confuse the repair methods for different flooring types. You cannot use a vacuum lifter on laminate or hardwood floors. Wood is porous. The suction cup cannot maintain a vacuum seal on the grain of an oak plank or the textured surface of a laminate board. For those materials, you are looking at plunge cuts and mechanical fasteners. Tile is unique because its surface is often vitreous and non-porous, making it the perfect candidate for vacuum physics. However, the rigidity of tile means that any mistake in the subfloor is immediate. While laminate can flex over a minor dip, a ceramic tile will simply snap. This is why the preparation of the substrate after extraction is the most vital step of the repair process.
| Parameter | Metric | Impact |
|---|---|---|
| Subfloor Flatness | 1/8 inch over 10 feet | Critical for bond integrity |
| Moisture Vapor Emission | 3 lbs per 1000 sq ft | Prevents thinset delamination |
| Suction Cup Rating | 100 lbs vertical lift | Required for large format porcelain |
| Grout Joint Width | minimum 1/16 inch | Allows for thermal expansion |
The 1/8 inch that ruins everything
In the flooring world, a 1/8 inch gap is the difference between success and failure. If your subfloor has a 1/8 inch dip, your tile will crack. If your grout joint is 1/8 inch too narrow, the floor will tent. When you are resetting a tile using the suction cup method, you must ensure that the new tile sits perfectly flush with its neighbors. Use a straight edge. Do not trust your eyes. If the tile sits 1/16 of an inch high, it becomes a trip hazard and a point of impact for furniture. The suction cup can actually be used to gently vibrate the tile into the thinset bed to ensure even distribution of the adhesive. This collapses the ridges and ensures 95 percent coverage, which is the industry standard for wet areas and heavy traffic zones.
Technical checklist for tile extraction
- Remove all grout around the perimeter using a diamond blade multi-tool.
- Clean the tile surface with denatured alcohol to ensure a perfect vacuum seal.
- Center the industrial vacuum lifter on the damaged tile.
- Engage the pump until the vacuum gauge reaches the safety zone.
- Apply steady vertical pressure while gently tapping the tile to break the mortar bond.
- Scrape the substrate clean of all old adhesive down to the base material.
- Vacuum the cavity to remove every speck of dust which acts as a bond breaker.
- Dry fit the new tile to check for height and alignment.
Moisture barriers and the regional climate
The humidity in places like Florida or the Gulf Coast makes tile installation a nightmare compared to the dry air of Nevada. In high humidity environments, concrete slabs are constantly