The Suction Cup Trick for Replacing a Single Broken Shower Tile
Most guys skip the leveling compound. They think the underlayment will hide the dip. It won’t. I spent three days grinding concrete on a job last month just so the floor wouldn’t click like a castanet. I have spent 25 years on my knees with a moisture meter and a level, and if there is one thing I have learned, it is that a floor is a performance surface, not a decoration. When you see a single cracked tile in a shower, you are not just looking at a cosmetic blemish. You are looking at a structural failure of the bond coat or a stress fracture from subfloor deflection. Replacing it requires more than a hammer and a prayer. It requires the precision of a glass lifter and an understanding of the molecular bond of modified thin-set. The suction cup trick is the only way to pull a tile without destroying the surrounding grout and the delicate waterproofing membrane beneath it. If you hack at it with a chisel, you will tear the Schluter-Kerdi or the liquid-applied membrane, and then you have a five thousand dollar mold problem on your hands.
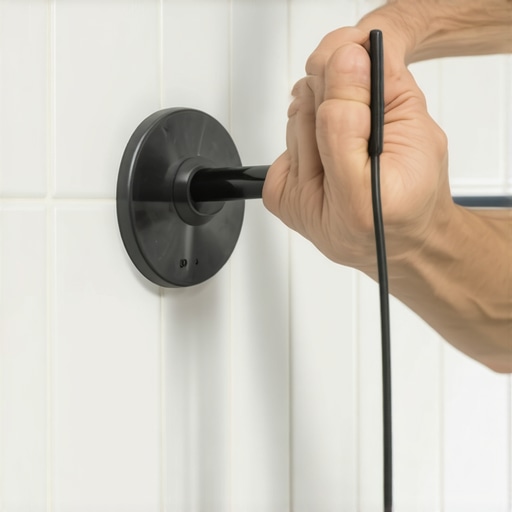
The physics of the single tile vacuum lift
A suction cup allows for a perpendicular tensile force that isolates the damaged tile from its neighbors. By applying a heavy-duty glass suction cup to the center of a cracked tile, you can exert upward pressure that pulls the ceramic or porcelain body away from the mortar bed without the lateral shearing forces that typically ruin adjacent grout lines. This is not about brute strength. It is about the vacuum seal and the controlled release of the adhesive bond. You must first remove every grain of grout around the perimeter using a carbide-grit saw or a steady hand with an oscillating tool. If even a fraction of a millimeter of grout remains, the suction cup will transfer that energy to the next tile and you will have two broken tiles instead of one. The goal is to isolate the energy. You are performing surgery, not demolition. The vacuum grip ensures that the pull is vertical. This is essential because tile is incredibly strong under compression but weak under tension. By focusing the tension solely on the center of the damaged piece, you encourage the remaining shards to lift cleanly away from the thin-set ridges. I have seen guys try to pry tiles up with screwdrivers. All they do is chip the edges of the good tiles. The suction cup is the professional way to maintain the integrity of the installation.
“A floor is only as good as the subfloor beneath it; deflection is the enemy of every joint.” – Master Flooring Axiom
The chemistry of the mortar bond
Thin-set mortar is not just mud but a complex chemical matrix of Portland cement and polymers. When you are dealing with showers, you are usually dealing with ANSI A118.4 or A118.15 modified mortars. These contain liquid latex or powdered polymers that create a flexible, high-strength bond. When you remove a tile using the suction cup trick, you are fighting against these polymer chains. This is why heat is your best friend. I often use a heat gun to soften the polymers in the thin-set before I engage the suction cup. You want to reach a temperature where the adhesive becomes slightly more ductile. This reduces the risk of the mortar pulling chunks out of the cement board or the plywood subfloor. The science of the bond is simple. The mortar creates mechanical keys in the microscopic pores of the tile. By heating it, you weaken those keys just enough to allow the vacuum pressure to do its work. If you are working with hardwood floors or laminate, the logic is different, but the respect for the bond remains. In those cases, you are dealing with tongue and groove friction or glues. But in a shower, the bond is everything. Once the tile is out, you have to scrape the old mortar down to the substrate without puncturing the waterproof layer. If you see a blue or red coating under the tile, that is your life raft. Do not poke it. Do not scratch it. If you do, you must patch it with the manufacturer-approved sealant before the new tile goes in.
Why your subfloor is lying to you
Subfloor flatness is often confused with subfloor levelness and this mistake ruins more floors than water. You can have a floor that is perfectly level but has a massive dip in the middle. The TCNA (Tile Council of North America) requires a flatness of 1/8 inch over 10 feet for large format tiles. If your shower floor was not prepped correctly, the tile you are replacing likely cracked because there was a void in the thin-set coverage. When you stepped on it, the tile deflected into that void and snapped. This is why I always check the back-buttering. When you install the replacement tile, you must back-butter it. This means applying a thin layer of mortar to the back of the tile itself before setting it into the notched trowel beds on the floor. This ensures 100 percent coverage. Without 100 percent coverage in a wet area, water will find its way into the air pockets. It will sit there and stagnate. It will grow things you do not want to name. It will eventually blow the tile off the floor. I have walked into jobs where the laminate was bouncing like a trampoline because the installer ignored a 1/4 inch dip. They thought the underlayment would cushion it. It did the opposite. It created a pivot point that snapped the locking mechanisms. In a shower, that pivot point results in a cracked tile. The suction cup trick is how you fix the symptom, but back-buttering is how you fix the disease.
| Adhesive Type | Tensile Strength (PSI) | Flexibility Rating | Best Use Case |
|---|---|---|---|
| Unmodified Thin-set | 200-300 | Low | Over stable cement board |
| Polymer Modified | 400-600 | Medium | Showers and high traffic |
| Epoxy Grout/Mortar | 1000+ | High | Commercial kitchens |
| Laminate Glue | Varies | High | Floating floor joints |
The ghost in the expansion gap
Every floor needs room to breathe and if you lock it in place it will eventually scream. This is especially true for hardwood floors and laminate, but even tile has an expansion coefficient. In a shower, the change in temperature from cold to hot water causes the materials to expand and contract. This is why the change of plane, where the wall meets the floor, should never be filled with hard grout. It must be filled with a 100 percent silicone sealant. Silicone is flexible. Grout is rigid. If you fill that corner with grout, the floor will expand, hit the wall, and the weakest link will break. Usually, that is the tile you are now trying to replace with a suction cup. I call this the ghost in the gap because you cannot see the pressure, but you can see the results. When I replace a tile, I always check the surrounding joints. If the grout is cracked everywhere, you have a bigger movement problem. You might need to install an expansion joint in the middle of the floor. This is common in large commercial spaces but often ignored in residential bathrooms. The physics do not change just because the room is smaller. The molecules still move. The moisture still pushes. If you do not give the floor a place to go, it will go up.
“Grout is for aesthetics and filling joints; it is never a structural component of a flooring system.” – TCNA Handbook Summary
The 1/8 inch that ruins everything
Precision in tile replacement is measured in fractions of an inch and a single mistake is permanent. When you are using the suction cup to drop the new tile in, you have one shot. If you drop it and it is crooked, you cannot just pry it up without making a mess of the surrounding thin-set. This is where spacers and a steady hand come in. I use a suction cup even for the installation of the new tile. It gives me a handle. It allows me to lower the tile perfectly vertically into the hole. This prevents the mortar from squeezing up into the grout lines too much. You want your grout lines to be clear to a depth of at least two-thirds of the tile thickness. If mortar fills the joint, your grout will be thin and it will flake out within a month. I see this all the time with DIY jobs. They go heavy on the mud and light on the grout. Then they wonder why their hardwood floors in the next room are cupping. It is all connected. Moisture from a failing shower floor will migrate through the subfloor and ruin the laminate or hardwood in the hallway. I once saw a $15,000 wide-plank walnut floor ruined because a shower pan two rooms away was leaking through a cracked tile that someone tried to fix with a screwdriver instead of a suction cup. The moisture traveled along the joists and the walnut started cupping like a potato chip. It was a heartbreak that could have been avoided with a ten dollar suction cup and an hour of patience.
- Remove all perimeter grout with a carbide tool before lifting.
- Apply consistent heat to soften the polymer bond of the old thin-set.
- Engage the suction cup in the center of the tile for a vertical pull.
- Clean the substrate down to the waterproofing without puncturing the membrane.
- Back-butter the new tile to ensure 100 percent mortar coverage.
- Use silicone in the corners to allow for thermal expansion.
Regional climate and the moisture battle
The swampy humidity of Houston means solid wood is a death wish; you need engineered cores. Similarly, in high-humidity areas, your shower repairs must be even more meticulous. In a place like Florida or the Gulf Coast, the ambient moisture in the air prevents thin-set from drying as quickly as it would in Phoenix. You have to wait longer before you grout. If you grout too early, you trap moisture under the tile. That moisture will eventually turn into steam when the hot shower hits it, and the pressure will pop the tile right back off. This is why I always use a moisture meter even on a simple tile repair. I want to know what the subfloor is doing. If the subfloor is saturated, the suction cup trick is just a temporary bandage on a sucking chest wound. You have to dry the area out completely. I have seen guys use fans for three days just to get a single square foot of plywood dry enough to accept a new bond. It sounds like overkill. It isn’t. It is the difference between a repair that lasts 20 years and one that lasts 20 days. Whether you are dealing with showers, laminate, or hardwood floors, the moisture content is the only metric that matters. The grout is just the skin. The mortar is the muscle. The subfloor is the bone. If the bone is rotten, the skin will never look good. Never trust a subfloor that hasn’t been tested. It will lie to you every time.
The final bond and grout selection
Choosing the right grout is as vital as the suction cup lift itself. Most people grab the cheapest bag of sanded grout they can find. If your joints are less than 1/8 inch, you need unsanded grout. If they are larger, you need sanded. But in a shower, you really should be looking at high-performance cements or epoxy grouts. These are less porous and more resistant to the chemicals in your shampoo and soap. They form a crystalline structure that is much tighter than standard grout. This prevents water from seeping into the thin-set bed. When I finish a repair, I make sure the grout is packed tight. I use a hard rubber float and I push it in at a 45-degree angle. Then I wait. The cleaning process is where most people fail. They use too much water. If you use a dripping wet sponge, you wash the pigment out of the grout and you weaken the top layer of the cement. You end up with a dusty, crumbly joint. Use a damp sponge. Change your water often. This is the part where my sawdust-covered nails get clean, and the floor finally starts to look like a floor again. It is a meticulous process, but it is the only way to ensure that the single broken tile you fixed doesn’t become a gateway for a total bathroom failure. Respect the physics. Respect the chemistry. Use the suction cup.