
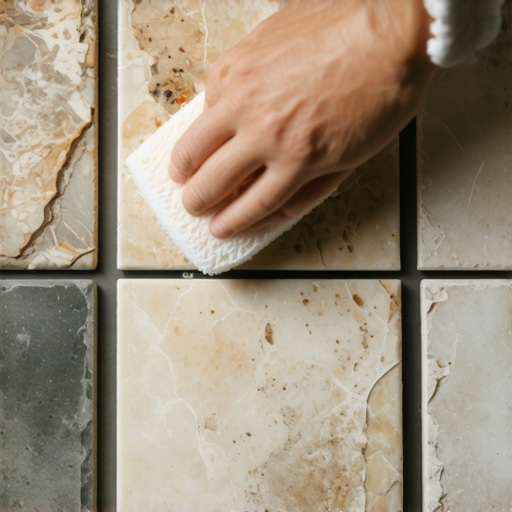
The science of stone capillaries
The wet sponge test for stone porosity identifies how quickly a natural material absorbs liquids by monitoring the darkening of the surface over several minutes. This simple diagnostic tool determines if a stone requires immediate sealing to prevent permanent staining from grout or household spills.
I have spent twenty-five years on my knees with a moisture meter and a levels. I have seen every mistake in the book. Most guys skip the leveling compound. They think the underlayment will hide the dip. It won’t. I spent three days grinding concrete on a job last month just so the floor wouldn’t click like a castanet. When you are laying natural stone, that dip is a death sentence for your grout lines. If the subfloor flexes, your expensive marble is going to crack right down the middle because the installer was too lazy to pull out a straightedge and some self-leveler. This is the reality of floor physics. You cannot hide a bad foundation with a pretty surface. Natural stone is a living, breathing material. It is not like the plastic stuff people buy at big-box stores. It has an appetite for moisture. If you do not understand how much water your tile can drink, you are setting yourself up for a disaster that involves expensive tear-outs and a lot of swearing. Hardwood floors have their own moisture issues, but stone is about mineralogy and pore space. You need to respect the rock. Ground moisture can travel through a slab and right into your travertine if you did not use a proper vapor barrier. I have seen $20,000 installations ruined because the installer did not understand capillary action.
The mechanics of water absorption
Absorbency in natural stone is a function of the rock mineral structure and the volume of interconnected pores within the specimen. Highly porous stones like travertine and some limestones possess a high absorption rate, meaning they will pull liquid grout pigments deep into the stone body during installation.
When we talk about the physics of flooring, we are talking about the surface tension of water and the microscopic tunnels inside the stone. Imagine a dry sponge. Now imagine a piece of slate. On a molecular level, they have more in common than you think. Natural stone is often metamorphic or sedimentary. These processes leave behind tiny voids. When you apply a wet sponge to the surface, you are performing a crude but effective pressure test. If the stone turns dark immediately, it is thirsty. That thirst is a warning. It tells you that if you spread a dark grout over that tile without a sealer, the stone will suck the pigment right out of the slurry. You will end up with a ghosting effect that no chemical cleaner can remove. This is why I tell people to stop looking at the color and start looking at the density. I smell the floor wax and the wet concrete every day. I know the difference between a dense granite and a soft marble just by the weight in my hand. You have to be meticulous. You have to be precise.
“A floor is only as good as the subfloor beneath it; deflection is the enemy of every joint.” – Master Flooring Axiom
The procedure for a successful wet sponge test
To perform the wet sponge test correctly, place a clean, saturated sponge on an unsealed tile for sixty seconds and then remove it to observe the surface darkening. If the tile remains dark for more than three minutes, the stone is highly absorbent and requires a high-quality impregnating sealer.
- Clean the tile surface with a dry cloth to remove any factory dust.
- Saturate a clean sponge with distilled water.
- Press the sponge firmly against the center of the tile.
- Wait exactly one minute for the water to penetrate the surface.
- Remove the sponge and wipe away excess surface water.
- Observe the rate of evaporation and color change.
This is not a suggestion. This is a mandatory step for any professional who values their reputation. If you are working in showers, this test is even more vital. A shower floor is a constant battleground between gravity and moisture. If you use a high-porosity stone in a wet area without understanding its absorption rate, you will have mold growing inside the stone within a year. It is a mess. I have seen people try to install laminate in a bathroom too. It is a joke. They call it waterproof, but the joints are the weak point. Stone is the same. The tile might be solid, but the pores and the grout are the entry points for failure. You need to be smarter than the material you are installing. Use your brain before you use your trowel.
The 1/8 inch that ruins everything
Precision in stone installation requires a tolerance of no more than one eighth of an inch over ten feet to ensure the stone does not experience point-load stress. This level of flat substrate is mandatory for large format natural stone tiles to prevent lippage and grout failure.
Table 1: Stone Absorption and Density Reference
| Stone Type | Porosity Level | Recommended Sealer | Janka Hardness (Relative) || :— | :— | :— | :— || Granite | Low | Impregnating | High || Marble | Medium | Solvent-based | Medium || Travertine | High | Heavy Duty | Low || Slate | Variable | Enhancing | Medium || Sandstone | Extreme | High Solids | Low |
You look at that table and you see numbers. I look at that table and I see the hundreds of jobs I have done. I see the slate floors that flaked because the homeowner used a cheap cleaner. I see the travertine that pitted because it was not filled correctly. The chemistry of the bond is everything. When you use a modified thin-set, you are creating a chemical and mechanical lock. If the stone is too absorbent, it can actually pull the water out of the thin-set too fast. This ruins the cure. The thin-set becomes brittle. You end up with a hollow sound when you walk across the floor. That click-clack sound is the sound of failure. It is the sound of an installer who did not check the porosity. I do not care if you are an architect or a DIYer. You cannot ignore the laws of physics. Water will go where it wants to go. Your job is to tell it where it is allowed to stay.
“Natural stone tiles must be acclimated to the installation environment for at least 48 hours to ensure thermal and moisture equilibrium.” – Master Flooring Axiom
The ghost in the expansion gap
Expansion gaps at the perimeter of a stone floor allow for the natural movement of the building structure without putting pressure on the tile assembly. Failing to leave a quarter-inch gap will lead to tenting where the tiles lift off the floor under thermal expansion.
People think stone is static. It is not. It moves. It expands when it gets warm and shrinks when it gets cold. If you butt your stone right up against the drywall, you are asking for trouble. The house moves. The subfloor moves. If there is no room for the stone to breathe, it will buckle. It will snap. I have seen it happen in the desert heat of Phoenix and the humid swamps of Houston. In high-humidity areas, the moisture in the air can actually change the volume of the stone. You need to use the right grout. Grout is not just a filler. It is a structural component. It handles the compression. If you use the wrong grout on an absorbent stone, the stone will pull the polymers out of the grout. The grout becomes chalky. It falls out. You are left with gaps that collect dirt and water. It looks terrible and it is a pain to fix. Do it right the first time. Use the wet sponge test. Check your moisture levels. Stop looking for shortcuts. There are no shortcuts in a quality floor installation. Only hard work and a lot of dust. Clean your tools. Keep your site organized. That is how a pro works. That is how I work. The smell of floor wax at the end of a job is the only reward you should need. That and a floor that will last a hundred years. If you follow these rules, you might actually build something that stays flat.