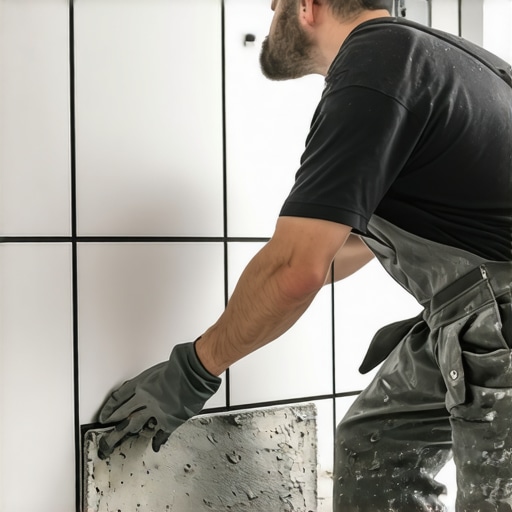
I once walked into a luxury master bathroom where the custom marble tiles were literally sliding off the wall like stickers on a hot car. The homeowner had spent twenty thousand dollars on stone, but the installer decided to skip the basic mechanics of a proper bond. I spent three days scraping dried thin-set off the cement board just so the new floor wouldn’t click like a castanet and the walls would actually hold their weight. Most guys think they can just trowel the wall and slap the tile on. They are wrong. A floor or a wall is only as good as the subfloor beneath it, and in a shower, the bond is the only thing standing between a beautiful retreat and a moldy catastrophe. If you do not back-butter your tiles, you are essentially gambling with gravity and moisture. Hardwood floors and laminate have their place in the dry zones of a home, but when it’s time to handle the high-pressure environment of a shower, tile is king, provided it is installed with structural integrity. Unlike hardwood floors that rely on mechanical fasteners or laminate that floats, tile requires a chemical and physical fusion to the substrate. This article breaks down why the back-buttering technique is the non-negotiable standard for any professional who values their reputation and the longevity of their work.
The hollow sound of a failing shower
Back-buttering is the process of applying a thin, flat layer of mortar to the back of a tile to ensure total contact with the thin-set ridges on the substrate. This technique eliminates air pockets, prevents tile breakage, and ensures the 95 percent coverage required by the Tile Council of North America for wet environments. When you walk into a bathroom and tap on the tiles, a hollow sound is the death knell of the installation. That sound means there is a void. In a shower, a void is a reservoir for water. Even with the best grout, moisture will eventually find its way behind the tile through capillary action. If there is a gap, that water sits. It breeds mold. It weakens the adhesive. Eventually, the bond fails entirely. I have seen porcelain tiles that looked perfect on the surface but were held up by nothing but hope and a bit of grout because the installer didn’t bother to burn the mortar into the back of the piece. You cannot afford that kind of failure in a wet zone. While hardwood floors might cup or crown when exposed to moisture, a failing tile wall can lead to structural rot that costs tens of thousands to repair.
“A floor is only as good as the subfloor beneath it; deflection is the enemy of every joint.” – Master Flooring Axiom
The physics of the mechanical bond
The mechanical bond between a tile and a wall depends on the interlocking of the mortar into the microscopic pores of both surfaces. Back-buttering forces the thin-set into the texture of the tile, creating a primary grip that prevents the mortar from skinning over before the tile is set. Think about the surface of a tile. Even a smooth porcelain tile has microscopic pits and textures. When you trowel mortar onto a wall, it begins to form a skin almost immediately. If you press a dry tile onto that skinned-over mortar, you might get 50 percent coverage if you are lucky. By back-buttering, you are ensuring that both the tile and the wall are wet with active adhesive. When these two surfaces meet, they fuse. This is the difference between a tile that stays for fifty years and one that pops off the first time someone bumps it with their elbow. The chemical additives in modern polymer-modified thin-set are designed to work this way. They need that physical pressure to bite into the material. This is why we don’t just use glue. We are creating a monolithic structure. It is a level of engineering that goes far beyond what people expect from a simple renovation.
Why the trowel ridge alone is a lie
Trowel ridges are designed to collapse and distribute mortar evenly, but they rarely achieve full coverage on their own because of tile warpage and substrate irregularities. Back-buttering fills the low spots on the back of the tile, ensuring that the collapsed ridges actually fill the entire space between the tile and the substrate. No wall is perfectly flat. No tile is perfectly flat. If you take a 12 by 24 inch tile and put a straight edge across the back, you will often see a slight bow. If you only trowel the wall, the center of that tile might never even touch the mortar. You end up with a perimeter bond and a giant air bubble in the middle. This is where the 95 percent rule comes in. For dry areas, 80 percent coverage is often acceptable, but for showers, the TCNA is clear. You need almost total coverage. If you are working with large format tiles, back-buttering is the only way to achieve this. It is the same principle I use when checking a subfloor for hardwood floors. If the floor isn’t flat to within an eighth of an inch over ten feet, the wood will squeak. In tile, if the coverage isn’t there, the tile will crack. The physics do not change just because the material does.
| Tile Type | Mandatory Coverage | Back-Buttering Required | Typical Environment |
|---|---|---|---|
| Porcelain | 95% | Yes | Shower Walls |
| Ceramic | 95% | Yes | Shower Walls |
| Natural Stone | 100% | Always | Wet Areas |
| Laminate | N/A | No | Living Rooms |
| Hardwood Floors | N/A | No | Bedrooms |
The structural anatomy of a wet wall
A shower wall is a multi-layered system consisting of the framing, a moisture barrier or waterproofing membrane, a mortar bed, and finally the tile. Each layer must be bonded perfectly to the next to prevent systemic failure caused by the weight of the tile and the constant presence of water. When you add up the weight of a square foot of porcelain tile and the mortar needed to hold it, you are looking at several pounds per square foot. On a tall shower wall, that is hundreds of pounds of downward force. If the bond is weak because you skipped the back-buttering step, gravity will eventually win. The mortar itself has a shear strength rating, but that rating is only valid if the mortar is actually in contact with the tile. I have seen guys try to use grout as a structural element to hold tiles in place when the bond failed. Grout is for filling joints and managing expansion, not for holding the tile on the wall. It is the same way we think about the subfloor under hardwood floors. You don’t rely on the finish to hold the planks together. You rely on the subfloor and the fasteners. In a shower, the back-buttering is your fastener.
Moisture migration and the capillary effect
Water can move through grout and into the voids behind tile through capillary action, leading to saturation of the substrate and eventual bond degradation. Full coverage through back-buttering eliminates these voids, forcing water to stay in the tile and grout layer where it can evaporate or drain. Even the best epoxy grout is not a substitute for a solid mortar bed. Moisture is persistent. It moves into any space it can find. If you have ridges of mortar with air channels between them, you have built a plumbing system behind your tile that you didn’t intend to build. This water eventually breaks down the bond of the thin-set. This is especially true with certain types of natural stone that are porous. The stone will soak up the water, and if the back of the stone isn’t fully coated in mortar, the water will sit against the back of the stone and cause it to discolor or delaminate. This is why I always tell people that the most important part of the job is the part they will never see. It is about the chemistry and the physics, not just the aesthetic.
Adhesive chemistry in high humidity environments
Modern thin-sets are engineered with polymers that require a specific moisture-to-solid ratio to cure correctly and provide a permanent bond. Back-buttering ensures that the mortar is properly integrated into the tile surface, preventing the tile from sucking the moisture out of the thin-set too quickly. If you put a dry, thirsty tile onto a thin layer of mortar, the tile can pull the water out of the mortar before the chemical reaction of curing is complete. This results in a weak, chalky bond. By burning a thin layer of mortar into the back of the tile first, you are essentially priming the surface. You are satisfying the suction of the tile so that the main bed of mortar can cure at its intended rate. This is the same reason we talk about acclimation for hardwood floors. You have to manage the moisture levels to get a stable result. In the world of tile, back-buttering is your moisture management tool. It is about controlling the environment at the molecular level to ensure a structural success.
The 95 percent coverage mandate
The Tile Council of North America Handbook explicitly requires 95 percent mortar coverage for tiles in wet areas to provide enough support and to prevent water from pooling behind the installation. Achieving this without back-buttering is statistically improbable even for the most skilled installers. I have performed dozens of tests where I set a tile without back-buttering and then immediately pulled it up to check the coverage. Even with perfect troweling on the wall, you often only see 60 or 70 percent coverage. There are always gaps. When you add the back-buttering step, that coverage jumps to nearly 100 percent every single time. It is a simple step that takes an extra thirty seconds per tile, but it saves you from a lifetime of warranty calls and repairs. I don’t care how fast you think you are. If you aren’t back-buttering, you aren’t doing the job right. It is a matter of professional ethics and technical necessity.
“Mortar coverage is the heartbeat of a tile installation; without it, the system is dead on arrival.” – TCNA Technical Bulletin
- Clean the back of the tile to remove any dust or manufacturing residue.
- Apply a small amount of thin-set to the flat side of the trowel.
- Hard-press the thin-set into the back of the tile to burn it in.
- Ensure the entire surface is covered with a thin, even coat.
- Set the tile into the combed mortar on the wall while both are still wet.
- Wiggle the tile perpendicular to the ridges to collapse them.
Substrate preparation before the first trowel twist
Before any mortar touches the wall, the substrate must be clean, flat, and structurally sound to support the weight of the tiled system. A deflection in the wall of more than an eighth of an inch will cause the tiles to lip and the bond to be uneven, regardless of how much back-buttering you do. You have to start with a good foundation. If you are going over old cement board that is bowing, or if the studs are out of plumb, you are fighting a losing battle. I spend a lot of time with a six-foot level before I ever mix a bag of mud. I look for the dips and the humps. I will use a high-quality floor leveling compound or a wall patching mortar to get everything dead flat. This makes the back-buttering even more effective because you aren’t trying to use the mortar to bridge massive gaps in the wall. You want a consistent thickness of mortar across the entire installation. This reduces shrinkage as the mortar cures and keeps the tiles perfectly aligned. It is the same attention to detail required for high-end hardwood floors. You can’t put a straight floor on a crooked subfloor.
The difference between buttering and skimming
Buttering involves applying enough mortar to actually add thickness, while skimming is simply burning the mortar into the pores of the tile for a better bond. For large format tiles or uneven stone, a true back-butter is necessary to compensate for the natural variations in the material. Some people get confused and think they just need a tiny bit of dust on the back. That is not enough. You need to actually fill the grid or the texture on the back of the tile. If the tile is particularly large, I might even use a small notched trowel on the back of the tile itself, though for most applications, the flat side of the trowel is sufficient. The goal is to make the tile and the wall act as one single unit. When you press them together, you should feel the suction. That suction is the sound of a good bond. It is the sound of a shower that isn’t going to fail in five years. It is the sound of a job done by a professional who knows the physics of his craft.
Tools of the trade for a lasting installation
Using the correct trowel size is just as important as the back-buttering technique itself to ensure the proper depth of the mortar bed. A half-inch square-notched trowel is standard for large tiles, but the specific requirements depend on the tile thickness and substrate flatness. You can’t use a tiny mosaic trowel for a 12 by 24 inch porcelain tile. You won’t get enough mortar to allow the ridges to collapse properly. You need enough mud to fill the voids but not so much that it oozes out of the joints and makes a mess of your grout lines. Managing the mortar is an art form. It requires a feel for the material. You learn how the thin-set behaves on a humid day versus a dry day. You learn when the mortar is starting to skin over and needs to be refreshed. These are the things that separate the masters from the amateurs. It isn’t just about sticking things to walls. It is about building a system that lasts. Hardwood floors and laminate might be easier for a DIYer to handle, but a professional shower is a masterpiece of engineering.