Most guys skip the leveling compound. They think the underlayment will hide the dip. It won’t. I spent three days grinding concrete on a job last month just so the floor wouldn’t click like a castanet. That job taught me that if you do not respect the slab, the slab will humiliate you. I have spent twenty five years with sawdust under my nails and the smell of WD-40 on my clothes, and I can tell you that a shower tile popping off the wall is never a mystery. It is a failure of structural engineering. You see a pretty ceramic square, but I see a mechanical bond that has been compromised by moisture migration or deflection. When tile loses its grip, it is usually because the installer treated the shower like a dry closet instead of a high-pressure hydraulic environment. We are going to look at the chemistry of the thin-set and the physics of the wall studs to find out exactly where your contractor cut corners.
The structural reality of wet environments
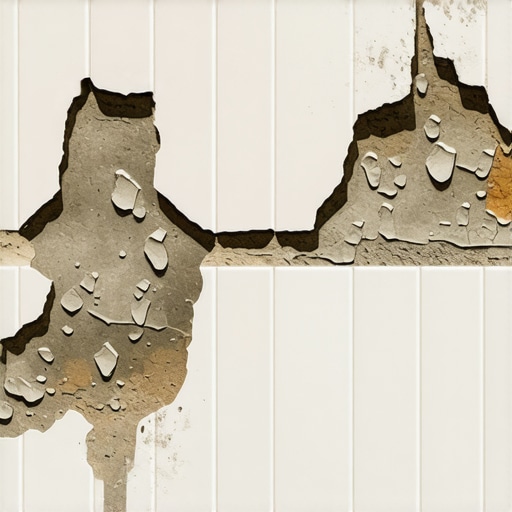
Shower tile failure occurs when the bond between the substrate and the tile is broken by moisture, movement, or improper adhesive application. This happens because water vapor penetrates grout lines and reaches the backer board, causing swelling or rot if the waterproofing membrane is absent or improperly installed. Structural movement also plays a massive role in tile delamination. If the house settles even a fraction of an inch, the rigid tile cannot flex. Without proper expansion joints, the stress has nowhere to go but out, pushing the tile away from the wall. This is a common sight in new builds where the wood is still drying out. You might think your wall is solid, but it is actually a living, breathing assembly of timber and fasteners that reacts to every change in humidity.
When we talk about the physics of a shower, we have to talk about the L/360 rule. This is the industry standard for deflection. It means that under a full load, the floor or wall should not bend more than the total span divided by 360. For natural stone, that requirement jumps to L/720 because stone is even less forgiving than ceramic. When a contractor ignores these numbers and installs tile over a bouncy subfloor or a flimsy wall, the bond will fail. The thin-set adhesive is designed to hold tile in place, not to act as a structural brace. If the wood behind the tile moves, the bond snaps. It is as simple as that. I have seen million dollar homes where the master shower looked like a jigsaw puzzle because someone used the wrong thickness of plywood or spaced the studs too far apart. You cannot fix a structural problem with more grout.
Why your thin-set is failing the bond test
Thin-set mortar is a blend of portland cement, sand, and water-retention agents that creates a mechanical and chemical bond. If the mortar is mixed with too much water, it becomes weak and porous. If it is mixed with too little, it skins over before the tile is set, preventing a proper grip. This is often where things go wrong in the shower. A installer might mix a huge bucket of thin-set and keep using it long after its pot life has expired. By the time they get to the top of the wall, the adhesive is basically just wet sand with no sticking power. You can tell if this happened if the back of your popped tile is clean. If the tile comes off and there is no mortar stuck to it, you had a transfer failure.
“A floor is only as good as the subfloor beneath it; deflection is the enemy of every joint.” – Master Flooring Axiom
The chemistry of the bond depends on something called the C-S-H gel. This is calcium silicate hydrate, which forms as the portland cement hydrates. This gel grows into the microscopic pores of the tile, locking it in place like a thousand tiny fingers. If the tile is too dense, like a high-quality porcelain, you need polymer-modified thin-set. These polymers act like a glue that bridges the gap between the mortar and the tile. If a cheap contractor used un-modified mortar on porcelain, those tiles will pop off the wall the first time the temperature changes. The difference in the coefficient of thermal expansion between the tile and the substrate will shear the bond. I have seen it happen a hundred times. You need those polymers to provide the flexibility required to handle the heat of a steaming shower.
The lie about waterproof backer boards
Backer boards are often water-stable but they are rarely waterproof without an additional topical membrane or liquid sealer applied by the installer. Many people believe that because cement board will not rot, it will protect the wood studs behind it. This is a dangerous mistake. Cement board is porous. Water will wick through it via capillary action, reaching the timber framing and causing the wood to swell and mold. As the wood expands, it pushes against the backer board, which in turn pushes against the tile. This pressure is what causes tiles to tent or pop off. You must have a continuous moisture barrier to prevent this cycle of destruction.
We also have to consider the role of the vapor barrier behind the board. In some climates, putting plastic sheeting behind the cement board is the standard. In others, a liquid-applied membrane on the front is preferred. If you do both, you create a moisture sandwich. This traps water between two layers of plastic with no way to evaporate. The water goes stagnant, smells like a swamp, and eventually destroys the adhesive bond from the inside out. I have seen guys use regular drywall in a shower because they thought the tile was the waterproof layer. That is a recipe for a total collapse. Tile and grout are decorative shedding layers. They are not a waterproof seal. If the prep work underneath is not handled with surgical precision, the whole system will fail within three to five years.
Deflection and the silent death of grout
Grout is the most rigid part of a tile installation and acts as the first indicator of structural movement or bond failure. When grout starts to crack or crumble, it is not just an aesthetic issue. It is a sign that the tiles are moving independently of each other. This movement usually stems from a subfloor that is too thin or wall studs that are not plumb. Once the grout is compromised, water entry increases exponentially, which accelerates the failure of the thin-set. Most people just try to re-grout the cracks, but that is like putting a bandage on a broken leg. You are not fixing the movement; you are just hiding it for a few weeks.
“The integrity of the assembly depends on the cumulative stiffness of all layers; skipping one layer compromises the entire system.” – Master Flooring Axiom
In many cases, the issue is the lack of movement joints. The TCNA (Tile Council of North America) specifies that you must have expansion joints every eight to twelve feet in wet areas. This means you should use a 100 percent silicone caulk in the corners and where the floor meets the wall instead of hard grout. Hard grout in a corner will always crack because the two walls move in different directions. When that corner grout cracks, water pours into the wall cavity. I have pulled apart showers where the corner studs were so rotten I could poke my finger through them. All of that because the installer was too lazy to use a tube of silicone. It is the small details that determine if a floor lasts for fifty years or five.
Comparing moisture resistance across surfaces
While we are talking about showers, we have to look at how other materials handle moisture compared to tile. Many people are trying to put laminate or hardwood floors in bathrooms, which is usually a terrible idea. Laminate is essentially pressed sawdust and paper. The moment water hits the core, it swells like a sponge. Hardwood floors are not much better in a high-humidity environment because they are constantly expanding and contracting. This movement destroys the finish and causes the boards to cup or gap. Tile remains the king of the bathroom for a reason, but only if the installation respects the physics of the room.
| Material Type | Moisture Resistance | Movement Potential | Acclimation Time |
|---|---|---|---|
| Ceramic Tile | High | Very Low | None |
| Porcelain Tile | Extreme | Negligible | None |
| Engineered Wood | Moderate | Medium | 72 Hours |
| Laminate Flooring | Low | High | 48 Hours |
| Solid Hardwood | Very Low | Extreme | 7 to 14 Days |
As the table shows, porcelain is the gold standard for wet areas. It has an absorption rate of less than 0.5 percent. This means it is nearly impossible for water to penetrate the tile itself. However, that density makes it harder for traditional mortar to grab onto. You need a high-polymer bond. If you look at laminate, it has no business being near a shower. Even the waterproof versions usually only guarantee that the surface is waterproof, not the joints. If water gets under the edge, the floor is toast. I have replaced dozens of laminate floors in bathrooms because a kid splashed too much during bath time. If you want the look of wood in a shower, buy wood-look porcelain planks. They give you the aesthetic without the structural nightmare.
The absolute prep checklist for a lasting shower
If you are building a shower or fixing a failed one, you cannot guess. You have to follow a strict protocol. I have seen too many people try to wing it and end up with a pile of broken ceramic and moldy wood. This checklist is the bare minimum for a professional-grade installation that will outlast the mortgage. Every step is about managing the relationship between the moisture and the structure.
- Verify stud spacing is 16 inches on center or less to prevent wall flex.
- Install a minimum of half inch thick cement backer board or waterproof foam board.
- Use alkali-resistant mesh tape and thin-set to seal all board seams.
- Apply a minimum of two coats of a liquid waterproofing membrane like RedGard or Laticrete Hydro Ban.
- Ensure the shower pan floor has a slope of a quarter inch per foot toward the drain.
- Perform a 24 hour flood test before laying a single tile to check for leaks.
- Use polymer-modified thin-set with at least 95 percent coverage for wet areas.
- Back-butter every tile larger than 12 inches to ensure full contact with the adhesive.
- Use 100 percent silicone sealant in all change of plane joints and corners.
One of the biggest mistakes I see is the lack of back-buttering. This is the process of spreading a thin layer of mortar on the back of the tile before pressing it into the wall. If you just put the tile on the ridges of thin-set on the wall, you leave air pockets. In a shower, those air pockets become collection points for condensation and mold. Over time, the moisture in those pockets weakens the bond. I always tell my guys that I want to see mortar squeezed out of every edge when the tile is set. If it is clean, it is wrong. You need that full coverage to create a solid, monolithic structure that water cannot penetrate.
Final word on structural integrity
At the end of the day, your shower tile is starting to pop off because someone treated the job like a hobby instead of a trade. They ignored the moisture levels in the subfloor. They ignored the deflection in the walls. They used the wrong chemistry for the bond. I have spent my life fixing these mistakes. It is a lot cheaper to do it right the first time than it is to tear out a brand new bathroom because the tiles are falling like autumn leaves. You have to think like an engineer. You have to respect the materials. If you don’t, the physics of the house will win every single time. Stop looking at the color of the grout and start looking at the strength of the framing. That is where the real floor is built.