
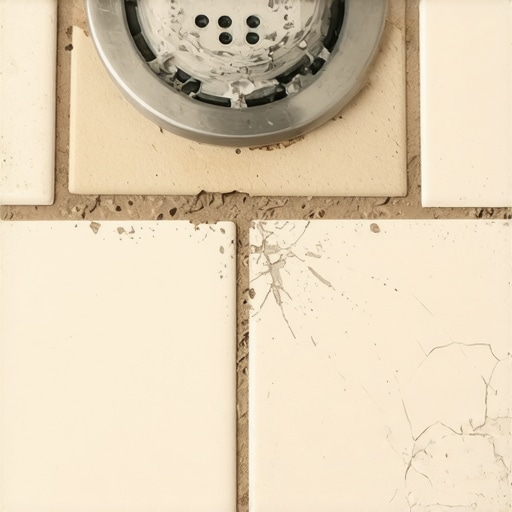
I spent three days grinding concrete on a job last month just so the floor would not click like a castanet. Most guys skip the leveling compound. They think the underlayment will hide the dip. It will not. That same laziness kills shower floors. When you see a crack in the grout surrounding your shower drain, you are not looking at a cosmetic issue. You are looking at a structural failure. My hands are stained with years of thin-set and my back remembers every heavy bag of mortar, so listen when I tell you that the flange is the most misunderstood part of your bathroom. If that flange is not set at the exact height, your tile is doomed before you even open a bag of grout. The drain flange is the bridge between your plumbing and your finish surface. It must be rock solid. If it flexes, the tile cracks. It is that simple.
The physics of the clamping ring drain
A shower drain flange functions as the primary mechanical bond between the waterproof liner and the plumbing waste pipe. It consists of a lower body and a clamping ring that secures the membrane to ensure no water escapes into the subfloor. This assembly must be perfectly level to prevent water from pooling around the perimeter of the drain. When a flange is installed too high, it creates a dam. This dam prevents the water that seeps through the grout from reaching the weep holes. Water sits there. It rots the mortar bed. It creates a swamp under your feet. Eventually, the expansion of that saturated bed will push against the tile until the grout snaps. You need to understand the chemistry of the mortar bed. It is a porous medium designed to allow moisture to migrate toward the drain. If the flange blocks that migration, the hydraulic pressure has nowhere to go but up.
Why deflection at the drain kills your grout
Subfloor deflection refers to the vertical movement of the floor under a load which directly causes tile and grout to crack near the shower drain. If your plywood subfloor has any bounce, the rigid tile and grout cannot flex with it. Most installers overlook the framing around the drain hole. They cut a hole too large, leaving the flange unsupported. When you step near that drain, the flange sinks a fraction of a millimeter. That is enough. Ceramic tile has a high compressive strength but almost zero tensile strength. It cannot handle the bending.
“A floor is only as good as the subfloor beneath it; deflection is the enemy of every joint.” – Master Flooring Axiom
This movement is even more dangerous when you have hardwood floors nearby. If the shower leaks due to a failing flange, the water wicks into the surrounding subfloor. Your expensive white oak will start to cup. The humidity in the room will spike. You will see the edges of your planks lift like potato chips because you did not support a piece of plastic in the shower. I have seen fifteen thousand dollar walnut floors ruined by a three dollar piece of scrap wood that should have been used to block the joists under a drain.
The mistake that turns a shower into a bathtub
Waterproof membranes must be integrated into the drain flange with a specific overlap to prevent subfloor saturation and eventual tile delamination. Many installers do not understand the difference between a traditional three piece drain and a modern integrated bonding flange. In a traditional setup, the liner is sandwiched between two layers of plastic. If you do not put pea gravel or a protective spacer around those weep holes, the mortar will clog them. Once those holes are clogged, the shower floor becomes a stagnant pond of gray water. This water eats away at the bond between the thin-set and the tile. You will notice the grout turning dark. That is the signal that your shower is failing from the bottom up. You are not just dealing with a leak. You are dealing with the structural integrity of your home. A wet subfloor loses its ability to hold fasteners. If you have laminate in the hallway, it will start to swell at the transitions. The moisture travels through the wood fibers like a straw.
Comparison of Drain Flange Materials
| Material | Pros | Cons | Common Failure Point |
|---|---|---|---|
| PVC | Affordable, easy to solvent weld | Can warp under high heat | Stripped bolt threads |
| ABS | High impact resistance | Requires specific cement | Cracking at the neck |
| Cast Iron | Extremely durable, quiet | Heavy, prone to rust | Corrosion of the bolts |
| Stainless Steel | Ultimate longevity | Expensive | Improper seal to membrane |
Technical differences between traditional and integrated drains
Integrated bonding flanges allow the waterproofing membrane to be applied directly to the top of the flange surface for a more reliable seal. Traditional drains require a thick mortar bed, which adds weight and height to the assembly. Integrated systems, like those from Schluter or Laticrete, are much thinner. This allows for a lower profile shower entry. But there is a trade-off. These systems require a very flat subfloor. If the floor is not level, the thin-set under the bonding flange will have voids. Voids lead to movement. Movement leads to cracks. You cannot hide a dip with thin-set. It shrinks as it cures. If you have a quarter inch dip, and you fill it with thin-set, it will be a three sixteenths inch dip by morning. I have seen guys try to build up the floor with extra underlayment. Too much cushion is a death sentence. It causes the locking mechanisms on LVP to snap under pressure, and it causes tile to pop off the floor. You want a solid, dense bond.
How subfloor prep dictates the life of your tile
Proper subfloor preparation involves checking for flatness within one eighth of an inch over ten feet to ensure the drain flange sits perfectly flush. I carry a six foot level and a straightedge on every job. If I see a hump, I grind it. If I see a valley, I fill it with a high quality self-leveling underlayment. This is not just about the shower. This is about the entire floor system. If your bathroom subfloor is uneven, your transition to the hardwood floors or laminate in the bedroom will look like garbage. You will end up with a bulky T-molding that everyone trips on. A master installer knows how to plane the floor so the transition is invisible. This requires understanding the thickness of every layer. You have the subfloor, the waterproofing, the thin-set, and the tile itself. If you miss your marks by even two millimeters, the drain will be the high point or the low point. Neither is acceptable.
Checklist for a Waterproof Shower Assembly
- Verify the drain pipe is centered and plumb within the floor opening.
- Apply a pre-slope of mortar at a quarter inch per foot toward the drain.
- Ensure the waterproof liner is not punctured by fasteners near the floor.
- Clear the weep holes of any mortar or debris using pea gravel.
- Perform a twenty four hour flood test before laying any tile.
- Check that the clamping ring bolts are torqued to manufacturer specifications.
The relationship between hardwood floors and bathroom humidity
High humidity levels from a leaking shower drain cause hardwood floors to expand and contract excessively leading to permanent wood damage. Wood is a hygroscopic material. It breathes. When your shower has a slow leak at the flange, the moisture levels in the bathroom rise. This moisture is absorbed by the bottom of your wood planks.
“Movement joints are not optional; they are essential for the survival of any ceramic or stone installation.” – Master Flooring Axiom
While tile is the focus in the shower, the surrounding wood is the canary in the coal mine. If you see gaps opening up in your oak floor during the winter that do not close in the summer, you have a moisture problem. It might not be a pipe bursting. It might just be the vapor pressure from the wet mortar bed under your shower tile. You have to think about the house as a single ecosystem. One failure in the shower drain ripples through the entire floor plan. The grout cracks are just the beginning of a much larger structural headache.