The structural failure under your feet
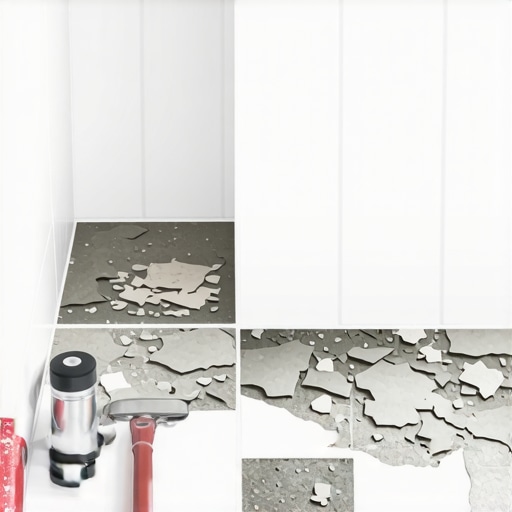
Shower tile failure and delamination often stem from subfloor deflection, improper thin-set coverage, or moisture migration within the cementitious bond. When the substrate moves beyond the L/360 deflection limit, the tensile strength of the mortar is exceeded, causing the tiles to pop off the surface. The sawdust under my nails is usually oak, but lately, it has been thin-set dust and pulverized ceramic. I have spent twenty-five years staring at floors. I see things homeowners ignore. You see a pretty mosaic. I see a failure of the mechanical bond. Most guys skip the leveling compound. They think the underlayment will hide the dip. It won’t. I spent three days grinding concrete on a job last month just so the floor wouldn’t click like a castanet. If your shower tiles are popping off, you are not looking at a tile problem. You are looking at a structural betrayal. Most installers treat thin-set like glue. It is not glue. It is a cementitious bond that relies on microscopic interlocking crystals. If the chemistry is wrong, the floor is dead before you ever step on it.
“A floor is only as good as the subfloor beneath it; deflection is the enemy of every joint.” – Master Flooring Axiom
Thin set chemistry and the bond that broke
Polymer-modified thin-set provides increased flexibility and adhesion strength for porcelain tile and natural stone in wet environments. Understanding the ANSI A118.4 standard for modified dry-set cement mortar is essential for preventing hydrostatic pressure from de-bonding the installation. Look at the chemistry. When you mix a bag of thin-set, you are triggering a hydration reaction. If you add too much water, you dilute the polymers. This leaves the cured mortar brittle. If you use an unmodified mortar (ANSI A118.1) on a non-porous porcelain tile, the moisture has nowhere to go. The crystals cannot penetrate the tile back. It is like trying to tape two pieces of glass together with wet sand. It will fail. You need those polymer chains to wrap around the microscopic irregularities in the tile. I have seen guys mix mud with a dirty paddle, introducing organic matter that rots behind the tile. It is disgusting. It smells like a swamp when those tiles finally pop off. You need a clean mix, a slow stir, and the right polymer count for the specific tile density. Porcelain has a water absorption rate of less than 0.5 percent. That is basically a raincoat. Your thin-set needs to be able to grip that raincoat through chemical adhesion, not just mechanical suction.
[IMAGE_PLACEHOLDER]
Subfloor deflection is the silent tile killer
Subfloor deflection refers to the vertical movement or flexing of the joists and sheathing under a load. For natural stone, the TCNA requires a deflection rating of L/720, while ceramic tile requires L/360 to prevent grout cracking and bond failure. I once walked onto a job where the homeowner used half-inch OSB for a shower floor. It felt like walking on a trampoline. You cannot put a rigid product like tile over a flexible base. It is a law of physics. The tile is the eggshell; the subfloor is the hand squeezing it. If the joists are spaced at 24 inches on center, the plywood between those joists is going to dip every time you take a step. That dip pulls the tile away from the mortar. You might not see it at first, but you will hear it. It is a crunching sound. That is the sound of your investment turning into gravel. To fix this, you either sister the joists or add a layer of exterior-grade plywood or a cement backer board that is properly thin-setted and screwed to the base. Note that I said thin-setted. Backer board without a bed of mud underneath it is just a hollow drum waiting to echo.
The waterproofing lies that lead to rot
Waterproof membranes and liquid-applied barriers such as ANSI A118.10 products are key to protecting the wooden structure from capillary action. Without a continuous moisture barrier, water penetrates grout joints and saturates the substrate, leading to mold growth and structural rot. Everyone thinks grout is waterproof. It is not. Grout is a sieve. It is basically colored sand with a little bit of binder. Water goes right through it. If you do not have a topical waterproofing membrane like Kerdi or a high-quality liquid roll-on, that water hits your subfloor. Once the wood gets wet, it expands. When it expands, it pushes the tile up. Then the wood dries and shrinks. The tile does not shrink. Now you have an air gap. This is where the popping starts. I have torn out showers where the 2×4 studs were so soft I could put my thumb through them. All because the installer thought a plastic sheet behind the backer board was enough. It never is. You need a system that manages moisture at the surface. If you let the mud bed get saturated, you are inviting a colony of mold to live under your feet. It is a health hazard and a construction failure.
| Thin-Set Type | ANSI Standard | Best Use Case | Flexibility Rating |
|---|---|---|---|
| Unmodified | A118.1 | Vitreous tile over cement base | Low |
| Modified | A118.4 | Porcelain tile and large format | Medium |
| High Performance | A118.15 | Submerged or heavy movement | High |
The 1/8 inch that ruins everything
Expansion joints at the perimeter and transitions must be at least 1/8 inch wide to allow for thermal expansion and contraction. Failure to provide a soft joint with 100 percent silicone caulk causes tented tiles as the field expands against rigid walls. Physics does not care about your aesthetics. Everything in a house moves. The walls move, the floors move, and the temperature changes. If you butt your tile tight against the wall, when that floor expands, it has nowhere to go but up. It creates a tent. I have seen floors pop with a sound like a gunshot because the pressure had nowhere to go. You need a gap. Hide it with the baseboard or the wall tile, but the gap must exist. And for the love of all that is holy, do not fill that corner joint with grout. Grout is rigid. It will crack the second the house settles. Use a color-matched silicone. It stays flexible. It acts like a shock absorber for your floor. If your installer says he doesn’t need expansion joints because he is a pro, fire him on the spot. He is a hack.
Mechanical versus chemical bonds in thin set
Mechanical bonding occurs when thin-set flows into the pores of a substrate, while chemical bonding relies on polymers to stick to non-porous surfaces. Achieving 95 percent coverage in wet areas is a standard requirement to prevent water pockets and hollow spots. If you pull up a popped tile and the back is clean, you had a bonding failure. If the thin-set is stuck to the tile but not the floor, your subfloor was dusty. I spend more time with a vacuum and a damp sponge than I do with a trowel. Dust is the enemy. It creates a microscopic barrier that prevents the mortar from ever touching the substrate. You are basically floating your floor on a layer of skin. I also see guys using the wrong trowel size. If you use a tiny 1/4 inch notch for a large 12×24 tile, you are not getting coverage. You need to collapse the ridges. You trowel in one direction, then slide the tile into place. Do not swirl the mud. Swirling traps air. Air pockets are where water sits. Water leads to mold. Mold leads to me coming in and charging you five grand to rip it all out. Do it right the first time.
“95 percent mortar coverage is mandatory for all tile in wet areas to ensure long-term structural integrity.” – TCNA Handbook
The final checklist for a permanent shower
Substrate preparation, mortar selection, and trowel technique are the pivotal elements of a successful installation. Following a technical checklist ensures that the installation meets industry standards and prevents costly repairs. Before you even open a box of tile, you need to check your environment. Is the room too hot? The water will evaporate out of your thin-set too fast and it will skin over. Is the floor level? If you have a hump in the middle, your large format tiles will lippage and trip you every morning. This is not about making things look pretty. This is about engineering a surface that can handle the weight of a person and the constant cycle of heat and moisture. Use a high-quality modified thin-set. Back-butter every single tile. This means you spread a thin layer of mud on the back of the tile like you are buttering toast. It ensures that the chemical bond is established on both sides. It is extra work. Most guys skip it. That is why their tiles pop and mine do not.
- Verify subfloor deflection meets L/360 or L/720 requirements based on tile material.
- Apply a waterproof membrane to the entire shower enclosure and floor.
- Select a polymer-modified thin-set meeting ANSI A118.4 or A118.15.
- Clean all dust and debris from the substrate using a HEPA vacuum.
- Use a square-notch trowel of appropriate size for the tile dimensions.
- Back-butter each tile to ensure 100 percent contact with the mortar.
- Maintain a 1/8 inch expansion gap at all perimeter walls and corners.
- Fill all change-of-plane joints with 100 percent silicone rather than grout.