Why You Should Always Undercut Door Casings for Laminate
I once spent three days grinding concrete on a job last month just so the floor wouldn’t click like a castanet. Most guys skip the leveling compound. They think the underlayment will hide the dip. It won’t. I have seen countless DIY jobs where the homeowner spent forty hours meticulously cutting laminate planks to fit around a door casing like a jigsaw puzzle. Within three months, that floor was peaking and the joints were failing. They forgot the most basic rule of floor physics. You do not bring the floor to the casing. You bring the casing to the floor. If you do not undercut your door jambs and casings, you are essentially building a trap for your flooring. Laminate is a floating system. It needs to breathe, move, and expand as the seasons change. When you notch a plank around a door frame, you create a pinch point. That pinch point is where the heartbreak begins. My knees have the scars from decades of fixing these mistakes. Let me explain why the physics of a door casing undercut is the difference between a professional finish and a structural disaster.
The expansion gap that saves your floor
Undercutting door casings allows laminate flooring to expand and contract freely beneath the door frame without visual gaps. This technique ensures that the expansion perimeter remains consistent across the entire installation. By tucking the plank under the jamb, you maintain the structural integrity of the floating floor system while hiding the necessary movement space from view. I have walked into houses where a beautiful wide plank walnut floor was cupping so bad it looked like a potato chip because the installer did not check the moisture or provide enough space. With laminate, the core is usually high density fiberboard. This material is basically a sponge made of wood fibers and resin. When the humidity in your house rises during the summer, every single cell in that fiberboard expands. If that expansion hits a solid door casing, the energy has to go somewhere. Usually, it goes up, causing the floor to peak at the seams. Undercutting solves this by letting the floor slide quietly under the wood where nobody can see it. It is a simple mechanical solution to a complex thermodynamic problem.
Why notching is a recipe for structural failure
Notching laminate around a door casing creates a static point that prevents the floor from floating. This practice leads to joint separation, buckling, and mechanical failure of the locking system. A notched plank loses its tensile strength and cannot effectively distribute the load weight of foot traffic. When you cut a C-shape or a U-shape into a laminate plank, you are compromising the very tongue and groove system that keeps the floor together. Think about the chemistry of the bond. These planks are engineered to work as a single monolithic unit. When one plank is anchored by a door casing, and the rest of the floor tries to move, the locking mechanism is put under immense shear stress. I have seen the plastic or wood HDF tongues snap off entirely. This leaves you with a gap that no amount of wood filler or caulk can fix. Unlike hardwood floors which are often nailed down, laminate must be free. If you notch it, you kill it. It is that simple.
The physics of seasonal movement in fiberboard cores
The molecular reality of laminate flooring is governed by the equilibrium moisture content of the room. Every plank has a core made of HDF which reacts to the partial pressure of water vapor in the air. In a typical 12 foot room, a laminate floor might expand by as much as a quarter inch over a six month cycle. If you have door casings on both sides of a hallway and you have not undercut them, you are effectively putting the floor in a vice. The pressure can reach hundreds of pounds per square inch. This is why we see the floor lifting off the subfloor. It is not a ghost. It is physics. You also have to consider the underlayment. People think a thicker pad is better. That is a lie. Too much cushion actually causes the locking mechanisms on LVP or laminate to snap under pressure because the floor deflects too much when you step on it. You need a high density underlayment and a clear path for expansion under every single door jamb in the house.
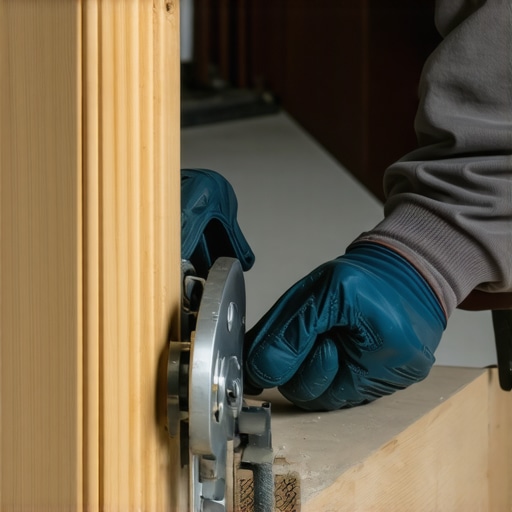
How to measure and execute the perfect undercut
To get the height right, you need a scrap piece of the actual laminate you are installing and a piece of the underlayment. You stack them against the casing. This gives you the exact thickness of the finished floor. You then use a flush cut saw, also known as a jamb saw, to cut through the bottom of the casing and the jamb. This is not a place for a hammer and chisel unless you want to spend the rest of the day wood prepping and painting. A powered flush cut saw or a manual Japanese pull saw will give you a clean, flat plane. You want to remove just enough wood so the plank can slide underneath with about a sixteenth of an inch of vertical clearance. This prevents the casing from pinning the floor down. If the casing is pinned, the floor cannot move, and you are back to the same problem as notching. You should also check for any hidden nails. Old houses are full of finish nails that will ruin a saw blade in half a second. Use a metal detector or a magnet if you are working in a pre-war home.
| Material Type | Expansion Rate (Per 10ft) | Acclimation Time | Required Gap |
|---|---|---|---|
| Laminate (HDF) | 0.25 inches | 48-72 Hours | 3/8 inch |
| Engineered Hardwood | 0.15 inches | 72+ Hours | 1/2 inch |
| Solid White Oak | 0.40 inches | 7-14 Days | 3/4 inch |
| Rigid Core LVP | 0.05 inches | 24 Hours | 1/4 inch |
The hidden danger of door jamb height
Measuring the height of the undercut requires accounting for both the plank thickness and the compressed underlayment. Failure to account for pad compression leads to pinching which stops the lateral movement of the floor. Always use a scrap piece as a guide to ensure the blade depth is consistent. If you cut too high, you leave an ugly gap that requires caulk. Caulk is the enemy of a clean flooring job. If you cut too low, you will struggle to get the plank in, and you will likely damage the tongue. I have seen guys try to force a plank under a tight cut with a pull bar and a dead blow hammer. All they do is mushroom the edge of the laminate. If the plank does not slide in like a hot knife through butter, your cut is not deep enough or your subfloor has a high spot. The subfloor is the foundation. If the subfloor is not level within 3/16 of an inch over a 10 foot radius, your undercut will never look right because the floor will be diving or climbing as it approaches the door.
Why hardwood floors and laminate share this requirement
Even though hardwood floors are often fastened to the subfloor, they still require door casing undercuts for a professional look. The difference is that hardwood is often 3/4 inch thick while laminate is usually between 8mm and 12mm. The principle of hiding the expansion gap remains the same. When I work with solid oak, I am looking at the grain direction. Wood expands mostly across its width, not its length. But a door casing usually sits perpendicular to the floor run. This means the wood is pushing directly into the jamb. If you are installing in a bathroom near showers, the humidity is even higher. The grout lines in the adjacent tile might look stable, but that wood is a living thing. It will move. I always tell apprentices that if you can see the end grain of a board at a door frame, you have failed the job. The end grain should always be tucked away, hidden by the architecture of the house.
Dealing with grout and tile transitions at the door
When your laminate meets a tiled area, like a kitchen or a bathroom, the undercut becomes even more complex. Often, the tile and grout are already in place. This creates a height transition. You cannot just undercut the wood. You might have to deal with the tile edge. I prefer to use a T-molding in these spots, but the T-molding itself needs to be tucked under the casing as well. Many installers stop the molding at the edge of the wood trim. That looks cheap. I want that transition to look like it was built into the house. If you are transitioning to a shower area, make sure you are using a 100 percent silicone sealant in the expansion gap rather than a hard grout. Grout will crack the moment the laminate tries to move. Silicone is flexible. It allows the floor to do its dance without breaking the seal. This is especially vital in high moisture zones where a leak could reach the HDF core and ruin the entire hallway.
The 1/8 inch that ruins everything
Most people think a small gap does not matter. They think they can hide a mistake with a bit of quarter round or some putty. They are wrong. A gap of just 1/8 inch can be the difference between a floor that lasts thirty years and one that fails in three. If you do not undercut and instead leave a 1/8 inch gap between the laminate and the casing, you will see that gap every time you walk through the door. It will collect dust, pet hair, and grime. Then, when the floor expands, it will close that gap and start pressing. If it is too tight, the floor will lift. I have seen the middle of a room rise three inches off the ground because the floor was pinched at the doorways. It looks like a bubble. You could literally jump on it and feel the air underneath. All of that because someone was too lazy to spend five minutes with a jamb saw.
A checklist for the perfect door casing prep
- Verify subfloor levelness within 1/8 inch near the door area.
- Check moisture content of the subfloor using a calibrated meter.
- Clear all debris and old carpet staples from the base of the casing.
- Use a scrap piece of flooring and underlayment as a height guide.
- Cut the casing and the jamb using a flush cut pull saw or power saw.
- Vacuum out the dust from inside the undercut to ensure a clear path.
- Test fit a plank to ensure it slides in and out without resistance.
- Maintain a 3/8 inch expansion gap behind the undercut for the floor to move.
Mastering the final transition
The final step of the undercut process is the most satisfying. When you slide that last plank into place and it disappears under the door frame, the room suddenly looks finished. There are no awkward gaps. There is no messy caulk. It looks like the floor was grown there. This is what separates a Master Floor Installer from a handyman. We understand that the beauty of a floor is in the details you cannot see. We know that the structural engineering of the expansion gap is what allows the aesthetic beauty to remain over time. Do not let anyone tell you that you can skip this step. Do not let a contractor tell you that ‘notching is fine.’ It isn’t. If they don’t have a jamb saw on the truck, they aren’t the right crew for the job. Your floor is an investment in your home. Protect it by respecting the physics of the material. Undercut your casings, keep your subfloors level, and give your laminate the room it needs to be a floor rather than a headache.
“A floor is only as good as the subfloor beneath it; deflection is the enemy of every joint.” – Master Flooring Axiom
“Floating floors require a minimum of 1/4 inch expansion space at all vertical obstructions to prevent buckling during hygroscopic expansion.” – General Flooring Standards