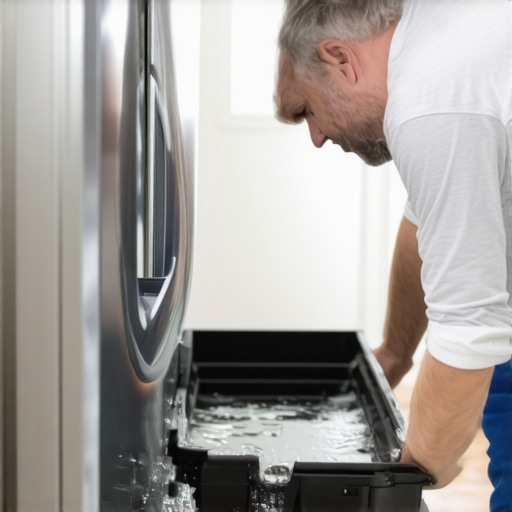
I remember a job in a high-rise where a beautiful wide-plank floor had been installed just weeks prior. The homeowners thought they were safe because the box said waterproof. A slow drip from the refrigerator water line changed that reality. Within forty-eight hours, the floor looked like a topographical map of the Andes. Homeowners always ask why their waterproof vinyl or laminate is buckling. Usually, it is because they locked it under a heavy kitchen island or a massive appliance, killing the floor ability to breathe and move. Water does not just sit on top of these floors, it finds the weakest point, the perimeter, and settles underneath where you cannot see it until the damage is structural. I spent three days on that job pulling up planks and testing the subfloor moisture levels because the installer had ignored the basic physics of expansion. Flooring is not just a surface, it is a complex engineering system that relies on dry conditions and movement. When a refrigerator leak occurs, the clock starts immediately. If you do not act within the first few hours, the cellulose fibers in your laminate core will swell past the point of no return. This is the reality of modern flooring chemistry and the reason why a simple leak can turn into a five-figure demolition project.
The silent killer behind the compressor
Refrigerator water leaks often originate from failed plastic supply lines, clogged defrost drains, or faulty inlet valves. These slow drips saturate laminate flooring cores and subfloor materials like plywood or concrete. Immediate water extraction and dehumidification are the only ways to prevent permanent floor buckling and mold growth.
The mechanics of a refrigerator leak are insidious because they often happen at the back of the appliance where airflow is minimal. The heat generated by the compressor creates a warm, humid microclimate that accelerates the rate at which wood fibers absorb moisture. Laminate is essentially a sandwich of high-density fiberboard (HDF) topped with a photographic layer and a melamine wear layer. While the top is nearly impenetrable to water, the edges where the planks click together are the Achilles’ heel. Capillary action pulls the water into the tongue and groove system. Once the water enters the HDF core, the wood fibers begin to expand. This is not a linear expansion. It is a three-dimensional swelling that breaks the internal bonds of the resin. I have seen guys try to dry these out with a hair dryer, but all that does is crack the wear layer while the core remains a soggy mess. You need to understand that the water is moving via surface tension through the entire installation. It does not stay in one spot. It follows the slope of the subfloor, often pooling in low spots several feet away from the actual leak. This is why you must pull the refrigerator out completely the moment you suspect a problem. Do not wait for the floor to start clicking or popping. If the trim feels damp, the floor is already in trouble.
“A floor is only as good as the subfloor beneath it; deflection is the enemy of every joint.” – Master Flooring Axiom
The false promise of waterproof marketing
Waterproof laminate flooring typically refers only to the surface wear layer and tightly locked joints that prevent top-down penetration. However, hydrostatic pressure and perimeter seepage allow moisture to reach the untreated underside of the planks. True moisture resistance requires sealed perimeters and vapor barriers.
Marketing teams love the word waterproof, but in the flooring industry, we have a saying that nothing is waterproof if you leave it submerged long enough. The term usually means the floor can withstand a spill for twenty-four to seventy-two hours. It does not mean the floor can handle a constant drip from a faulty ice maker. When water sits against the edge of a plank, it eventually finds a way through the wax or polymer coating. Once it hits the HDF, the game changes. The HDF is made of wood particles bonded with resins like urea-formaldehyde. These resins are strong, but they are not immune to the hydraulic force of expanding cellulose. As the fibers swell, they push against each other with incredible PSI. This is why you see the edges of the planks lifting, a phenomenon we call peaking. Peaking is a sign that the floor has no room to expand because it is trapped against a wall or an appliance. If you have a refrigerator sitting on top of the laminate, you have effectively pinned the floor in place. When it tries to expand from the moisture, it has nowhere to go but up. This creates the classic bounce you feel when walking on a water-damaged floor. It is not just water under the planks, it is the structural failure of the locking mechanism itself.
The capillary action within the fiberboard core
The molecular structure of wood fibers in laminate flooring facilitates capillary action, where water molecules are drawn into microscopic voids. This hygroscopic behavior leads to interfacial de-bonding of the resins and adhesives. Understanding this porosity is essential for effective restoration and moisture mitigation.
Let us look at the chemistry of the core. The HDF is compressed at high temperatures to create a dense material, but it remains porous at a microscopic level. Water molecules are polar, and wood fibers are full of hydroxyl groups that love to bond with water. When a leak occurs, the water does not just sit in the gaps. It is actively pulled into the cell walls of the wood particles. This causes the cell walls to thicken, which increases the overall volume of the plank. This process is known as adsorption. Once the water is inside the cell walls, it is much harder to remove than free water sitting on the surface. This is why you can dry the floor for a week and still see it buckled. The internal moisture content of the HDF must be brought back down to its equilibrium moisture content (EMC). In most homes, this is between six and nine percent. After a refrigerator leak, I have seen readings as high as twenty-five percent. At that level, the structural integrity of the plank is compromised. The glues that hold the fibers together start to dissolve or soften. Even if you manage to dry it out, the floor might feel soft or crunchy when you walk on it because the internal matrix of the HDF has been shattered. This is why immediate extraction is so vital. You are not just fighting a puddle, you are fighting a chemical reaction that wants to turn your floor back into sawdust.
Why the subfloor determines your recovery rate
The subfloor material, whether OSB, plywood, or concrete, acts as a moisture reservoir that can prolong drying times. Non-porous subfloors trap water against the laminate backing, while porous subfloors absorb the leak, leading to structural rot or efflorescence in masonry surfaces.
If you are on a concrete slab, the water has nowhere to go but up or sideways. Concrete is porous, and it will soak up the water like a sponge. This is a nightmare for laminate. Even if the floor looks dry on top, the concrete underneath is still holding moisture. This moisture will slowly release over weeks, a process called off-gassing, which will keep the laminate core damp and lead to mold. If you have a plywood or OSB subfloor, the risk is even higher. Wood subfloors will rot. I have seen floor joists start to grow mushrooms because a refrigerator leak went unnoticed for months. When I walk onto a job, the first thing I do is pull up a transition strip or a piece of baseboard. I want to see what is happening underneath. If the underlayment is wet, the floor has to come up. There is no way around it. Many people use a foam underlayment that claims to be a moisture barrier, but all it does in a leak is trap the water against the bottom of the laminate. It creates a sandwich of moisture that cannot evaporate. You end up with a stagnant pool that smells like a swamp within days. The physics of evaporation require airflow, and there is zero airflow under a clicked-together laminate floor. This is why I tell people to stop wasting time with fans on top of the floor. You have to get the air to the subfloor if you want to save anything.
| Material Type | Core Composition | Expansion Rate | Recovery Potential |
|---|---|---|---|
| Standard Laminate | HDF (Wood Fiber) | High | Very Low |
| Waterproof Laminate | Treated HDF | Medium | Low |
| Solid Hardwood | Natural Cellulose | Moderate | Moderate |
| LVP (SPC) | Stone Plastic | Negligible | High |
The physics of hydrostatic pressure in floor joints
Hydrostatic pressure occurs when trapped water is forced into laminate joints by the weight of appliances or foot traffic. This mechanical stress breaks the tongue and groove connections, leading to vertical deflection and locking mechanism failure. Managing pressure points is a key component of floor salvage.
Think about the weight of a refrigerator. It can be three hundred to five hundred pounds. That weight is concentrated on four small feet. When water gets under the floor, that weight creates pressure. Every time the compressor kicks on and vibrates, or every time you walk by, you are pumping water deeper into the joints of the floor. It is like a hydraulic press. This pressure forces the water into the unsealed parts of the laminate. I have seen situations where the water was pushed ten feet away from the leak just by the pressure of people walking on the planks. This is why the area of damage is always larger than the area of the spill. You have to map the moisture using a professional meter. I use a pinless moisture meter that uses electromagnetic signals to detect water up to an inch deep. It allows me to see the ghost of the water traveling under the planks. If you do not have a meter, you are just guessing. And in this business, guessing costs thousands of dollars. You also have to consider the expansion gap. Most installers are lazy and do not leave the required quarter-inch gap at the walls. When the floor gets wet and tries to expand, it hits the wall and the pressure has to go somewhere. The planks will either buckle up in the middle of the room or the tongues will snap off. Once those tongues snap, the floor is junk. You cannot glue them back together and expect them to hold.
A triage protocol for saturated planks
The triage protocol for water-damaged laminate involves source termination, immediate appliance removal, and selective plank extraction. Identifying irreversible swelling in the HDF core allows for targeted replacement rather than complete floor demolition, saving material costs and installation time.
- Shut off the water supply valve immediately to stop the flow.
- Pull the refrigerator out and place it on a protective plywood sheet to prevent further floor gouging.
- Remove the baseboards around the perimeter of the affected area to allow the edges to breathe.
- Use a wet-dry vacuum to suck water out of the expansion gaps and joints.
- Check the moisture levels in the subfloor using a professional grade meter.
- Extract any planks that show visible peaking or soft spots in the core.
- Set up a low-grain refrigerant (LGR) dehumidifier to pull moisture from the air and the materials.
- Point air movers across the surface but do not apply direct high heat.
Measuring the damage with a pinless moisture meter
Professional moisture meters utilize electrical impedance or electromagnetic sensors to quantify the moisture content of flooring materials. Accurate readings compared against dry standards are essential data points for insurance claims and restoration decisions.
When I walk into a house with a leak, I am looking for the dry standard. I find a part of the floor that I know is dry, maybe in a bedroom or a closet. That gives me my baseline. If the dry floor is at eight percent and the floor near the fridge is at eighteen percent, I know I have a problem. The difference between those two numbers tells me how much water the floor has absorbed. A pinless meter is great because it does not damage the wear layer, but sometimes I need to use a pin-type meter to get deep into the subfloor. I will stick the pins into the subfloor through the expansion gap. If the subfloor is saturated, the laminate is almost certainly going to fail. You also have to look for delamination. This is where the top photographic layer starts to peel away from the HDF core. Once that starts, the floor is aesthetically ruined. There is no glue that can fix that and look good. The heat from the refrigerator can also cause the adhesive in the laminate to become brittle. If the floor was exposed to both heat and water, the damage happens twice as fast. I have seen the melamine layer literally bubble up like a blister. That is a sign of extreme moisture and heat. It is a total loss at that point.
“Laminate flooring must be maintained within a specific relative humidity range to prevent irreversible dimensional change.” – NWFA Technical Guidelines
The structural reality of subfloor moisture traps
Subfloor moisture traps occur when vapor barriers or insulating underlayments prevent vertical evaporation. This results in lateral migration of water, often causing damage to adjacent rooms and structural framing. Proper ventilation is the primary solution for long-term stability.
In regions with high humidity, like the coastal South, this problem is amplified. The air is already saturated, so it cannot take on much more moisture from a wet floor. You end up with a situation where the floor stays wet for weeks. In a dry climate like Phoenix, you might get lucky and have some of it evaporate, but you will still deal with the shrinkage and cracking after the floor dries out too fast. The subfloor is the foundation of the system. If you are on a crawlspace, you need to check underneath the house. I have seen refrigerator leaks that have dripped through the subfloor and created a pool of water in the crawlspace. This leads to wood rot and attracts termites. You are not just saving a floor, you are protecting the bones of your house. Every time I see a leak, I think about the gravity of the situation. Water always takes the path of least resistance. It will find every nail hole, every crack in the subfloor, and every gap in the vapor barrier. This is why a simple kitchen leak can lead to mold in the basement. It is all connected. You have to think like an engineer, not just a decorator. The floor is a system, and the system has been compromised.
The chemistry of the high density fiberboard core
The chemical composition of HDF cores involves lignocellulosic fibers and thermosetting resins that undergo hydrolysis when exposed to excessive water. This chemical breakdown results in permanent thickness swelling and loss of mechanical strength in the locking system.
Let us get into the weeds of the HDF core chemistry. Most laminate cores are made by mixing wood fibers with a resin and then pressing them under extreme heat. This creates a bond that is very strong in dry conditions. However, the resin is susceptible to hydrolysis, which is a chemical reaction with water. When the water molecules enter the HDF, they start to break the chains of the resin. This is why the floor feels soft. The wood fibers themselves also have a memory. Once they have been swollen by water, they never truly go back to their original size. They might shrink a little as they dry, but they will stay distorted. This is why you get that permanent ridge at the seams. Even after the floor is dry, the seams stay peaked. This is a telltale sign of a previous water event. If you are buying a house and see peaked seams in the kitchen, you know there was a leak. It is a permanent scar on the floor structural history. The only way to fix it is to replace the affected planks. But here is the catch, laminate is often discontinued. If you do not have extra boxes from the original installation, you might end up replacing the whole room because you cannot find a match for the locking system. Manufacturers change their profiles every few years just to make sure you have to buy a new floor. It is a racket, and it is why I always tell people to buy three extra boxes and keep them in a dry closet.
The 1/8 inch that ruins everything
The expansion gap of one-eighth to one-quarter inch is a non-negotiable requirement for floating floor installations. Without this clearance, moisture-induced expansion leads to structural peaking and joint separation, rendering the warranty void and the floor unstable.
I have spent years fixing floors that were installed tight against the baseboards. It is the most common mistake in the industry. People want it to look tight, so they push the planks right up to the drywall. Then a leak happens, the floor tries to expand that tiny eighth of an inch, and it cannot. The force has to go somewhere. The floor will actually lift the kitchen island or pop the transition strips right out of the floor. I once saw a floor that had expanded so much it had bowed up in the middle of the kitchen like a bubble. You could literally jump on it and it would bounce. That was all because the installer did not leave a gap. When you are drying a floor after a leak, you need to check these gaps. If the floor has expanded and is now touching the wall, you need to use a toe-kick saw or a multi-tool to cut a gap. This will sometimes allow the floor to lay back down as it dries. It is a trick of the trade that can save a floor from the dumpster. But you have to be careful not to cut into the subfloor or the electrical lines that often run behind the baseboards. It is precision work, and it requires a steady hand and a lot of patience. If you do it right, the floor has room to breathe again. If you do it wrong, you have just made a mess.
Preventive measures for the modern kitchen
Preventive flooring strategies include the installation of plastic drip trays under refrigerators and the use of braided stainless steel supply lines. These engineered solutions provide leak containment and durability, significantly reducing the risk of catastrophic floor failure.
If you are installing a new floor, do it right. Put a plastic tray under the fridge. They cost twenty bucks and can save you twenty thousand. The tray has a lip that will catch a slow drip and direct it forward where you can see it before it ruins the floor. Also, get rid of those cheap plastic water lines. They are garbage. They get brittle over time and snap. Use a braided steel line. They are much more durable. And finally, seal your perimeter. Use a 100 percent silicone caulk in the expansion gap around the refrigerator area before you put the baseboards back. This creates a bathtub effect. If there is a leak, the water stays on top of the floor where you can mop it up, instead of running under the planks. It is a simple step that most guys skip because they are in a hurry. But in my world, that ten-minute step is the difference between a floor that lasts thirty years and one that lasts three. You have to respect the physics of water. It is the most powerful force in your home, and it wants to destroy your floor. Your job is to make that as difficult as possible.