
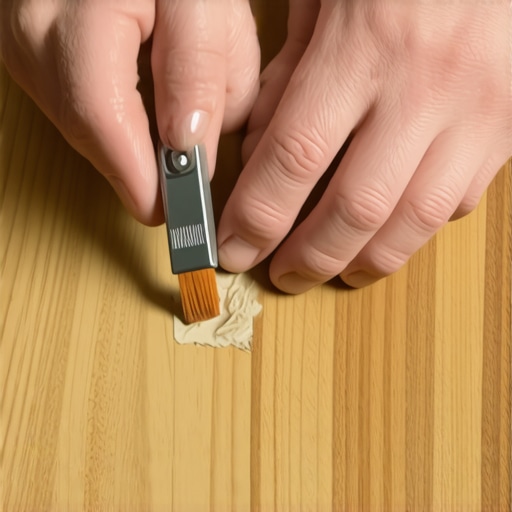
You do not need to lease a drum sander and turn your entire home into a dust storm just because a heavy piece of furniture dragged a deep trench into your floor. Most homeowners, and quite frankly a lot of rookie contractors, panic when they see a deep scratch that penetrates past the polyurethane layer into the raw wood fiber. They immediately assume the only solution is a dusty, expensive, and destructive sand-and-refinish job. This guide will show you how to repair deep gouges and scratches in your hardwood floors by utilizing the exact chemical and physical techniques that master floor installers use every single day.
The day the walnut potato chip broke my heart
I once walked into a house where a $15,000 wide-plank walnut floor was cupping so bad it looked like a potato chip because the installer didn’t check the crawlspace humidity before laying down the planks. It was a brutal lesson in wood mechanics, but it taught me that wood is alive and reacts to every force. When a dog claw or a metal chair leg gouges your hardwood floors, it does not just remove material. It crushes the cellular structure of the wood fibers and tears the protective cross-linked polyurethane coating. If you treat this as a simple cosmetic scratch, your repair will fail within months. You must understand the physics of wood compression and the chemistry of topcoat finishes to make a deep scratch vanish permanently without sanding the entire room.
“A floor is only as good as the subfloor beneath it; deflection is the enemy of every joint.” – Master Flooring Axiom
The molecular anatomy of a deep hardwood gouge
Deep scratches in hardwood floors are physical deformations where wood fibers are compressed or severed and the protective polyurethane seal is breached. Repairing these areas requires restoring the lost wood mass with structural fillers and chemically bonding a new topcoat to the existing finish without creating visible halos or witness lines. If you ignore the depth of the scratch, moisture will eventually penetrate the raw wood, causing localized graying and rot.
Wood is a porous, fibrous material composed of cellulose, hemicellulose, and lignin. When a sharp object gouges the surface, it either compresses these fibers or tears them away completely. If the fiber is merely compressed, we can actually use thermodynamic principles to swell the wood cells back to their original shape. If the fibers are gone, we must use a compound that mimics the density, flexibility, and stain-receptive properties of the surrounding wood. Normal wood filler from a big-box store will not work. It shrinks as it cures, dries to a chalky texture, and does not hold stain. We need to use professional-grade epoxy resins, solvent-based wood doughs, or burn-in wax sticks that chemically fuse with the surrounding wood structure.
The thermodynamic steam trick for compressed wood fibers
Ironing out compressed wood fibers uses heat and moisture to expand crushed cellular walls back to their original volume. This technique only works on bare wood where the polyurethane finish has been completely broken, allowing water molecules to penetrate the cell walls. By applying a damp cotton cloth and a hot iron to the gouge, you force water to vaporize and expand inside the wood cells, popping the indentation back up to ground level.
To execute this, clean the scratch with mineral spirits to remove any wax or dirt. Moisten a white cotton t-shirt with distilled water. Place the damp cloth directly over the scratch. Set your household iron to its highest steam setting. Place the tip of the iron onto the damp cloth directly over the gouge and hold it there for ten seconds. The heat instantly converts the liquid water into steam, which penetrates the wood cells and forces them to expand. Remove the cloth and check your progress. You will see the bottom of the gouge has risen. Let the area dry for twenty-four hours before proceeding with any coloring or sealing. If the wood grain was torn rather than compressed, steaming will not restore the missing material, and you must proceed to chemical filling.
The chemical science of infusing structural color
Coloring a deep hardwood scratch requires matching the multi-tonal grain of natural wood using alcohol-based dyes rather than thick pigment stains. Pigment stains contain large color particles that sit on top of the wood and obscure the grain, while dyes contain microscopic color molecules that penetrate deep into the cellular structure of the wood. This distinction is what prevents your scratch repair from looking like a muddy smear of brown paint.
Before you apply any filler, you must color the raw wood fibers at the bottom of the trench. If you fill the scratch first with clear or neutral filler, you will seal the white, damaged wood fibers beneath it, creating a permanent white line under your patch. Use a fine-tip artist brush and an alcohol-based aniline dye or a high-quality wood stain marker. Apply the color sparingly to the scratch. Keep a clean rag damp with mineral spirits in your other hand. If you get dye on the surrounding, undamaged finish, wipe it off immediately. The polyurethane coating will resist the dye if you wipe it quickly, leaving the color only where the raw wood was exposed. Build the color in thin layers, always matching the lightest background tone of the wood first. You can draw dark grain lines back in later with a graining pencil.
The choice between burn-in wax and solvent-based fillers
Choosing between polymer-modified wood dough and hard burn-in wax depends on the traffic level of the area and the elasticity of the floor. High-traffic zones near exterior doors require solvent-based fillers that dry hard and accept finish, while floating floors subject to high seasonal movement require flexible burn-in wax sticks that can flex without popping out. Most amateur DIYers use soft putty, which never cures and attracts dirt, turning your scratch into a black streak.
| Filler Type | Chemical Base | Flexibility Rating | Best Application Zone | Drying Time |
|---|---|---|---|---|
| Hard Burn-In Wax | Shellac & Carnauba Wax | High | High-flex, floating floors | Instant upon cooling |
| Solvent-Based Wood Dough | Nitrocellulose & Wood Flour | Medium | Solid hardwood, high traffic | 2 to 4 hours |
| Two-Part Epoxy Resin | Epoxy Polymide | Low | Deep structural gouges | 30 minutes to 1 hour |
Hard burn-in wax is the gold standard for cabinet makers and master floor mechanics. It requires a hot knife or a specialized soldering iron to melt the hard resin into the gouge. Once inside the scratch, it cools instantly, hardens to the same density as the wood, and will not shrink. Solvent-based wood dough is packed with real wood flour and shrinks very little, but it must be applied slightly proud of the surface and sanded flush using micro-abrasives once dry.
The micro-sanding protocol to prevent witness lines
Sanding a localized repair requires limiting the abrasive action to a fraction of an inch to prevent stripping the surrounding factory finish. Using a block of wood wrapped in 400-grit wet-or-dry sandpaper allows you to level the patch without touching the adjacent polyurethane coat. If you sand with your bare fingers, you will create a dished dip in the wood that will catch the light and expose your repair from twenty feet away.
Wrap your abrasive paper around a hard, flat sanding block. Moisten the paper with a drop of mineral spirits to act as a lubricant. Gently sand the patch in the direction of the wood grain. Do not sand across the grain. Check your progress every three strokes by wiping the area clean with a microfiber cloth and looking at the repair from a low angle. The goal is to make the patch perfectly level with the surrounding finish. Once the patch is level, use a gray nylon abrasive pad to lightly scuff the surrounding finish about half an inch around the repair. This creates microscopic scratches, known as a mechanical anchor, which allows the new topcoat to chemically adhere to the old finish.
The chemistry of matching the polyurethane sheen
Applying the final clear coat requires matching both the chemical composition of the original finish and its exact specular gloss level. Applying a high-gloss finish over a satin floor will make the repair stand out like a beacon, while using a water-based finish over an oil-based finish can cause peeling due to surface tension incompatibility. You must test the finish in an inconspicuous area, like a closet, before applying it to the middle of your living room.
Most modern hardwood floors are finished with aluminum oxide, pre-catalyzed polyurethane, or waterborne acrylics. For spot repairs, a high-quality oil-modified polyurethane or a waterborne acrylic polyurethane spray is highly effective. Do not spray directly onto the floor. Spray a small amount of the finish into a plastic cup, then use an artist brush to paint the finish onto the repair. If the finish is too glossy, you can dull it down after it cures by rubbing it very gently with 0000 steel wool and a drop of paste wax. If the finish is too matte, you can buff it with a clean cotton cloth to increase the sheen.
“Every polyurethane coating has a specific surface energy; matching this energy is what prevents the new coat from peeling off like old skin.” – NWFA Technical Guidelines
The absolute checklist for a flawless spot repair
Follow these steps systematically to ensure your repair is permanent and invisible to the naked eye. Skipping even one of these steps will result in a patch that looks cheap, darkens over time, or pops out during the next seasonal humidity shift.
- Analyze the damage: Determine if the wood fibers are compressed (use steam) or missing (use filler).
- Decontaminate the zone: Clean the scratch with mineral spirits to remove oils, wax, and silicones.
- Color the raw wood: Apply alcohol-based wood dye to match the base tone before filling.
- Select the correct medium: Use hard burn-in wax for flexible zones or solvent dough for stable timber.
- Level the repair: Use a hard block and 400-grit wet-or-dry paper lubricated with mineral spirits.
- Create a mechanical bond: Scuff the surrounding finish lightly to allow the new topcoat to stick.
- Match the sheen: Apply the matching polyurethane with a fine brush and blend the edges.
How to handle click-lock laminate and shower-adjacent thresholds
While this guide focuses on solid and engineered hardwood floors, some homeowners confuse laminate or hybrid luxury vinyl plank with real wood. You cannot steam laminate or engineered floors with thin wood veneers because the heat will delaminate the glue layers. Furthermore, if you are working near showers or wet areas, moisture defense is your absolute priority. Grout lines in adjacent tile floors must be sealed, and any transition thresholds must be caulked with 100% silicone underneath the T-molding to prevent water from creeping under the wood planks. A hardwood floor next to a bathroom is always at risk, so ensuring your scratch repair is completely sealed with a high-grade polyurethane is paramount to stopping water from entering the wood core.
Frequently asked questions regarding spot repairs
Can I use wood putty to fix a deep scratch? No. Standard wood putty does not dry hard and will attract dirt, making the scratch look like a dark, dirty line. Use solvent-based wood dough or hard burn-in wax instead.
Will steam damage the finish around the scratch? Yes, if you are not careful. Keep the steam concentrated directly over the bare wood fibers. Do not let the hot iron sit on undamaged polyurethane for more than a few seconds, or it may blush and turn white.
How do I find the correct color stain? Always start lighter than you think you need. You can always apply a second, darker layer of dye, but you cannot lighten wood fibers once they have absorbed a dark dye.
By treating your hardwood floor as a precision engineered surface rather than a simple aesthetic canvas, you can execute repairs that are structurally sound and visually indistinguishable from the rest of the floor. Take your time, use the right chemistry, and protect that subfloor.