Most guys skip the leveling compound. They think the underlayment will hide the dip. It won’t. I spent three days grinding concrete on a job last month just so the floor wouldn’t click like a castanet. I have spent twenty-five years on my knees with a moisture meter and a straight edge, and if there is one thing I have learned, it is that the subfloor is the only thing that matters. People look at the shiny top layer of a laminate floor and think they are buying a finished product. They are wrong. They are buying a structural assembly that relies entirely on the geometry of the surface beneath it. If your subfloor is out by more than an eighth of an inch over ten feet, your locking mechanisms will fail. It is not a matter of if, but when. I have seen fifteen thousand dollar wide-plank walnut floors turn into potato chips because some installer did not check the crawlspace humidity. Flooring is not decoration. It is a performance surface. When you are dealing with laminate, you are dealing with a high-density fiberboard core that is essentially compressed sawdust and resin. It is brittle. It is unforgiving. And if you do not know how to cut it, you will end up with a ragged edge that looks like a beaver chewed through it.
The physics of the chip free cut
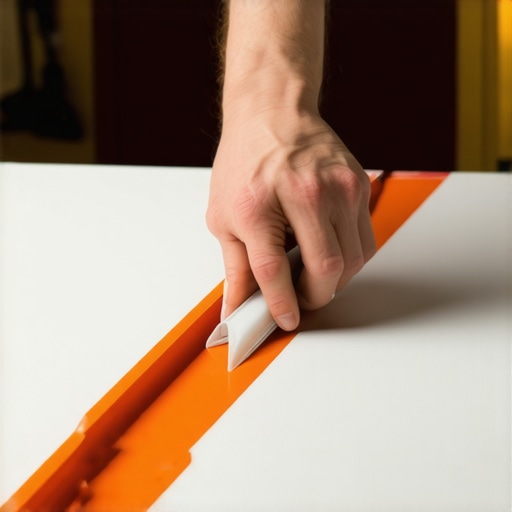
Laminate flooring requires blue painters tape to prevent chipping because the melamine wear layer is extremely brittle and prone to shattering under the upward force of a circular saw blade. By applying pressure to the surface fibers, the tape stabilizes the decorative layer during the high-speed impact of carbide teeth. This is not just a trick for beginners. It is a fundamental requirement when you are working with materials that have a high Janka hardness on the surface but a softer core. When a saw blade rotates, the teeth exit the material on the top side if you are using a standard circular saw. That upward exit is where the damage happens. The melamine resin, which gives laminate its durability, does not bend. It snaps. By laying a strip of high-quality painters tape across your cut line, you are essentially creating a temporary laminate of your own. The adhesive on the tape binds to the wear layer, providing enough tensile strength to resist the upward pressure of the blade. It is a five-dollar solution to a five-hundred-dollar mistake. You have to realize that once that wear layer chips, the floor is compromised. Moisture can now enter the HDF core. Once moisture gets into that core, the board will swell like a sponge and you will never get it back down.
“A floor is only as good as the subfloor beneath it; deflection is the enemy of every joint.” – Master Flooring Axiom
Why your subfloor is lying to you
Subfloor flatness is the most ignored variable in flooring failures because installers rely on underlayment to bridge gaps that are far too large for foam to handle. A flat subfloor must meet the industry standard of three-sixteenths of an inch deviation over a ten-foot radius to prevent mechanical failure. When I walk onto a job site, the first thing I do is pull out a long box level. I do not care what the builder said. I do not care if the house is new. New houses are some of the worst offenders because the green lumber shrinks as it dries, pulling the subfloor into weird troughs and peaks. If you lay laminate over a dip, every time you step on that spot, the tongue and groove joint flexes. Metal fatigue is real, but plastic and wood fatigue happens even faster. Eventually, the locking mechanism will snap. Then you get the click. That annoying, repetitive sound that tells everyone in the house that the floor was installed by an amateur. You can avoid this by using a high-quality self-leveling underlayment. We are talking about cementitious products that flow like water and dry hard as a rock. Do not use the cheap stuff. You need something with a high compressive strength, at least 3,000 PSI, to ensure that the floor stays stable under heavy furniture like pianos or kitchen islands.
| Material Type | Janka Hardness (lbf) | Expansion Gap Required | Typical Core Density |
|---|---|---|---|
| Solid White Oak | 1,360 | 3/4 inch | 750 kg/m3 |
| HDF Laminate | Varies (High) | 1/4 – 1/2 inch | 900-1000 kg/m3 |
| Engineered Maple | 1,450 | 1/2 inch | 800 kg/m3 |
| LVP (Vinyl) | N/A | 1/4 inch | 1800 kg/m3 (SPC) |
The ghost in the expansion gap
Expansion gaps are the breathing room for your floor that must be maintained around every fixed vertical surface to prevent buckling and peaking. Without a minimum quarter-inch gap at the perimeter, the natural thermal expansion of the material will force the planks upward at the weakest joints. People think that because laminate is not solid wood, it does not move. That is a dangerous lie. Laminate is mostly wood fiber, and wood fiber reacts to humidity. When the humidity in the room rises, those fibers absorb moisture and expand. If the floor is tight against a wall, it has nowhere to go but up. I have seen floors tent three inches off the subfloor because some guy wanted a tight fit against the baseboard. You need to leave that gap. Use spacers. Do not trust your eyes. And for the love of all things holy, do not run the floor under heavy cabinets. A kitchen island weighs five hundred pounds. If you pin the laminate under that island, you have effectively locked it in place. Now, when the floor tries to expand from the other side of the room, it hits that island and buckles. This is why we use T-moldings in large spans. If your room is longer than thirty feet, you need a break. It might not look as clean as a single run, but it beats replacing the entire floor in two years.
Why your shower grout is destined to crack
Shower grout cracks occur because the underlying framing or subfloor deflects beyond the allowable limit of L/360, which creates movement that the rigid cementitious grout cannot accommodate. Proper tile installation requires a rigid substrate and a waterproof membrane that uncouples the tile from the structural movement of the house. I hate seeing grout in the corners of showers. It is a sign of a lazy installer. Corners should always be caulked with a high-quality 100 percent silicone sealant. Why? Because houses move. The studs in your walls twist. The floor joists under your feet bend. Grout is essentially thin concrete. It does not stretch. When the wall moves a millimeter and the floor stays still, the grout will crack. If you do not have a proper waterproofing system like a bonded membrane or a liquid-applied guard, that water is going to find its way into the subfloor. I have seen showers where the plywood underneath was so rotten you could put a finger through it. All because someone used grout where they should have used silicone. You have to think about the chemistry. Modified thin-set has polymers that allow for some movement, but once that grout is cured, it is a brittle rock. If the subfloor has any bounce, the grout is the first thing to go.
- Check subfloor moisture with a pin-less meter before starting.
- Acclimate laminate planks in the room for at least 48 hours.
- Use a 60-tooth carbide blade for all cross-cuts.
- Apply blue painters tape to the cut line to prevent melamine chipping.
- Vacuum the subfloor three times to ensure no grit is trapped under the planks.
- Maintain a consistent expansion gap using dedicated plastic spacers.
The geometric reality of saw blades
Saw blade geometry determines the quality of the cut by influencing how the teeth engage with the melamine surface and the high-density core of the laminate. A high tooth count blade with a Triple Chip Grind is the best choice for laminate because it shears the fibers rather than tearing them. If you are using the same blade you used to frame a deck, you are going to ruin your floor. Framing blades have 24 teeth. They are designed for speed, not precision. For laminate, you need a 60 or 80-tooth blade. The angle of the teeth, known as the hook angle, also matters. A negative hook angle is often better for laminate because it does not try to grab the material as aggressively, which reduces the chance of shattering that top wear layer. When you combine the right blade with the painters tape trick, you get an edge that is factory-clean. I also tell guys to cut from the back of the board if they are using a miter saw. This way, the teeth are entering the finished face and exiting the back, which keeps all the chipping on the side that no one will ever see. It is about understanding the direction of the force. If you do not respect the physics of the tool, the tool will destroy your material.
“The wood flooring shall be acclimated to the environment in which it is to be installed for a minimum of 72 hours.” – NWFA Installation Guidelines
The heavy burden of waterproof vinyl
Waterproof vinyl flooring often fails not because of water, but because the locking mechanisms are too thin to support the weight of the floor over an uneven substrate. High-quality Luxury Vinyl Plank must have a minimum wear layer of 20 mils to withstand residential traffic without losing its finish. Everyone wants LVP now. They think it is the magic bullet. They think they can flood their house and the floor will be fine. While the material itself is waterproof, the installation often is not. If water gets under the floor and stays there, it will grow mold. It will rot your baseboards. The bigger issue is the thickness of the plank. Cheap vinyl is thin. When you put that thin plank over a subfloor with a dip, the locking joint is only a couple of millimeters thick. It will snap within six months. I have seen it a hundred times. People buy the discount stuff from big-box stores and then wonder why the seams are opening up. If you want a floor that lasts, you have to pay for the core. A Stone Plastic Composite core is rigid. It handles temperature changes better. It does not telegraph every little bump in the subfloor. But even with the best LVP, you still need that painters tape for your cuts. The vinyl wear layer can peel if the blade is dull or the tooth count is too low. Precision is a habit, not an accident. You have to be a stickler for the details if you want a floor that outlives your mortgage.