
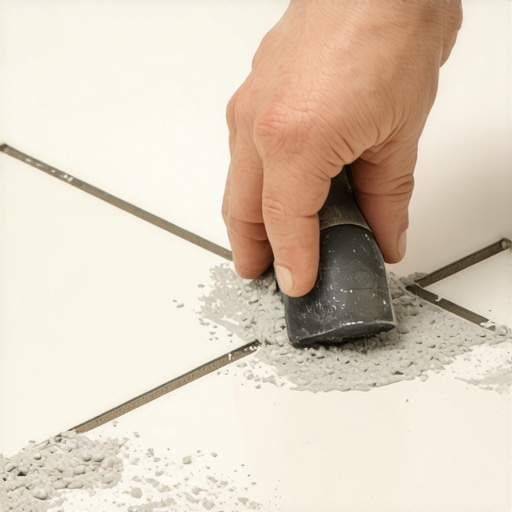
I spent three days grinding concrete on a job last month just so the floor wouldn’t click like a castanet. That job taught me that the foundation dictates the finish. Most installers want to rush the prep phase because they cannot bill for it as easily as the installation itself. I walked into a master bath last week where the previous guy tried to use a high-speed oscillating tool to remove stained grout from a delicate marble mosaic. He chewed through the stone edges and turned a simple refresh into a five thousand dollar tear-out. Experience tells me that the most expensive power tool in the trailer is often the wrong choice for precision work. I prefer the grit and the feedback of a five dollar manual carbide rake. It smells like wet stone and old thin-set in these tight shower stalls but my hands know the difference between a clean channel and a ruined substrate. You have to feel the resistance of the Portland cement against the blade. You have to understand that grout is not just a filler. It is a structural component that manages the lateral expansion of your tile field.
The overlooked carbide tipped hand rake for shower joints
Carbide-tipped grout rakes are the most effective manual tools for removing cementitious grout because they provide mechanical leverage without the risk of chipping ceramic tiles or damaging the waterproof membrane underneath. Unlike power tools that spin at twenty thousand revolutions per minute, a manual rake allows the installer to control the depth of the cut and ensure the tile shoulders remain intact. This tool is essential for showers where the sloped pan requires precise grout lines for proper drainage. The physical feedback provided by a hand tool ensures you do not inadvertently pierce the topical waterproofing or the liquid-applied barrier behind the tile. When you are working in a confined space like a shower stall, the dust management of a manual tool is far superior to any mechanical alternative. I have seen guys trigger whole-house smoke alarms because they were too lazy to pick up a hand tool. You want to focus on the 2 millimeter gap between the porcelain. You want to see the original edge of the tile reappear as the old, discolored sand-and-cement mixture falls away. It is slow work. It is hard on the forearms. But it is the only way to guarantee the new grout bonds to the actual tile instead of just sitting on top of old debris.
“A floor is only as good as the subfloor beneath it; deflection is the enemy of every joint.” – Master Flooring Axiom
The molecular reality of grout adhesion and failure
Grout failure typically occurs due to excessive moisture in the subfloor or a lack of expansion gaps at the perimeter of the room. When the Portland cement in the grout becomes saturated, the chemical bonds weaken and the crystalline structure of the material begins to crumble into fine powder. This process is accelerated in high-traffic areas where deflection causes the tiles to move independently. At a microscopic level, grout is a porous matrix. It is designed to breathe, but it is not designed to be submerged. This is why the TCNA standards emphasize the importance of proper thin-set coverage and moisture barriers. If the grout is soft enough to be removed with a five dollar tool, it was likely mixed with too much water or the hydration process was interrupted by a drafty room. When I pull a rake through a joint, I am looking for the sound of the carbide scratching against the silica sand. If it sounds like scraping chalkboard, the grout is healthy but stained. If it feels like digging through damp sand, the installation was doomed from the start. You must understand the chemistry of the material you are removing. Polymer-modified grouts are tougher because the latex additives create a flexible bridge between the cement particles. These require more passes with the rake but offer better protection against the minor shifts in your floor’s joist system.
Why your power tools are killing your tile edges
Mechanical grout removal tools often cause percussion damage to the glaze of the tile which results in micro-cracking and eventual delamination of the finish. The high frequency of an oscillating multi-tool can create heat friction that weakens the epoxy bond of the thin-set. While many think speed is an advantage, the loss of control leads to overshot cuts that gouge the drywall or the hardwood floors in adjacent rooms. I have seen the aftermath of a rotary tool slip. It leaves a permanent scar on a laminate transition or a natural stone threshold that cannot be buffed out. A manual scraper behaves like a surgeon’s scalpel. You can stop the stroke the millisecond you feel the blade drift. You are using your shoulder and your core to drive the carbide into the joint, not a motor that does not know when to quit. In a bathroom where the moisture levels are high, the integrity of the tile edge is what prevents water from seeping into the wall cavity. If you nick that edge with a power blade, you have created a capillary path for water. The water will find that gap. It will travel behind the tile. It will rot your plywood subfloor. It will grow mold that you will not smell for two years until the floor starts to bounce under your feet. This is why the manual tool is the professional’s choice for repair work.
| Tool Type | Control Level | Risk of Tile Damage | Best Use Case |
|---|---|---|---|
| Carbide Hand Rake | Excellent | Very Low | Residential Showers |
| Oscillating Multi-Tool | Moderate | High | Large Commercial Floors |
| Rotary Dremel | Low | Extremely High | Wide Sanded Joints |
| Diamond Hand File | Excellent | Minimal | Edge Cleaning |
The ghost in the expansion gap
Expansion gaps are the most misunderstood element of flooring architecture because they are hidden under baseboards and shoe molding where the homeowner never sees them. A tile floor is a rigid sheet of stone that must be decoupled from the vertical walls to prevent tenting or cracking. When the humidity rises, your subfloor expands. If the tile is locked tight against the framing, the pressure has nowhere to go but up. This is the same reason hardwood floors cup and laminate planks peak at the seams. When you are scraping grout, pay close attention to the perimeter. If the installer filled the gap between the tile and the wall with hard grout instead of 100 percent silicone caulk, you have found your problem. That hard grout acts like a wedge. It transfers every vibration and every thermal shift directly into the center of the floor. This causes the grout in the middle of the room to crack. It is a structural failure disguised as a cosmetic one. I always tell my clients that a floor needs to breathe. It needs that 1/4 inch of empty space around the edges. If I find grout in that gap, I spend the extra hour digging it out. I want that floor to be able to move. A floor that cannot move is a floor that is waiting to explode. You might think the baseboard hides the sin, but the physics of the house do not care about your trim work.
“Grout is not a glue; it is a sacrificial joint designed to manage the stresses of a building’s movement.” – TCNA Installation Manual
Preparation for hardwood floors and laminate transitions
Transition strips and T-moldings are the critical interfaces where hardwood floors or laminate meet the tile surfaces in a modern home. These areas require special attention during grout removal because the mechanical vibration from scraping can loosen the adhesive bond of the adjacent flooring. If you are working near engineered oak or luxury vinyl plank, you must protect the wear layer from the abrasive carbide dust. Carbide is harder than the aluminum oxide finish on most laminate floors. One stray grain of sand under your knee will scratch a five dollar per square foot floor instantly. I use blue painter’s tape and heavy kraft paper to create a buffer zone. The chemistry of the transition also matters. You should never grout the gap between tile and wood. Wood moves at a different rate than ceramic. You must use a color-matched flexible sealant that can handle the expansion and contraction cycles of the different materials. I have seen solid 3/4 inch white oak buckle and rip the transition strip right out of the subfloor because some handyman thought grout was a universal filler. It is not. Grout belongs in the tile field. Silicone belongs at the transitions. Understanding the Janka Hardness of your wood floor also helps. A soft wood like pine will dent if you drop your scraper. A hard wood like Brazilian Cherry might resist the impact but the finish will still shatter. Treat every transition like a structural joint.
- Inspect the joint depth to ensure at least 2/3 of the tile thickness is cleared.
- Vacuum the channels using a HEPA filter to remove microscopic silica dust.
- Wipe the tile edges with denatured alcohol to remove residual oils or soap scum.
- Check the subfloor for deflection by applying pressure near the cleared joints.
- Select a grout that matches the original moisture-absorption rating of the tile.
- Apply a penetrating sealer to the new grout once the 28-day cure cycle is complete.
The grit that saves the finish
Manual grout scraping requires a specific rhythmic technique where the installer applies downward pressure on the pull stroke while maintaining a neutral wrist position to prevent repetitive strain. The carbide blade is composed of tungsten and carbon, making it one of the few materials capable of grinding down hardened silica without dulling after the first ten feet. You will feel the tool bite into the cement. If the rake starts to skip, the blade is loaded with debris and needs to be cleaned with a stiff wire brush. I keep a bottle of WD-40 in my kit to clean my tools, but never let it touch the grout joint. Oils are the enemy of adhesion. The goal is to create a mechanical key. You want the new grout to have a clean, rough surface to grab onto. Think of it like sanding a piece of wood before you stain it. If the surface is too smooth, the new material will just peel off in a year. While most people want the thickest underlayment, too much cushion actually causes the locking mechanisms on LVP to snap under pressure. The same logic applies to grout. You do not want a massive, thick layer of grout sitting on top of a shallow joint. You need depth. You need a clean channel that reaches down to the thin-set bed. This is how you ensure the repair lasts another twenty years. It is about the physics of the bond. It is about the honesty of the prep work. If you spend the five dollars on the tool and the five hours on your knees, you will never have to do the job again. That is the hallmark of a master installer. We do it right the first time so we do not have to come back and fix a failure later. The dust in my lungs and the calluses on my hands are proof that there are no shortcuts to a performance surface.