
Most guys skip the leveling compound. They think the underlayment will hide the dip. It won’t. I spent three days grinding concrete on a job last month just so the floor wouldn’t click like a castanet. That job taught me that every millimeter of sub-surface preparation determines the longevity of the final aesthetic layer. When you are dealing with a shower, the stakes are higher because of the hydrostatic pressure involved. A single cracked tile is a gateway for moisture to compromise the Schluter-Kerdi membrane or the liquid-applied waterproofing. If that barrier fails, the studs rot. It is that simple. I have seen fifteen thousand dollar wide-plank walnut floors cup like potato chips because of a slow leak in an adjacent bathroom. My hands are stained with the residue of a thousand grout jobs, and my knees carry the permanent ache of decades spent on concrete slabs. I do not care about the color of your tile. I care about the bond between the substrate and the ceramic unit. One broken tile does not mean you have to rip out the entire pan, but it does mean you have to be surgical. The suction cup trick is the only way to pull a tile vertically without destroying the waterproofing membrane or the surrounding grout lines.
The physics of the vacuum seal in tile extraction
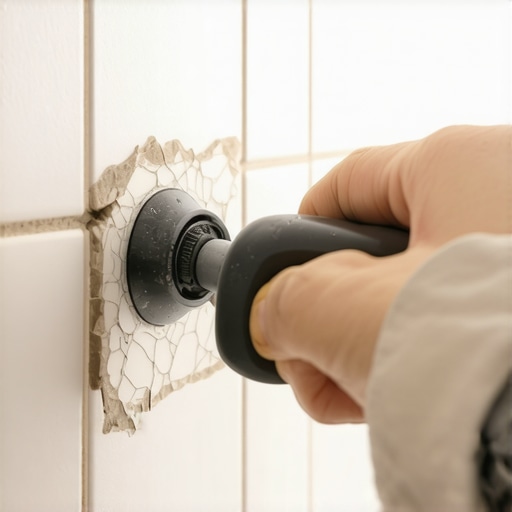
Vacuum suction cups and atmospheric pressure are the primary forces used in this professional repair technique to lift a ceramic or porcelain tile vertically from its mortar bed. By creating a hermetic seal on the non-porous glazed surface, the installer can apply perpendicular tension that overcomes the mechanical bond of the thin-set without lateral shearing. This method is superior because it avoids the use of pry bars which inevitably chip the edges of neighboring tiles or puncture the waterproofing layer behind the grout. The suction cup provides a grip that human fingers cannot achieve. You are essentially fighting the vacuum created by the mortar itself. When you pull, you are stretching the polymer chains in the modified thin-set until they reach their breaking point. If you use a hammer and chisel, you risk sending a shockwave through the entire shower floor, which can loosen the bond of tiles that were otherwise perfectly fine. I have spent twenty-five years watching DIYers try to save ten bucks on a tool only to end up costing themselves thousands in a full-scale remodel.
“A floor is only as good as the subfloor beneath it; deflection is the enemy of every joint.” – Master Flooring Axiom
The suction cup trick works best on large format tiles. If you are dealing with a one by one mosaic, this is not the tool for you. But for a twelve by twenty-four porcelain slab, a double-head suction cup lifter is your best friend. You need a surface that is clean and free of soap scum. I tell my apprentices to scrub the target tile with denatured alcohol first. If the cup slips while you are pulling, you are going to slam your knuckles into the wall, and the tile might crack further, sending shards into your eyes. Wear your safety glasses. I do not care if they fog up. The goal is to isolate the failure. Usually, a tile breaks because there was a void in the thin-set. This is often called spot-bonding, and it is a crime in the flooring world. The Tile Council of North America (TCNA) requires at least 95 percent coverage in wet areas. If you pull up that tile and see big circles of dry mortar, you know exactly why it cracked. The tile was bridging a gap, and when you stepped on it, the tensile strength of the ceramic failed under your weight.
[IMAGE_PLACEHOLDER]
Why your subfloor is lying to you
Subfloor deflection and joist spacing are the hidden culprits behind cracked grout and shattered tiles in modern showers and hardwood floors. A subfloor that feels solid to the foot might still have micro-deflection that exceeds the L/360 standard required for ceramic tile installations. If your joists are spaced twenty-four inches on center, your plywood or OSB is going to flex like a trampoline. You can put the most expensive tile in the world on top of that, but it will fail. I have walked into jobs where the homeowner complained about grout popping out like popcorn. I take one look at the crawlspace and see two-by-eight joists spanning fifteen feet. No amount of suction cup tricks will fix a structural failure. You have to stiffen that floor from below. In a shower, this deflection is even more dangerous. Every time the floor flexes, the waterproofing membrane is stretched. Eventually, it tears. Then the water gets to the wood. Then the mold starts. By the time you see the crack in the tile, the damage is already done. This is why I am a stickler for underlayment. I prefer cement backer board or uncoupling membranes like Ditra. These products allow the tile and the subfloor to move independently. It is the same reason we leave expansion gaps at the perimeter of laminate and hardwood floors. Physics does not negotiate.
| Adhesive Type | Bond Strength (PSI) | Flexibility Rating | Best Use Case |
|---|---|---|---|
| Unmodified Thin-set | 200-300 | Low | Over uncoupling membranes |
| Polymer-Modified Thin-set | 400-600 | Medium | General porcelain installation |
| Epoxy Mortar | 1000+ | High | High-stress commercial areas |
| Type 1 Mastic | 100-150 | Zero | Dry wall applications only |
The suction cup trick explained
Removing a broken tile requires you to first extract the grout around the perimeter using a carbide-tipped grout saw or an oscillating multi-tool with a diamond blade. Once the grout joint is cleared down to the substrate, you apply a heavy-duty vacuum suction cup to the center of the tile and apply vertical pressure. If the tile is already shattered, you may need to use clear packing tape over the cracks to create a non-porous surface for the suction cup to grip. This is a surgical operation. You are not just pulling; you are listening. You want to hear that satisfying pop of the mortar bed releasing. If it does not budge, do not force it. You might need to drill small holes in the tile to relieve the internal tension. I have seen guys try to use laminate pull bars for this, but that is a mistake. A pull bar relies on leverage against the edge of the next tile. That is how you turn a one-tile repair into a ten-tile disaster. The suction cup is the only tool that respects the integrity of the layout. After the tile is out, you have to scrape the old thin-set off the subfloor. This is the part everyone hates. You have to get it back down to the original substrate without cutting into the waterproofing membrane. I use a plastic scraper and a lot of patience. If you leave a hump of old mortar, the new tile will sit high. A high tile is a lippage nightmare. It will catch your toe every time you get in the shower, and eventually, the grout will crack again because of the uneven pressure.
The 1/8 inch that ruins everything
Lippage and tile height variances are often the result of failing to account for the one-eighth inch of thin-set thickness during a single tile replacement. Professional installers use a notched trowel to ensure even distribution of mortar ridges, which collapse under pressure to create a solid bond. If you simply butter the back of the tile and slap it down, you will likely end up with trapped air pockets and an uneven surface. In the flooring world, lippage is defined as any variation in height between adjacent tiles. The ANSI standards allow for very little tolerance, usually less than the thickness of a credit card. If you are off by an eighth of an inch, you have failed. This is why I always check the subfloor levelness before I even open a bag of thin-set. On a job last month, the floor had a quarter-inch dip over four feet. Most guys would have just thick-set it. I spent the time grinding concrete. Why? Because modified thin-set shrinks as it cures. If your mortar bed is too thick, it will pull the tile down as the water evaporates, leaving you with a trip hazard. It is the same reason hardwood floors need a perfectly flat subfloor. If the wood bridges a dip, it will squeak and the tongue and groove joints will eventually snap. Everything comes back to the geometry of the substrate.
- Check for hollow spots: Tap the surrounding tiles with a screwdriver handle to ensure they haven’t delinked.
- Clear the joints: Use a vacuum to remove every speck of dust from the grout channels.
- Dry fit the tile: Always place the new tile in the hole without glue first to check the height.
- Back-buttering: Apply a thin layer of mortar to the back of the tile to ensure 100 percent coverage.
- Tape the edges: Use blue painter’s tape on the surrounding tiles to protect them from stray mortar.
- Weight it down: Use a gallon of water or a heavy box to keep the tile flat while the adhesive cures.
Grout chemistry and the molecular bond
Curing times and chemical hydration are the most misunderstood aspects of grout and tile repair in showers and high-moisture areas. Grout is not just colored sand; it is a cementitious product that undergoes a chemical reaction known as hydration. If you add too much water to the mix, you weaken the molecular structure, leading to soft grout that crumbles and discolors. This is why your shower grout looks disgusting after three years. The installer used a sponge that was too wet, washing away the pigment and the binders. When you are replacing a single tile, you have to match the original grout perfectly. This is nearly impossible because of batch variance and aging. I tell people to buy a grout refresh product or a stain to blend the new repair with the old. But the real secret is the water-to-powder ratio. It should be the consistency of creamy peanut butter. If it is runny, it is ruined. And for the love of everything holy, do not use pre-mixed grout from a bucket for a shower repair. That stuff is basically latex paint with sand in it. It never truly hardens in a wet environment. You need polymer-modified grout that you mix yourself. It is harder to work with, but it will actually seal the joint. If you are working in a humid climate like Florida or Houston, the grout will take longer to cure. If you are in Arizona, it might dry too fast and crack. You have to play the environment. I often mist the grout joints with water to slow down the evaporation and ensure a stronger cure.
“Maximum allowable deflection for ceramic tile installations is L/360 under live and dead loads.” – TCNA Handbook Standards
Why laminate and hardwood floors fear your shower
Hydrostatic pressure and capillary action allow moisture to migrate from a leaking shower pan into the subfloor of adjacent rooms, causing laminate to swell and hardwood floors to buckle. I have seen luxury vinyl plank (LVP) floors fail because water traveled thirty feet under the locking mechanisms from a single cracked tile in a master bathroom. This is why the suction cup trick is more than just a cosmetic fix. It is a structural intervention. When a tile cracks, it creates a capillary channel. Water is pulled into that crack by surface tension. Once it hits the subfloor, it has nowhere to go but out. If you have engineered hardwood in the hallway, the plywood core will soak up that water like a sponge. The edges will delaminate, and the finish will turn cloudy. Most homeowners do not realize their flooring disaster started with a hairline crack in a grout line. You have to treat your bathroom floor as a containment system. Every penetration, whether it is a toilet flange or a shower drain, is a potential point of failure. If you do not respect the moisture barrier, the house will eventually win. I have spent my life fighting water, and water is patient. It will find the one-eighth inch you missed. It will rot the joists and mold the drywall while you are sleeping. That is why I do not take shortcuts. I use the suction cup, I grind the concrete, and I check the moisture levels with a Tramex meter before I ever think about setting a tile. Flooring is not an aesthetic choice. It is a structural engineering challenge that requires discipline and the right tools.