The bounce that breaks your heart
Spongy spots in laminate flooring are caused by subfloor depressions, missing underlayment, or moisture damage that warps the plank core. Fixing these soft areas without a full tear out involves adhesive injection or low expansion foam applied through small drill holes followed by weighted curing to stabilize the floor against the substrate.
Most guys skip the leveling compound. They think the underlayment will hide the dip. It won’t. I spent three days grinding concrete on a job last month just so the floor wouldn’t click like a castanet. When you walk across a room and feel that sickening give under your heel, it is not just an aesthetic annoyance. It is the sound of your floor dying. Every time that plank bends into a subfloor void, the tongue and groove locking mechanism is stressed. Eventually, those thin pieces of milled fiberboard will snap. Once the lock breaks, the floor starts to gap. Then the dirt gets in. Then the moisture gets in. It is a slow motion train wreck that starts with a simple 1/8 inch dip in your plywood or concrete slab.
The physics of the floating floor void
Laminate is a floating floor system. It relies on its own collective mass and the friction of the locking joints to stay in place. It is not attached to the ground. This means the entire assembly acts like a drum skin stretched over a frame. If the frame has a low spot, the skin will deflect. We measure this in deflection ratings. The industry standard usually demands no more than 3/16 of an inch of deviation over a ten foot radius. If your subfloor looks like a topographical map of the Ozarks, no amount of expensive underlayment will save you. The air trapped in that pocket creates a bellows effect. It sucks in dust and forces it out through the seams every time you step. This is why you see those little puffs of gray powder near spongy spots. That is your subfloor literally being turned into dust by the friction of the moving planks.
“A floor is only as good as the subfloor beneath it; deflection is the enemy of every joint.” – Master Flooring Axiom
The surgical injection method explained
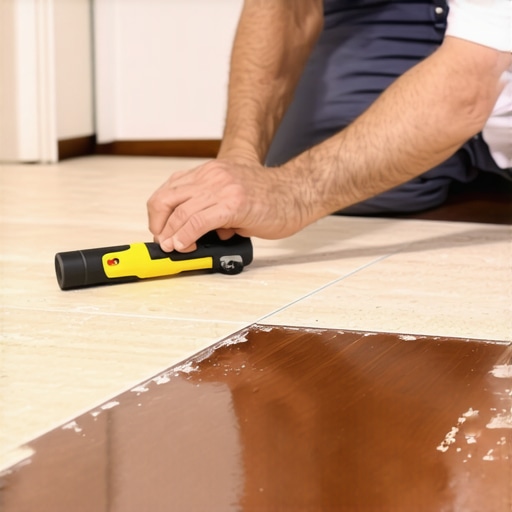
To fix a soft spot without a total demolition, we have to think like a surgeon. We are going to perform an injection. You will need a drill, some high grade masking tape, and a specialized floor repair adhesive or a very specific type of low expansion foam. Do not use the stuff from the hardware store meant for filling gaps around windows. That stuff is too aggressive. It will lift your entire floor and create a mountain where you once had a valley. You need a polyurethane resin that stays somewhat flexible after it cures. This allows the floor to still move slightly with seasonal humidity changes without cracking the bond. You drill a tiny hole, usually 1/16 or 1/8 of an inch, right in the center of the soft spot. You might need to drill a few holes if the void is large. You want the adhesive to flow like lava, filling the cavern beneath the plank until it reaches the edges of the depression.
Comparison of Repair Strategies
| Method | Structural Integrity | Drying Time | Skill Level Required |
|---|---|---|---|
| Adhesive Injection | High | 24 Hours | Intermediate |
| Low Expansion Foam | Medium | 4 Hours | Advanced |
| Plank Replacement | Extreme | Immediate | High |
| Shimming from Below | High | Immediate | Professional |
Why your subfloor is lying to you
Concrete slabs are notorious for moisture vapor emission. Even if the slab looks bone dry, it is constantly breathing. If you didn’t lay down a 6 mil poly film before the laminate went in, that spongy spot might actually be a symptom of a much larger problem. High moisture levels soften the high density fiberboard core of the laminate. When the core softens, it loses its structural rigidity. It begins to follow the contours of the subfloor more aggressively. It sags. You might think you have a dip in the concrete, but you actually have a localized rot issue because of a leaky sliding glass door or a poorly sealed shower pan in the next room over. Always check the moisture content with a pinless meter before you start pumping glue into a hole. If the wood is wet, the glue won’t stick. You will just be making a sticky mess inside a damp dark hole.
The 1/8 inch that ruins everything
Precision is the difference between a floor that lasts thirty years and one that fails in three. When you are injecting resin, you have to be mindful of the weight. Once the adhesive is in, you must weigh down the area. I use five gallon buckets of joint compound or heavy toolboxes. You need enough weight to push the laminate down so it makes contact with the adhesive and the subfloor, but not so much weight that you squeeze all the adhesive out to the sides. It is a balancing act. If you under weight it, the laminate will cure in a raised position, creating a trip hazard. If you over weight it, you might cause the surrounding planks to lift. This is the mechanical reality of the repair. You are creating a permanent bridge between the floor and the ground.
The Pre Repair Checklist
- Identify the exact boundaries of the soft spot by tapping with a rubber mallet.
- Mark the area with blue painter tape to avoid damaging the wear layer.
- Check the moisture levels of the subfloor through the expansion gap at the wall.
- Ensure the room temperature is between 60 and 80 degrees for optimal adhesive flow.
- Vacuum the drill holes thoroughly to remove all sawdust before injecting.
Chemistry of the bond
The adhesives used in these repairs are often moisture cured polyurethanes. They react with the ambient humidity in the air and the subfloor to harden. This is why you cannot rush the process. If the air is too dry, the glue stays tacky for days. If it is too humid, it might foam up and exit the hole like a volcano. Understanding the Janka hardness of your top layer doesn’t help much here because laminate is a composite. You are dealing with a wear layer of aluminum oxide, a decorative paper layer, and then the core. The core is the thirsty part. It will soak up some of the adhesive. This is actually good because it strengthens the plank from the inside out. It turns that spongy fiberboard into something resembling a hard plastic. It becomes a solid block of material that can no longer flex.
“Wood flooring is a hygroscopic material, meaning it gains and loses moisture based on the environment.” – NWFA Technical Standards
The ghost in the expansion gap
Before you commit to drilling holes, check your perimeter expansion gaps. I have seen countless cases where a floor felt spongy but the problem was actually a lack of space at the walls. If the laminate is tight against the drywall or a heavy kitchen island, it has nowhere to go when it expands. It will bow upward. This creates an air pocket that feels like a soft spot when you step on it. It is a false void. If you inject glue into a tension bow, you are permanentizing a mistake. Remove the baseboards and check that you have at least a 1/4 inch gap everywhere. If the floor is tight, use a toe kick saw or a multi tool to trim the edges. Sometimes, the floor will suddenly drop back down and the spongy spot disappears instantly. This is the simplest fix in the book, yet it is the one most people overlook because they are too focused on the middle of the room.
The last word on the level
Repairing a floor without pulling it up is a compromise. It is a way to extend the life of a surface that was likely installed with poor preparation. It works well for isolated dips, but it cannot save a floor that is fundamentally failing due to systemic subfloor rot or massive structural settling. You have to know when to walk away and start over. If you have more than five or six spongy spots in a single room, the labor of injecting and weighting will eventually exceed the cost of just pulling it up and doing it right with a self leveling underlayment. Real pros know that the finish is only as good as the start. Take care of the subfloor, and the floor will take care of you. Keep your tools sharp and your levels long. The sawdust under my nails has taught me that short cuts usually lead to long days of repair work later on. Clean the holes, use the right resin, and give it the time it needs to cure. That is how you stop the bounce and save the floor.