The fifteen thousand dollar lesson in moisture management
I once walked into a house where a fifteen thousand dollar wide-plank walnut floor was cupping so bad it looked like a potato chip because the installer didn’t check the crawlspace humidity. The smell of damp oak and rotting subfloor is something you never forget. It stays in your nostrils like the scent of WD-40 and fresh sawdust after a long day in the shop. That job taught me that flooring is not a cosmetic layer, it is a structural management system. Most installers treat a floor like a rug, but a real pro treats it like a bridge. You are dealing with a living, breathing material that reacts to every grain of moisture in the air. When you are trying to fit that living material against something as unforgiving as a natural stone wall, the stakes are even higher. If you don’t respect the expansion gap, the stone won’t move, but your floor sure as hell will. It will buckle, it will scream, and eventually, it will fail. This is why we use the Painter’s Tape Secret to ensure a perfect fit that maintains structural integrity while looking like the wood grew right out of the rock.
The anatomy of an uneven stone wall transition
Scribing hardwood to stone requires a precise map of the stone’s irregularities transferred onto the wood plank using a compass and blue painter tape. This process ensures that the expansion gap remains consistent even when the wall surface varies by inches. You cannot simply use a straight edge or a piece of molding to hide the gap when dealing with fieldstone or river rock. Those surfaces are chaotic. The goal is to create a negative image of the stone on the edge of your hardwood. By applying tape to the wood first, you create a high-contrast surface for your scribe line that prevents the wood grain from hiding your marks. This is the difference between a floor that looks like it was hacked together and one that looks like it was crafted by a master. You are fighting the physics of the material. Wood moves across its width, and stone does not move at all. If you pin the wood against the stone, something has to give when the humidity hits sixty percent in the summer months.
“A floor is only as good as the subfloor beneath it; deflection is the enemy of every joint.” – Master Flooring Axiom
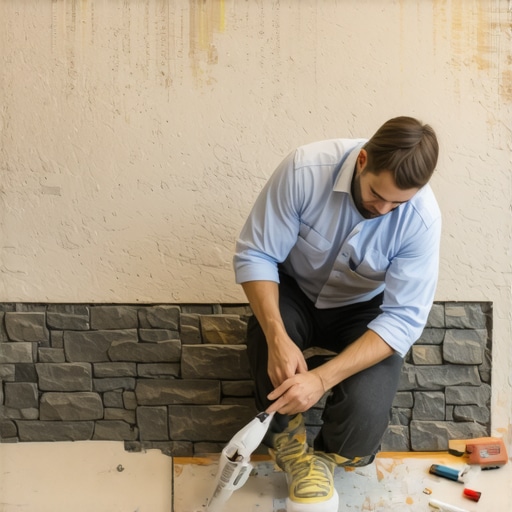
Why blue painter tape is your best architectural tool
Blue painter tape provides a non-permanent, high-visibility surface for marking complex scribe lines on dark or heavily grained hardwood species like walnut or hickory. It also serves a second, more critical purpose. When you are using a jigsaw or an oscillating tool to cut that jagged scribe line, the tape protects the finished surface of the wood from the baseplate of the saw. Scratches on a pre-finished floor are a nightmare to repair. I have seen guys try to mark their lines directly on the wood with a white pencil, but under the heat of a work light, those lines disappear into the grain. The tape gives you a crisp, clean edge to follow. You place the plank against the stone, set your compass to the widest gap, and drag the point along the stone while the pencil traces the contour onto the taped wood. It is a slow, methodical dance that requires a steady hand and a lot of patience. If you rush this part, you might as well be installing builder-grade carpet in a basement.
The chemistry of adhesive bonds on perimeter joints
Modern urethane adhesives create a flexible yet tenacious bond that allows for minor wood movement while preventing the plank from shifting away from the stone wall. When you are finishing a scribe, you often cannot use a nail because you are too close to the wall. This is where the chemistry of your glue matters. You need an adhesive with a high shear strength but enough elasticity to handle the seasonal expansion of the wood cells. The lignin in the wood acts like a sponge. When the ambient moisture rises, the cells swell. If your glue is too brittle, the bond snaps. If it is too soft, the floor drifts. I prefer a moisture-cure urethane because it actually uses the humidity in the air to harden, creating a waterproof barrier at the edge of the floor. This is especially important if the stone wall is an exterior wall where temperature fluctuations are more extreme. You are creating a microscopic seal that keeps the subfloor dry and the hardwood stable.
| Wood Species | Janka Hardness | Stability Rating | Best Climate |
|---|---|---|---|
| White Oak | 1360 | High | Humid/Temperate |
| Hickory | 1820 | Medium | Arid/Stable |
| Black Walnut | 1010 | Excellent | Controlled |
| Hard Maple | 1450 | Low | Stable Humidity |
The ghost in the expansion gap
The expansion gap is a mandatory void between the wood and the stone that must be maintained at exactly one half inch to prevent buckling. Many homeowners hate the look of a gap, but it is the lungs of the floor. Without it, the floor suffocates. When scribing to stone, you are essentially hiding that gap under the shadow of the stone’s irregularities. If the stone is deeply undercut, you can tuck the wood underneath, which is the gold standard of installation. If you are scribing to the face of the stone, you must be precise. I use a 1/8 inch margin of error. If the gap is too wide, it looks sloppy. If it is too tight, the floor will peak. I have seen floors in the swampy humidity of Houston expand so much they actually pushed a baseboard off the wall because the installer didn’t leave enough room. Stone is even less forgiving than drywall. It will not compress. It will win every fight against your hardwood.
- Clean the stone surface of any loose mortar or debris.
- Apply 2-inch blue painter tape to the edge of the hardwood plank.
- Position the plank parallel to the stone wall at a fixed distance.
- Set the scribe compass to the widest distance between the wood and stone.
- Trace the contour of the stone onto the tape with a sharp pencil.
- Cut the line using a jigsaw with a fine-tooth down-stroke blade.
- Test fit and micro-adjust with a belt sander or hand plane.
Hardwood versus laminate in high moisture zones
Laminate flooring should never be scribed to stone in wet areas because the core material is highly susceptible to edge-swelling when exposed to moisture. Unlike solid hardwood, laminate is made of compressed wood fibers and resins. If you cut the factory seal to scribe it to a stone wall near a bathroom or kitchen, you are inviting disaster. The moment someone splashes water from the showers or spills a drink, that exposed edge will soak up the liquid like a paper towel. The edges will mushroom, and the floor will be ruined. If you must use a floating floor, you need to use a waterproof laminate or a high-quality LVP, but even then, the expansion requirements are even stricter than hardwood. You are better off using hardwood floors in areas where you can control the environment, or sticking to tile with grout if the area is prone to getting wet. A stone wall next to a shower is a recipe for rot if the transition isn’t handled with architectural precision.
“Wood flooring will perform best when the environment is controlled to stay within a relative humidity range of 30 to 50 percent.” – NWFA Technical Publication
The structural failure of thin underlayment
Thin, cheap underlayment fails to provide the necessary support for the locking mechanisms of modern floors, leading to vertical deflection and eventual joint failure. While most people want the thickest underlayment, too much cushion actually causes the locking mechanisms on LVP to snap under pressure. You want a high-density material that doesn’t compress more than a few millimeters. When you are scribing to a stone wall, the subfloor must be perfectly level. Any dip in the subfloor near the stone will cause the scribed plank to move vertically every time someone walks near it. This movement will eventually rub the wood against the stone, wearing down the finish and creating a squeak that will drive you crazy. I spend three days grinding concrete on a job last month just so the floor wouldn’t click like a castanet. Leveling is not optional. It is the foundation of the craft. If the subfloor is out of flat by more than 1/8 inch over 10 feet, you are building on sand.